Slicer3:Volume Rendering
Contents
- 1 Overview
- 2 Tutorials
- 3 Screen shots
- 4 How to compile the module
- 5 Current Features
- 6 Future Features
- 7 How to use the module
- 8 Goals
- 9 Wish List
- 10 Glossary
- 11 Feature Requests
- 12 Problems, issues with current implementation
- 12.1 Load and Save Frame is much too complicated
- 12.2 Details GUI is recreated everytime a new volume is selected
- 12.3 vtkSlicerVRGrayscaleHelper is not maintainable
- 12.4 GUI offers too much configuring options at the same time
- 12.5 It is not possible to use parameters from existing MRML-Volume rendering nodes
- 12.6 Questions for Steve
- 12.7 Notes for new class diagramm
- 12.8 New Architecture
Overview
The topic of the new Volume Rendering Module is the integration of hardware accelerated volume rendering into the Slicer 3 environment. There is a special focus of achieving interactive update rates, easy user interaction (e.g. by offering several presets) and the use of label maps. Goals also include incremental updates (if module is used with Editor module), saving and loading of the configuration etc.
Tutorials
Follow this link for Volume Rendering tutorials including step-by-step screencasts.
Screen shots
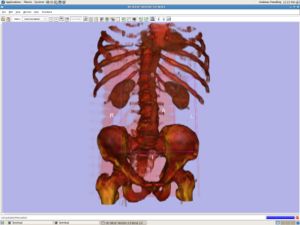
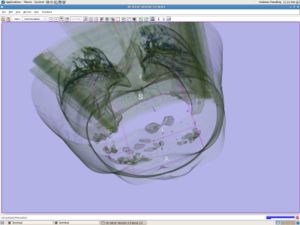
- The following screen shots are all captured on the same abdominal data set. Only the visualization parameter sets are different.

|

|

|
How to compile the module
- Switch the compile option "VolumeRenderingModule" on (in cmake)
- Make sure that you recompile "Slicer3.cxx"
- Compile
- Note: if you also want to us the latest labelmap support add the following steps before compiling
- Switch the compile option "VR_Labelmaps" on (in cmake)
- Make sure that you recompile "vtkSlicerVolumeRenderingModuleGui.cxx"
Current Features
- Visualize grayscale volumes
- Create Visualization Parameter sets, load and save them
- Use preset Visualization Parameter sets and link already created Parameter sets with current Volume
- Edit parameters like shading; color , opacity and gradient transfer functions
- Interactive render rates, achieved through 3 step rendering
- Select different qualities of rendering and performance levels of rendering
- Receive exact progress about rendering
Future Features
- Render labelmaps properly
How to use the module
First steps
- Step 1: Load a MRML Scene or add a volume to a new Scene (see other module descriptions for better instructions)
- Step2: A standard Visualization Parameter Set will be generated automatically and your volume will show up in the render window.
- Step3: Adjust the parameter set:
- To change interpolation use the interpolation drop down menu.
- To enable shading click on the material button.
- To change the transfer functions just click into the particular histogram to add a point, drag a point outside the editor to delete it or click on the point to change its color, position etc.
- If you choose "Interactive Apply" all changes in the transfer functions will be processed immediately otherwise just interact with the volume to use the new parameters
Quality/Performance
Volume rendering in Slicer 3 uses a 3 step rendering technology. To achieve interactive render rates the quality of the volume will drop down every time you interact with the volume or change parameter sets. If you don't interact with it the quality increases. You can see the progress of the rendering in the right bottom corner. If you have a high end computer and you want to get rid off the low quality rendering try to change the Performance /Quality drop down menu. Using middle quality, the lowest resolution will be skipped. Using highest quality only the highest resolution will be used.
Work with Visualization Parameter Sets
Visualization Parameter Sets are used to save your configuration. If you save your MRML Scene all Visualization Parameter Sets will be saved so that next time you load the Scene every configuration will be available again.
- If you want to create a new Parameter Set just type a name into the text field and click on "Create Visualization Parameter Set". A new default Parameter Set will be created. Now you can edit all your parameters like described in first steps.
- To switch between Parameter Sets use the drop down menu "Current Visualization Parameter Set".
- If you already created a Parameter Set while editing another volume in the same Scene just select it in the drop down menu "Use Existing Visualization Parameter Sets" (below the separator). Aft that this Parameter Set will also be linked to the current volume. (CAUTION: Any changes to this Parameter will effect the Parameters in both volumes (as it is still the same Parameter Set)).
- If you are looking for some default Parameter Sets look into the "Use existing Visualization Parameter Set" drop down. All Parameter Sets shown above the separator are default Parameter Sets. If you choose one of them, your current Parameter Set will be filled with the values from the default Parameter Set.
Goals
Volume rendering presets :
- MIP (Maximum Intensity Projection)
- CT Bone and vessel
- Use Hounsfield units
- Bone +400->+1000
- Soft tissue +40->+80
- Water 0
- Fat -60->-100
- Lung -400->-600
- Air -1000
- Problem with Vessels: Different contrast mediums?!
- Use Hounsfield units
- T1 MR Air/skin interface
- Label map per-label object rendering
Slicer3 module interface:
- Select from loaded volumes
- Specify preset transfer functions or use KWWidgets tools
Slicer3 internals:
- Correct coordinates including transforms
- Level of detail rendering
- Proper integration with surface rendering
Different Volume Rendering Algorithms
- RayCast
- 2D Texture Mapping
- 3D Texture Mapping
- ...
- Cuda Support for 4D imaging
Wish List
- 2D Transfer functions - may require specialized opengl code integrated with VTK. Talk with Gordon about latest work from Utah.
- use glTexSubImage3D so that incremental changes to the volume can be quickly reflected
- use distance maps (inlcude several components) in rendering
- Use Cuda for 3D projection algorithm
- Integrate code from MIST projects into Slicer for higher software rendering performance
Glossary
- Visualization Parameter Set: A Visualization Parameter is the combination of different mapping options. This includes color, opacity, gradient transfer functions as well as the type of interpolation (nearest neighbor or linear) and shading.
Feature Requests
- Show cropping boundaries in slice view
- Save cropping boundaries
- Extend GUI for easier usability
- Include scene snapshot functionality
- Enhance functionality differentiation for DTI and label maps
Problems, issues with current implementation
Load and Save Frame is much too complicated
- Include "Name new Parameterset:" and "Create Visualization Parameterset" into one Parameterset "Node Selector"
- Don't allow n:m relationships between volumes and vtkMRMLVolumeRenderingNodes but only 1:1 relationships
- Select parameterset before selecting volume
- Rename "Current Parametersets" to "Presets" and put only real presets in the corresponding node selector
Details GUI is recreated everytime a new volume is selected
- Create GUI on startup of slicer
- Split existing class in several new classes and completely integrate every widget into the MRML architecture
vtkSlicerVRGrayscaleHelper is not maintainable
- Split it into several different widget classes and into one class that holds all rendering logic
- Completely implement MRML pattern
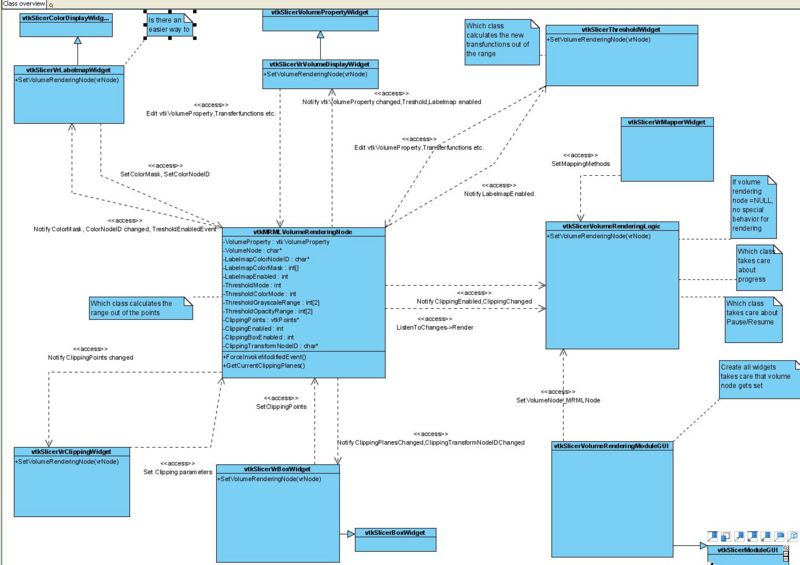
- Details see class diagramm below
GUI offers too much configuring options at the same time
- Make own page for tresholding
- Make tresholding page the default page
It is not possible to use parameters from existing MRML-Volume rendering nodes
- Add a transfer configuration from node NodeSelector to Details frame
Questions for Steve
- Which coordinate system for clipping sliders
- Can I use vtkVolumeProperty in the MRML-Node
- Discuss new class architecture
- Restructuring achievable in the small time frame?
- if labelmaps or tresholding is enabled, disable the other ones (labelmaps, treshold or VolumePropertyWidget)
- where should all the important logic go one class?
- what about the integration of snapshot functionality
Notes for new class diagramm
- SetVolumeRenderingNode(NULL) in all classes disables the widget and sets values back to start configuration.
- SetVolumeRenderingNode(aMRMLNode) populates the widgets with values from node, (initial calculations are done, the internally update is called)
- ForceInvokeModifiedEvent is used for changes to vtkVolumeProperty (doesn' trigger events on its own)
- clipping planes are part of mapper => cannot be saved in vtkVolumeProperty
- Should threshold settings go into MRML
- Include vtkMRMLVolumeRendering into Undo/Redo Stack at the following situations
- Transfer parametersets
- Enable labelmaps
- Enable threshold
- When selecting preset
- etc.
