Documentation/4.5/Developers/EditorExtension
|
For the latest Slicer documentation, visit the read-the-docs. |
Contents
Goal
This page will show you how to build your own editor effect as an extension to slicer4. An 'editor effect' is an entry in the Editor tool palette that consists of:
- An 'options' user interface for setting parameters of your effect
- Code to handle mouse and key events and translate them into operations on the current label map
- An icon for your effect as a png file
Caveats
This project is actively evolving and is being worked on, for example, at the Winter 2012 Project Weeek.
The instructions here are for linux or mac environments. Windows is similar but the build process is slightly different.
Prerequisites
First you need to Build Slicer4. Be sure to build the svn trunk to get the latest features. The examples here were made using the 4.0.1 version (January 2012), so things may have improved by the time you try it. This tutorial was created with revision 19037.
Developing an Editor Effect requires familiarity with python.
Interfaces are build with PythonQt which exposes most of the Qt interface so that sophisticated interfaces can be easily created.
It is possible to implement the logic of the effect using VTK Python binding. You can get ideas of what is possible from the VTK tutorials.
Slicer also comes bundled with numpy so many interesting array operations are easy to perform on image data.
It is also possible to invoke slicer command line modules from python. These can be written in any language, but often rely on ITK for processing. In the near future SimpleITK should be available directly inside slicer.
Creating the Extension from a Template
Here we work through an example that will make a 'Wand Effect' as a simple extension that acts something like the magic wand.
First, we need to make the directory to hold the source and build directories:
mkdir WandEffect
cd WandEffect/
Now, we use the ModuleWizard tool from slicer to create a scaffold for us to add our own code. In this example, replace occurrences of "/home/pieper/slicer4/latest/Slicer4" with the path to your slicer4 checkout and replace 'WandEffect' with the name of your effect.
$ slicer4=/home/pieper/slicer4/latest/Slicer4
$ python ${slicer4}/Utilities/Scripts/ModuleWizard.py --template ${slicer4}/Extensions/Testing/EditorExtensionTemplate --templateKey EditorExtensionTemplate --target ./WandEffect WandEffect
Now create a build directory and make the tool:
mkdir WandEffect-build
cd WandEffect-build/
ccmake ../WandEffect
make
You will need to point ccmake to your Slicer-build directory (i.e. the subdirectory inside your superbuild directory).
Configuring Slicer
You'll need to point slicer to the build directory of your module. This is a one-time process for each editor extension you create per-machine.
Select the Edit->Application Settings menu item.
Go to the Module options, and select the Add button. Browse to select the qt-scripted-modules subdirectory inside the build tree of your effect. For example, the path could be: WandEffect-build/lib/Slicer-4.0/qt-scripted-modules
Restart slicer.
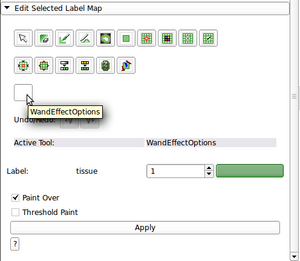
With a grayscale volume loaded (for example the MRHead from the Sample Data module, you will see the spot for your new effect. Congratulations! You are now ready to start writing your own editor code.
The Code
If you look in the WandEffect source directory you'll see there's not much there. Just a CMakeLists.txt file that is already set up for you, and a WandEffect.py file that contains the actual guts. There's also a Testing directory that is a placeholder for future work.
Inside the WandEffect.py file you'll find the following classes:
- WandEffectOptions which defines the python qt GUI for your effect - one of these will be instanced by the Editor module with the parent argument being the QFrame in which to create your GUI when your tool is selected.
- WandEffectTool defines the interactive behavior of a mouse tool. One of these will be instanced for each of the slice views. The processEvent method gets called when something interesting happens. In general, this class can create vtk actors that provide visual feedback.
- WandEffectLogic this is the helper class that actually implements the effect.
- WandEffectExtension this is the hook that collects the options, tool, and logic into a single group that the Editor module can work with conveniently.
- WandEffect which is the hook by which Slicer's extension loading mechanism recognizes the code as something that should be brought into the slicer runtime.
- WandEffectWidget which is a dummy class that would be used if this were a regular slicer module instead of an Editor Effect.
In practice, the last three of these can be left as-is (no modification required). The first place to play is in the WandEffectOptions class.
Adding Custom Behavior
The Options
In the template, the Apply button does nothing:
  def onApply(self):
    print('This is just an example - nothing here yet')
This prints to the python console and the error log, but people don't usually look there so let's make things more obvious to the user with a message box:
  def onApply(self):
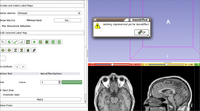
    qt.QMessageBox.warning(slicer.util.mainWindow(), 'WandEffect', 'Nothing implemented yet for WandEffect')
Now comes the exciting part:
- Save the modified WandEffect.py in your WandEffect source directory
- Go to the WandEffect-build directory and run make
- Restart Slicer
- Load a volume and go into the Editor
- Select your WandEffect and click Apply
- See the pretty dialog box?
Next Steps
Now that you've got the essentials handled, you can start really getting down to business. The best thing to do is experiment some with the interface and using the python console and study examples.
Stay tuned for more details on how to make use of this interface as the project evolves. For now, follow up with the slicer-devel mailing list if you want to get more hints on how to write implement your interactive editing plans.
A More Complete Example
Skipping several hundred steps, we get to a working version of the WandTool that you can look at in this repository: https://github.com/pieper/WandEffect
This example includes many interesting features:
- The Options class has a more interesting GUI with a couple widgets and signal/slot connections.
- Communication between the WandEffectOptions and the WandEffectTools is handled through MRML. That is, the GUI callback code only modifies the MRML parameter node and Tool instances access that node when they need the data.
- The WandEffectTool does some simple event processing and calls on the logic to do the work.
- The WandEffectLogic has several features that may be worth detailed study
- Processing parameters are accessed via MRML
- background and label nodes and volumes are accessed via the sliceLogic
- There is and example of calculating IJK coordinates in a volume from the XY event location
- The image data is manipulated via numpy access inside the vtkImageData
- A simple breadth-first recursion is used to implement the tool.
Using the WandEffect as a Starting Point
Note that if you want to use this as the starting point for your work, you can still use the ModuleWizard. For example, to make your own special HarryPotterWandEffect, you could do this:
python ModuleWizard.py --template ./WandEffect --templateKey WandEffect --target ./HarryPotterWandEffect HarryPotterWandEffect
TODO
- Effect created by the wizard is based off LabelEffect (?). There are also MorphologyEffect (Erosion/Dilation), just Effect (GrowCut). Probably would make sense to describe the differences.


