Difference between revisions of "Documentation:Nightly:Registration:RegistrationLibrary:RegLib C49"
| Line 52: | Line 52: | ||
##again select the Dilate tool and click "Dilate" 2-3 times. We can afford to dilate more here since the skull is very dark in the B0. | ##again select the Dilate tool and click "Dilate" 2-3 times. We can afford to dilate more here since the skull is very dark in the B0. | ||
#'''Affine Register T2-B0''' | #'''Affine Register T2-B0''' | ||
| − | [[Documentation/Nightly/Modules/BRAINSFit|''General Registration (BRAINS)'' module]] | + | ##go to the [[Documentation/Nightly/Modules/BRAINSFit|''General Registration (BRAINS)'' module]] |
| − | + | ##''Input Images: Fixed Image Volume'': B0 | |
| − | + | ##''Input Images: Moving Image Volume'': T2 | |
| + | ##''Output Settings'': | ||
| + | ###''Slicer Linear Transform'' (create new transform, rename to: "Xf1_T2-B0_Affine") | ||
| + | ###''Output Image Volume'' none. No resampling required for linear transforms | ||
| + | ##''Registration Phases'': select/check ''Rigid'' , ''Rigid+Scale'', ''Affine'' | ||
| + | ##''Main Parameters'': | ||
| + | ###increase ''Number Of Samples'' to 300,000 | ||
| + | ##''Mask Option'': select ROI button | ||
| + | ###''Masking input fixed'': select B0_mask | ||
| + | ###''Masking input moving'': select T2_mask | ||
| + | ##Leave all other settings at default | ||
| + | ##click: ''Apply''; runtime < 1 min. | ||
| + | #'''BSpline Register T2-B0''' | ||
| + | ##leave B0 and T2 as fixed and moving volumes | ||
| + | ##''Output Settings'': | ||
| + | ###''Slicer Linear Transform'' select None | ||
| + | ###''Slicer BSpline Transform'' create new, rename to "Xf2_T2-B0_BSpline" or similar | ||
| + | ###''Output Image Volume'': create new and rename to "T2_Xf2". Resampling '''is''' required for nonrigid transforms. | ||
| + | ##''Registration Phases'': unchheck ''Rigid'' , ''Rigid+Scale'', ''Affine'' and check "BSpline" only | ||
| + | ##''Main Parameters'': | ||
| + | ###increase ''Number Of Samples'' to at least 300,000 | ||
| + | ###''BSpline Grid Size'': set to 10,10,5 or similar. Note we have lower resolution in the z-direction, hence we reduce the grid size there. | ||
| + | ###leave masking settings as before | ||
| + | ##click: ''Apply''; runtime < 3 min. | ||
| + | ##we now have the T2 aligned with the DTI. Place T2_Xf2 and B0 in the foreground and background and use the fade slider to view the result | ||
| + | #'''Affine Register T1-T2''' | ||
| + | ##go to the [[Documentation/Nightly/Modules/BRAINSFit|''General Registration (BRAINS)'' module]] | ||
| + | ##''Input Images: Fixed Image Volume'': T2 | ||
| + | ##''Input Images: Moving Image Volume'': T1 | ||
| + | ##''Output Settings'': | ||
| + | ###''Slicer Linear Transform'' (create new transform, rename to: "Xf3_T1-T2_Affine") | ||
| + | ###''Output Image Volume'' none. No resampling required for linear transforms | ||
| + | ##''Registration Phases'': select/check ''Rigid'' , ''Rigid+Scale'', ''Affine'' | ||
| + | ##''Main Parameters'': | ||
| + | ###''Number Of Samples'' to 300,000 | ||
| + | ##''Mask Option'': select "NOMASK" button | ||
| + | ###''Masking input fixed'': select "None" | ||
| + | ###''Masking input moving'': select "None" | ||
| + | ##Leave all other settings at default | ||
| + | ##click: ''Apply''; runtime < 1 min. | ||
| + | ##verify the alignment in the Slice views | ||
| + | ##go to the [[Documentation/Nightly/Modules/Data|''Data'' module]], note that the T1 has been placed inside the Xf3 transform. | ||
| + | ##right click on the T1 image inside the transform. From the pop-up menu select '''Harden Transform'''. You should see the T1 node move back out to the main hierarchy level. You have now applied the new orientation to the T1 image, so we rename it to document that change: | ||
| + | ##double click on T1 node, change name to "T1_Xf3" or similar | ||
| + | ##we now have the T1 aligned with the T2. We can therefore apply the same transform "Xf2_T2-B0_BSpline" from above to the T1: | ||
| + | #'''Resample T1:''' | ||
| + | ##Go to the [[Documentation/Nightly/Modules/BRAINSResample|''Registration/Resample Image (BRAINS)'']] module | ||
| + | ###''Image To Warp'': T1_Xf3 | ||
| + | ###''Reference Image'': T2_Xf2 or B0 | ||
| + | ###''Output Image'': create new and rename to "T1_Xf3_Xf2" or similar | ||
| + | ###''Pixel Type'': set to short | ||
| + | ###''Warping Parameters / Transform file'': select "Xf2_T2-B0_BSpline" | ||
| + | ###''Interpolation Mode'': select ''linear'' or ''WindowedSinc'' | ||
| + | ##click Apply. | ||
| + | ##we now have all images in the same orientation as the B0. | ||
==Registration Results== | ==Registration Results== | ||
{|cellpadding="10" cellspacing="0" border="0" | {|cellpadding="10" cellspacing="0" border="0" | ||
| − | |[[Image: | + | |[[Image:RegLib_C49_unregistered.gif|300px]] ||MR/CT before registration (click to enlarge) |
|- | |- | ||
| − | |[[Image: | + | |[[Image:RegLib_C49_registered1_T2B0.gif|300px]]|| alignment of T2 to B0 (click to enlarge) |
| + | |[[Image:RegLib_C49_registered2_T1T2.gif|300px]]|| preliminary affine alignment of T1 to T2 (click to enlarge) | ||
| + | |[[Image:RegLib_C49_registered3_T1B0.gif|300px]]|| final alignment of T1 to B0 (click to enlarge) | ||
|} | |} | ||
=== Acknowledgments === | === Acknowledgments === | ||
Revision as of 17:11, 18 September 2013
Home < Documentation:Nightly:Registration:RegistrationLibrary:RegLib C49Contents
Slicer Registration Library Case #49: Pediatric Brain DTI
Input
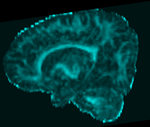
| fixed image/target DTI (FA) |
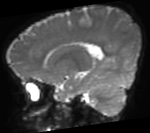
fixed image/target DTI (B0) |
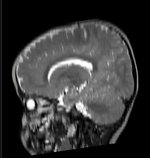
moving image T2 MRI |
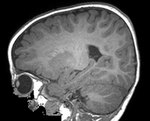
moving image T1 MRI |
Description
Goal is to align the structural T1 and T2 images with the DTI. Particularly the T1, which is associated with additional atlas/segmentation data (not shown). The DTI has strong distortions typical for EPI acquisitions.
Approach: Because the T2 matches the B0 contrast better than the T1, we will use the T2 as registration target. We will then register the T1 to the T2 and finally to the B0. Since the DTI contains strong distortions, a nonrigid registration is necessary. Workflow:
- affine register T2-B0
- BSpline register T2-B0, using the above affine as starting point
- affine register T1-T2. Apply transform without resampling
- resample T1 with nonrigid transform obtained for the T2.
Modules used
- General Registration (BRAINS) module
- Resample (BRAINS) module
- Editor module (for mask generation/editing)
Download (from NAMIC MIDAS)
Why 2 sets of files? The "input data" mrb includes only the unregistered data to try the method yourself from start to finish. The full dataset includes intermediate files and results (transforms, resampled images etc.). If you use the full dataset we recommend to choose different names for the images/results you create yourself to distinguish the old data from the new one you generated yourself.
- RegLib_C49.mrb: input data only, use this to run the tutorial from the start (Slicer mrb file. 50 MB).
- RegLib_C49_full.mrb: includes raw data + all solutions and intermediate files, use to browse/verify (Slicer mrb file. 82 MB).
Keywords
MRI, pediatric, brain, intra-subject, diffusion MRI, DWI, DTI
Video Screencasts
Procedure
- Prepare Masks: see also movie above
- two masks for the B0 and T2 are already provided with the dataset. For examples on how to obtain masks quickly from your image data see:
- We will use these masks for the registration. To ensure sufficient points outside the brain surface can participate in the registration, we dilate the two masks slightly to extend beyond the brain:
- go to the Documentation/Nightly/Modules/Editor ''Editor'' module
- Master Volume: T2
- Merge Volume: T2_mask
- click on the Dilation Tool. Set label to 1. Ensure T2_mask is visible in the slice views
- click on the "Dilate" button once. You should see the boundary expand. Because there is little interstitial space/cortical CSF, we dilate only little to avoid including the skull in the ROI.
- switch MergeVolume to B0 and the Merge Volume to B0_mask
- again select the Dilate tool and click "Dilate" 2-3 times. We can afford to dilate more here since the skull is very dark in the B0.
- Affine Register T2-B0
- go to the General Registration (BRAINS) module
- Input Images: Fixed Image Volume: B0
- Input Images: Moving Image Volume: T2
- Output Settings:
- Slicer Linear Transform (create new transform, rename to: "Xf1_T2-B0_Affine")
- Output Image Volume none. No resampling required for linear transforms
- Registration Phases: select/check Rigid , Rigid+Scale, Affine
- Main Parameters:
- increase Number Of Samples to 300,000
- Mask Option: select ROI button
- Masking input fixed: select B0_mask
- Masking input moving: select T2_mask
- Leave all other settings at default
- click: Apply; runtime < 1 min.
- BSpline Register T2-B0
- leave B0 and T2 as fixed and moving volumes
- Output Settings:
- Slicer Linear Transform select None
- Slicer BSpline Transform create new, rename to "Xf2_T2-B0_BSpline" or similar
- Output Image Volume: create new and rename to "T2_Xf2". Resampling is required for nonrigid transforms.
- Registration Phases: unchheck Rigid , Rigid+Scale, Affine and check "BSpline" only
- Main Parameters:
- increase Number Of Samples to at least 300,000
- BSpline Grid Size: set to 10,10,5 or similar. Note we have lower resolution in the z-direction, hence we reduce the grid size there.
- leave masking settings as before
- click: Apply; runtime < 3 min.
- we now have the T2 aligned with the DTI. Place T2_Xf2 and B0 in the foreground and background and use the fade slider to view the result
- Affine Register T1-T2
- go to the General Registration (BRAINS) module
- Input Images: Fixed Image Volume: T2
- Input Images: Moving Image Volume: T1
- Output Settings:
- Slicer Linear Transform (create new transform, rename to: "Xf3_T1-T2_Affine")
- Output Image Volume none. No resampling required for linear transforms
- Registration Phases: select/check Rigid , Rigid+Scale, Affine
- Main Parameters:
- Number Of Samples to 300,000
- Mask Option: select "NOMASK" button
- Masking input fixed: select "None"
- Masking input moving: select "None"
- Leave all other settings at default
- click: Apply; runtime < 1 min.
- verify the alignment in the Slice views
- go to the Data module, note that the T1 has been placed inside the Xf3 transform.
- right click on the T1 image inside the transform. From the pop-up menu select Harden Transform. You should see the T1 node move back out to the main hierarchy level. You have now applied the new orientation to the T1 image, so we rename it to document that change:
- double click on T1 node, change name to "T1_Xf3" or similar
- we now have the T1 aligned with the T2. We can therefore apply the same transform "Xf2_T2-B0_BSpline" from above to the T1:
- Resample T1:
- Go to the Registration/Resample Image (BRAINS) module
- Image To Warp: T1_Xf3
- Reference Image: T2_Xf2 or B0
- Output Image: create new and rename to "T1_Xf3_Xf2" or similar
- Pixel Type: set to short
- Warping Parameters / Transform file: select "Xf2_T2-B0_BSpline"
- Interpolation Mode: select linear or WindowedSinc
- click Apply.
- we now have all images in the same orientation as the B0.
- Go to the Registration/Resample Image (BRAINS) module
Registration Results
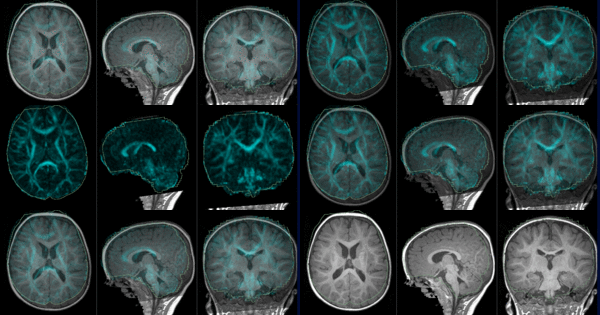 |
MR/CT before registration (click to enlarge) | ||||
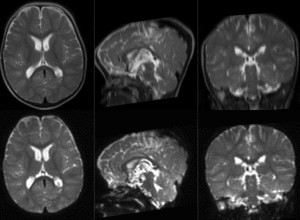 |
alignment of T2 to B0 (click to enlarge) | 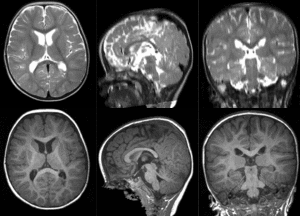 |
preliminary affine alignment of T1 to T2 (click to enlarge) | 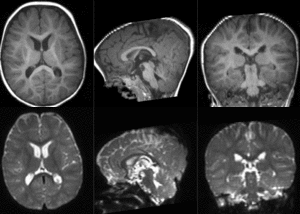 |
final alignment of T1 to B0 (click to enlarge) |
