Slicer3:Build Instructions
Contents
- 1 All-in-one Script to checkout and build Slicer3
- 1.1 Building the 3.2 release
- 1.2 Building the latest development version
- 1.3 Testing
- 1.4 What does getbuildtest.tcl do?
- 1.5 Usage
- 1.6 Errors from getbuildtest
- 1.7 Updating Your getbuildtest Build
- 1.8 getbuildtest on linux
- 1.9 getbuildtest on windows
- 1.10 getbuildtest on Apple Mac OS X
- 1.11 configuration options
- 2 Manual checkout/build of Slicer3 and support libraries:
- 3 SBuild
- 4 Links
All-in-one Script to checkout and build Slicer3
To compile and build Slicer3, you need a set of development packages installed on your machine:
There's a script called getbuildtest.tcl that makes the support libraries (VTK, ITK, teem, etc) and also builds slicer and does a dashboard submission. (Click here for background on getbuildtest and the experimental getbuildtest2 version).
Building the 3.2 release
Just do the following two commands (see for windows users below):
  svn co http://svn.slicer.org/Slicer3/branches/Slicer-3-2 Slicer3

  ./Slicer3/Scripts/getbuildtest.tcl
Building the latest development version
  svn co http://svn.slicer.org/Slicer3/trunk Slicer3

  ./Slicer3/Scripts/getbuildtest.tcl
Note: that a Slicer3-lib and Slicer3-build directory will be created for you. This is meant to be used to set up new machines and to run nightly testing of the full builds.
To run (all platforms):
./Slicer3-build/Slicer3
Note: the whole build environment takes about 8G of disk space.
Testing
Note also that getbuildtest will do an Experimental submission to the Slicer3 dashboard. If you want to use getbuildtest without submitting to the dashboard, you can set the test type to nothing with
getbuildtest.tcl -t ""
Other options for the -t (--test-type) option are Nightly or Continuous (or any of the CTest options).
What does getbuildtest.tcl do?
This script just automates the steps needed to build slicer. What you end up with is a set of source and build directories that can either be further manipulated with getbuildtest or can be worked with normally. That is, on windows you will have solution files that you can load in visual studio for debugging and further development.
Specifically, getbuildtest does the following steps:
- Refreshes Slicer3 svn
- Runs Scripts/genlib.tcl which does the following for each of the support libraries
- does a cvs/svn checkout/update
- runs cmake with the correct settings for use with Slicer3
- runs make (or developer studio) to build the libraries
- Runs cmake on Slicer3
- Builds Slicer3
- Runs ctest on Slicer3
- (optionally) Runs CPack on Slicer3
Usage
Usage:
 usage: getbuildtest [options] [target]
   [target] is determined automatically if not specified
   [options] is one of the following:
    --help : prints this message and exits
    --clean : delete lib and build directories first
    -t --test-type : CTest test target
    --release : compile with optimization flags
    --update : does a cvs/svn update on each lib
    --pack : builds a distribution package (cpack)
Errors from getbuildtest
You will need to have your firewall configured to allow access to cvs servers through port 2401. Also you need 8081 for submitting to the dashboard.
Other errors might mean you don't have all the build tools (see next section).
If you want to generate a log of the build process, you can use a command like the following:
# for csh/tcsh:
./Scripts/getbuildtest.tcl |& tee build.log
or
# for sh/bash:
./Scripts/getbuildtest.tcl 2>&1 | tee build.log
Updating Your getbuildtest Build
There are a few options:
- you can re-run getbuildtest and it will update slicer3 and rebuild (just slicer3)
- you can add the --update option and all the libs will get a cvs/svn update and will rebuild if needed (good for tracking the development head of VTK/ITK/KWWidgets etc).
- you can just 'svn update' in the Slicer3 directory and then do 'make' in the Slicer3-build to get just the latest Slicer3 code.
The following command for unix machines will update, build, and launch the latest Slicer3:
svn update && (cd ../Slicer3-build; make && ./bin/Slicer3)
Note that on Windows you can also use the CMakeSetup.exe interface to CMake and then use Microsoft Visual Studio for debugging. You can use a command like the following in a cygwin shell to use the slicer launcher to start up visual studio with the correct environment to find the .dll files needed for debugging.
./Slicer3.exe --launch c:/Program\ Files/Microsoft\ Visual\ Studio\ 8/Common7/IDE/devenv.exe --detach Slicer3.sln
getbuildtest on linux
To compile Slicer3 and do development, be sure you have a complete set of development packages installed on your machine. The exact packages vary by distribution, but include:
- gcc
- gcc-c++
- libX11
- libX11-devel (libX11-dev on Ubuntu 7.04)
- libXt-devel (libXt-dev on Ubuntu)
- opengl/mesa (libgl1-mesa-dev on Ubuntu)
Ubuntu one line install:
sudo apt-get install subversion cvs tcl8.4 gcc g++ libX11-dev libXt-dev libxext-dev libgl1-mesa-dev libncurses5-dev tcsh
Also, be sure you have OpenGL and the GLX extension to X working. To check the installation, it is usually enough to confirm that the command
glxgears
runs with no errors.
getbuildtest on windows
The script should work fine on a properly configured windows environment. Current requirements are:
- Developer Studio 8 2005
- For Developer Studio 9.0 2008 Visual C++ Express which is free from Microsoft see below.
- Be sure to install any service packs for Visual C++.
- Older releases of visual studio are not tested and may not work (2003, 7, and 7.1)
- If they are installed in the default locations in "c:/Program Files" they will be detected by the build script automatically (you need to edit slicer_variables.tcl to point to the installation).
- Cygwin with the following packages
- tcltk
- svn
- cvs
- unzip
- curl
- With Developers Studio and cygwin installed, you only need to do the svn checkout and getbuildtest script to get a fully working Slicer3 plus all the tools you need to develop new code.
Note: CMake and VTK will not work on a FAT formatted disk (use NTFS).
getbuildtest on Apple Mac OS X
For Mac OS 10.4.10 install the following from the OS disks (not installed by default on new machines):
- Xcode Tools (OS Disk 1, default window)
- X11: also on OS Disk 1, but you need to scroll down and find the Optional Installs installer and select X11 under Applications. See step-by-step instructions.
- X11SDK - from OS Disk 1, Xcode Tools/Packages/X11SDK.pkg
- Subversion. Installation options here. Get the latest svn version for compatibility with the server and be sure your client includes SSL (so it can access https repositories).
Remember to run getbuildtest from an xterm so the tests can access the X server.
Note: The X11 application on Mac OSX 10.5.x (Leopard) crashes frequently. This is a known issue that is still under investigation.
configuration options
The file Slicer3/slicer_variables.tcl includes configuration options for which versions of support libraries to use. You may want to change these for testing or to get access to new functionality.
These flags control the versions of code pulled from external repositories:
set ::Slicer3_TAG "http://svn.slicer.org/Slicer3/trunk"
set ::CMAKE_TAG "CMake-2-6"
set ::KWWidgets_TAG "Slicer-3-2"
set ::VTK_TAG "VTK-5-2"
set ::ITK_TAG ITK-3-6
set ::PYTHON_TAG "http://svn.python.org/projects/python/branches/release25-maint"
Other libraries, such as Tcl/Tk, teem, and curl, together with windows binaries for CMake and Tcl/Tk are mirrored for efficiency at http://svn.slicer.org/Slicer3-lib-mirrors.
For example, you may want a build against the ITK cvs head. Change the flag value and then run
getbuildtest.tcl --update
which will get the version from cvs, build it, and rebuild slicer3. Depending on how radically different the versions you build are, you may need to use the --clean option which will delete all build directories and rebuild.
Manual checkout/build of Slicer3 and support libraries:
Note: the getbuiltest script described above simply automates and systematizes a sequence of build operations that can be performed manually. You may want to use the manual method if you are testing against different versions of VTK or ITK, or if you have existing build trees that you want to re-use. Note that not all combinations of software versions and build flags are actively tested. The following information may not be up to date as new code is added to the various repositories.
Prerequisite software
You need to get and build the following packages if you aren't using the getbuildtest script:
- CMake (2.4.1 or later)
- Tcl/Tk (8.4 or later)
- incrTcl (3.2.1)
- VTK 5.2
- ITK 3.8
- KWWidgets HEAD
- Teem (trunk)
- SlicerLibCurl (HEAD tag)
Build Steps
Steps:
$ svn co http://svn.slicer.org/Slicer3/trunk Slicer3
$ cvs -d :pserver:anoncvs@www.vtk.org:/cvsroot/VTK co VTK -r VTK-5-2
$ cvs -d :pserver:anoncvs@www.itk.org:/cvsroot/Insight co Insight -r ITK-3-6
$ cvs -d :pserver:anoncvs@www.kwwidgets.org:/cvsroot/KWWidgets co KWWidgets -r Slicer-3-2
$ svn co http://svn.slicer.org/Slicer3-lib-mirrors/trunk/cmcurl cmcurl
Configure and build ITK
- BUILD_SHARED_LIBS ON
- CMAKE_SKIP_RPATH ON
Configure and build VTK
- All systems:
- BUILD_SHARED_LIBS ON
- CMAKE_SKIP_RPATH ON
- VTK_WRAP_TCL ON
- VTK_DEBUG_LEAKS ON
- MacOSX specific (Make sure to install X11):
- VTK_USE_CARBON OFF
- VTK_USE_X ON
- Note, those options should not appear, since they disapear since VTK5:
- VTK_USE_HYBRID ON
- VTK_USE_PATENTED ON
- Make sure that the TCL and TK path are set properly
- TCL_* and TK_*
Configure and build KWWidgets
- You need to specify where your VTK build tree is.
- BUILD_SHARED_LIBS ON
- CMAKE_SKIP_RPATH ON
Configure and build curl
- BUILD_SHARED_LIBS OFF
Build and Run Slicer3
Manually
- Check out and build slicer3 (e.g. on linux)
 svn co http://svn.slicer.org/Slicer3/trunk Slicer3
 mkdir Slicer3-build
 cd Slicer3-build
 ccmake ../Slicer3
 make
Again make sure to turn:
- BUILD_SHARED_LIBS ON
- CMAKE_SKIP_RPATH ON
Start slicer with the Slicer3 executable in your build directory.
SBuild
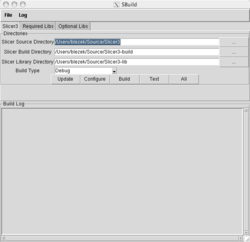
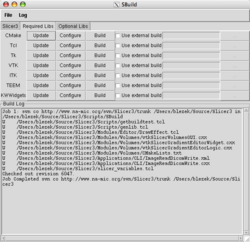
SBuild is a new, experimental build system for Slicer. It is based on getbuildtest2.tcl and genlib2.tcl, but rather than try to hid the gory details of building Slicer, SBuild attempts to expose a reasonable amount to the developer. The interface should be reasonably intuitive, but a brief walk through is useful. Click on the thumbnails for larger views. SBuild allows you to update and build just the portions of Slicer that you may require or want to build. Any of the required libraries may be specified to be build by SBuild, or to use an existing build. Existing libraries are not controlled by SBuild. Under the hood, SBuild calls CMake to do the heavy lifting, just like getbuildtest2.tcl.
Screenshots
- Configure the "Slicer Source Directory" by clicking on the "..." button, or typing a path to where you would like Slicer source saved
- Configure the "Slicer Build Directory" and "Slicer Library Directory" in the same fashion
- (Optional:) Switch to the "Required Libs" tab
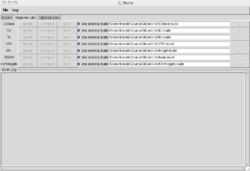
- Configure any of the external builds that you may have by clicking on the checkbox next to the "Use external build" label
- When prompted, find the external build directory
- Note: SBuild looks for specific files inside the directory you choose, if not found you will be warned. In this case, choose better.
- Any of the required libraries may be Updated, Configured, or Built from this tab.
- To build everything, go to the Slicer3 tab and click "All"
- Output of the build process should fly by.
Binary downloads
- Mac OSX PPC (must use X11)
- Mac OSX x86 (must use X11)
- Linux x86
- Linux x86-64
- Win32 (please properly rename it)
- Generic tclkit (any platform)
Adding new Libraries to SBuild
The default package of SBuild contains the minimal number of required libraries to build Slicer. Currently no optional libraries are installed. The procedure for providing an SBuild plugin is modestly complicated, but several good examples exist. All plugins go in SBuild.vfs/lib/SBuildPlugins. As an example, let's create a plugin called Mythical, contained in SBuild.vfs/lib/SBuildPlugins/Mythical.tcl.
In the Slicer3/Scripts/SBuild directory, run ./bootstrap run to run SBuild, and ./bootstrap build to build the Tcl Starkits.
The first section of Mythical.tcl provides some housekeeping details:
package provide SBuildPlugins 1.0

lappend ::SBuild(Plugins) Mythical

set ::Plugin(Mythical,Type) "optional"
set ::Plugin(Mythical,Order) 100
set ::Plugin(Mythical,CanUseUserBuild) 1
The Mythical plugin must append itself to ::SBuild(Plugins) to register, and declares itself optional, builds in order 100, and can use user provided builds.
Each plugin must provide several Tcl procs to do various functions. The naming convention is PluginName-Function-Architecture. In this example PluginName is Mythical. SBuild first looks for the -Architecture variant, and failing, calls the PluginName-Function. For instance, Mythical-Update is the Tcl proc that updates the source for Mythical, while Mythical-Build-Windows is a specialization for Windows. The important functions are: Update, Configure, Build, and ConfigureSlicer. The ConfigureSlicer function may append a CMake argument to be used when Slicer is configured. If external packages are allowed, the ConfigureExternal function is called. ConfigureExternal usually looks for libraries and sets a LibPath to be used to configure Slicer. Examples of these functions are shown below.
# Here is where we would add lines to the main Slicer3 configuration
proc Mythical-Setup {} {
  global SBuild
}

# How do we setup for an external build
proc Mythical-ConfigureExternal {} {
  global SBuild
  set SBuild(Mythical,LibPath) [file dirname [FindFile $::SBuild(Mythical,ExternalBuildPath) [list libMythicalCommon* MythicalCommon*.lib MythicalCommon*.dll]]]
}

# Add a line to Slicer's CMake command
proc Mythical-ConfigureSlicer {} {
  global Plugin SBuild Slicer
  set dir [file join $SBuild(SlicerLibDir) Insight-build]
  if { $SBuild(Mythical,UseExternalBuild) } {
    set dir $SBuild(Mythical,ExternalBuildPath)
  }
  Debug "setting Mythical_DIR to $dir"
  lappend Slicer(CMakeArguments) -DMythical_DIR:FILEPATH=$dir
}

# How do we update Mythical?
proc Mythical-Update {} {
  Debug "Checking out Mythical"
  global SBuild Plugin
  file mkdir Insight
  ExecuteCommand $SBuild(SVNCommand) co http://www.mythical.org/svn/Mythical/trunk Mythical
}

# Configure to build
proc Mythical-Configure {} {
  Debug "Configure Mythical"
  global SBuild Plugin
  file mkdir Mythical-build
  cd Mythical-build
  ExecuteCommand $SBuild(CMake) \
    -G$SBuild(Generator) \
    -DCMAKE_CXX_COMPILER:STRING=$::SBuild(CompilerPath)/$SBuild(Compiler) \
    -DCMAKE_CXX_COMPILER_FULLPATH:FILEPATH=$::SBuild(CompilerPath)/$SBuild(Compiler) \
    -DBUILD_SHARED_LIBS:BOOL=ON \
    -DCMAKE_SKIP_RPATH:BOOL=ON \
    -DBUILD_EXAMPLES:BOOL=OFF \
    -DBUILD_TESTING:BOOL=OFF \
    -DCMAKE_BUILD_TYPE:STRING=$::SBuild(BuildType) \
    -DCMAKE_CXX_FLAGS_DEBUG:STRING=$::SBuild(CMakeCXXFlagsDebug) \
    ../Insight
}

# How do we build on windows?
proc Mythical-Build-Windows {} {
  global SBuild
  cd Insight-build
  ExecuteCommand $SBuild(Make) Mythical.SLN /build  $SBuild(BuildType)
}

# How do we build on other Makefile-based systems?
proc Mythical-Build {} {
  Debug "Building Mythical"
  global SBuild
  cd Insight-build
  eval ExecuteCommand $SBuild(Make) $SBuild(ParallelMake)
}

# Clean up Mythical (nothing for the moment).
proc Mythical-Clean {} {
  Debug "Cleaning Mythical"
}
Links
Information on Free Microsoft C++ Compiler on Windows
To build with the free version of the windows compiler, follow the instructions here.
As of April 11, 2008, this works with the slicer3 svn trunk. You will need to manually install a newer version of cmake as part of the process described in the link above.


