Documentation:Nightly:Registration:RegistrationLibrary:RegLib C12
From Slicer Wiki
Home < Documentation:Nightly:Registration:RegistrationLibrary:RegLib C12
Contents
Slicer Registration Library Case #12: Liver Tumor Cryoablation
Input

|

|

|
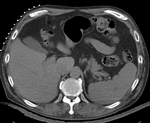
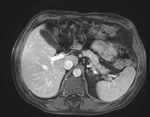
| fixed image/target | moving image |
Slicer4 Modules used
Download
Objective / Background
We seek to align a pre-operative MRI with a contrast enhanced CT for surgical guidance.
Keywords
MRI, CT, IGT, intra-operative, liver, cryoablation, change detection, non-rigid registration
Input Data
- reference/fixed : pr-op CT, 0.95 x 0.95 x 5 mm voxel size
- moving: intra-op MRI, 0.78 x 0.78 x 2.5 mm axial,
Discussion: Registration Challenges
- large differences in FOV
- strong differences in image contrast between MRI & CT
- contrast enhancement and pathology and treatment changes cause additional differences in image content
- we have strongly anisotropic voxel sizes with much less through-plane resolution
Notes / Overall Strategy
- masking is required to focus the registration algorithm on the structure of interest
- Overall strategy:
- obtain (manual) a coarse segmentation of the liver in both MRI and CT. Dilate by a few pixels to include the organ boundary
- perform a manual initial alignment of MR to CT. Use this alignment as starting point for the automated registration
- run an affine registration with above masks and intial alignment
- run a non-rigid BSpline registration with above affine alignment as starting point
Procedures
- Phase I: Build Masks
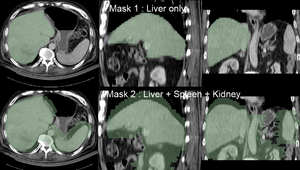
- Note: for illustration the example set contains 2 masks: one with only the liver and one also including spleen and kidney (Mask2). As shown in the results below, the liver-only mask is insufficiently constraining the registration, yielding a result that at first glance looks ok for the liver, but has significant misalignment in the remaining abdominal area. Hence it is advisable to stabilize the registration further by including more structures with good contrast in both images (Spleen, Kidney).
- open the Editor module
- select "MRI" as the master volume ; a new "MRI_label" is created
- using the Brush tool, trace the liver contour from axial slices. Also include kidneys and spleen.
- repeat the same for the CT.
- you should end up with 2 label maps similar to those included in the example dataset. See snapshots in Result section below.
- save the label maps as "MRI-label.nrrd" or similar
- registration masks ideally extend beyond the structure boundary:
- select the Dilate tool and click Apply 3-4 times to extend the mask area
- repeat for both masks
- In the Editor module, use the Dilate function to expand the outline by 2-3 pixels (click on Apply button 2-3 times)
- save dilated labelmasks under new name (e.g. CT_mask.nrrd)
- Phase II: MR-CTpre registration (Affine)
- open the General Registration (BRAINS) module
- Fixed Image Volume: CT
- Moving Image Volume: MRI
- Output Settings:
- Slicer BSpline Transform": none
- Slicer Linear Transform: create new transform, rename to "Xf1_MRI-CT_Affine"
- Output Image Volume: create new volume, rename to "MRI_Xf1" (we use this for ease of validation only)
- Initialization: select the useCenterOfROIAlign
- Registration Phases: check boxes for Rigid , Rigid+Scale and Affine
- Mask Option: select ROI button
- (ROI)Masking input fixed: CT_mask
- (ROI)Masking input moving: MRI_mask
- Leave all other settings at default
- click: Apply; runtime < 1 min (MacPro QuadCore 2.4GHz)
- this should generate a first alignment.
- Phase III: Nonrigid Registration
- open the General Registration (BRAINS) module
- Fixed Image Volume: CT
- Moving Image Volume: MRI
- Output Settings:
- Slicer BSpline Transform": create new transform, rename to "Xf2_MRI-CT_BSpline"
- Slicer Linear Transform: none
- Output Image Volume: create new volume, rename to "MRI_Xf2"
- Initialization:
- Initialization Transform: select "Xf1_MRI-CT_Affine" created in Phase II above
- Initialization Transform Mode: Off
- Registration Phases: check boxes for BSpline only
- Main Parameters:
- Number Of Samples: 200,000
- B-Spline Grid Size: 7,7,3
- Mask Option: select ROI button
- (ROI)Masking input fixed: CT_mask
- (ROI)Masking input moving: MRI_mask
- Leave all other settings at default
- click: Apply
Registration Results
| unregistered MRI & CT | |
| registration masks | |
| affine registered MRI & CT | |
| nonrigid registered MRI & CT | |
| insufficient mask: nonrigid registered with liver mask only, note the misalignment in the remaining abdomen | |
| Color overlay of registered MRI onto CT, illustrating the fusion: MRI soft tissue contrast shows substructures & vasculature invisible on the CT |
Acknowledgments
Thanks to Dr.Stuart Silverman and Dr. Nobuhiko Hata for sharing this case.


