Documentation:Nightly:Registration:RegistrationLibrary:RegLib C39
Contents
Slicer Registration Library Case #39: In Vitro cerebral body CT (thoracic spine)
Input

|

|

|
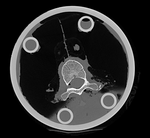
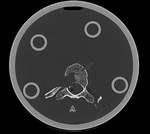
| fixed image/target | moving image |
Modules used
Download (from NAMIC MIDAS)
Why 2 sets of files? The "input data" mrb includes only the unregistered data to try the method yourself from start to finish. The full dataset includes intermediate files and results (transforms, resampled images etc.). If you use the full dataset we recommend to choose different names for the images/results you create yourself to distinguish the old data from the new one you generated yourself.
- RegLib_C39.mrb (input data only, Slicer mrb file. 25 MB)
- RegLib_C39_full.mrb (input data + results, Slicer mrb file. 45 MB).
Description
We have 2 in vitro CT scans of a human thoracic spine, before and after application of a controlled structural damage. We apply a rigid registration to bring the two images into alignment. Because the container tube and fixtures add image content that is "distracting" to the registration, we crop both images to contain just the vertebra of interest. Also the spines were not imaged in the same orientation, and as consequence we have an inverted z-axis in one of the images we have to correct first. Finally the two images have very different spatial origins (as defined in original DICOM header), so we need to recenter first before running the registration.
Keywords
CT, spine cancer, vertebrae
Video Screencasts
- Movie/screencast showing window & level and re-centering steps
- Movie/screencast showing steps for fixing the orientation issue (inverting z-axis)
- Movie/screencast showing cropping of both volumes to the region of interest
- Movie/screencast showing rigid registration and applying to image without resampling
Procedure
- Window & Level , Recenter: open the Volumes module. ( Movie/screencast )
- in the Display tab, click on "Auto W/L" to get a preliminary adjustment, then drag left mouse key in the slice views horizontal & vertical to adjust contrast
- once you have acceptable levels, note the window & level entries in the display tab, then change the active volume and apply the same settings to the other image by typing them directly into the window and level fields. When judging alignment with very high precision, it is good practice to ensure window & level settings are identical for both volumes
- for both volumes, click the "Center Volume" button to reset the origin
- place "T10_intact" and "T10_defect" into foreground and background, respectively. Use the fade slider to assess misalignment
- Orientation Fix: open the Data module. ( Movie/screencast )
- you will notice that the "T10_intact" spine is upside down (sagittal view) compared to "T10_defect". This is because the tube was inverted during the 2nd acquisition. We will correct this with a transform.
- in the Data module, right click on the "Scene" node and select "Insert Transform" from the pop-up menu
- rename the transform to "Xf0_OrientationFix" or similar
- drag the "T10_intact" volume node into/onto the transform node.
- adjust sagittal view so that "T10_intact" is visible
- switch to the Transforms module.
- the newly created "Xf0_OrientationFix" transform should already be selected.
- Note the 3x3 matrix showing mostly zeros and three 1.0 along the diagonal. Double click on the last 1.0 in the bottom right corner. It represents the direction of the z-axis which we want to invert. Change the sign, i.e. replace "1.0" with "-1.0". Then hit ENTER.
- you should see the view update and the "T10_intact" image flip.
- return to the Data module.
- right-click on the "T10_intact" node inside the transform and select "Harden Transform". This will apply the new orientation to the image header. The node will move back out t the main level.
- double click on "T10_intact" and rename it to "T10_intact_flip" or similar. Note that your original image has been modified. To avoid accidentally overwriting the original on disk with the new version it is important to immediately rename the node upon applying the transform.
- save new "T10_intact_flip" image under a new name.
- Crop:open the Crop Volume module (under Converters menu) . (Movie/screencast )
- Input volume: "T10_intact_flip"
- Input ROI: "Create & rename new annotation ROI", rename to "intact_CropROI" or similar
- ensure "T10_intact_flip" image is visible in slice views (or 3D view)
- you should see a set of colored dots/beads in at least one of the slice views. If not scroll a bit to locate them. The beads represent sides and corners of an ROI box. Drag the corners of the box to completely enclose the desired region.
- we already have close to isotropic resolution for these images, hence we have no need for isotropic resampling. Select "Voxel based cropping" and leave all other settings at defaults.
- click on the Crop! button
- go to the Data module
- several new nodes were created: look for nodes called "_subvolume-scale" or similar. Double click and rename to "T10_intact_flip_crop" or similar.
- Delete the ROI box , either via the InputROI menu in the Crop module or directly in the Data module. We do this to more easily distinguish the next ROI box created for the second volume below.
- repeat the same for the "T10_defect" image.
- Save intermediate results.
- Rigid Registration: open the General Registration (BRAINS) module. (Movie/screencast)
- Fixed Image Volume: "T10_intact"
- Moving Volume: "T10_defect"
- Registration phases: check box for Rigid" only
- Slicer Linear Transform: select "create new transform", rename to "Xf1_Rigid" or similar
- increase sample points to 200,000
- leave rest at defaults. Click Apply
- registration should take ~ 10 secs.
- use fade slider to verify alignment; compare with result snapshots shown below.
- note: you can also change the colormaps for the fixed and moving volumes to better judge the alignment: go to the Volumes module and in the Display tab, select "green" and "magenta" as the respective colormaps for the two volumes.
Registration Results
 before registration (click to enlarge)
 after rigid alignment. (click to enlarge)
Acknowledgments
Registration problem and dataset kindly provided by Dr. Ron Alkalay from the Beth Israel Deaconess Medical Center.