Difference between revisions of "Documentation/Nightly/Developers/Tutorials/BuildTestPackageDistributeExtensions"
m |
|||
| Line 81: | Line 81: | ||
$ make ExperimentalUpload | $ make ExperimentalUpload | ||
</nowiki>}} | </nowiki>}} | ||
| + | |||
| + | '''MaxOSX''': Extension '''must be configured''' specifying <code>CMAKE_OSX_*</code> variables matching the one used to configure Slicer: | ||
| + | * <code>-DCMAKE_OSX_ARCHITECTURES:STRING=x86_64</code> | ||
| + | * <code>-DCMAKE_OSX_DEPLOYMENT_TARGET:STRING=/same/as/Slicer</code> | ||
| + | * <code>-DCMAKE_OSX_SYSROOT:PATH=SameAsSlicer</code> | ||
| + | |||
| valign="top" | | | valign="top" | | ||
<ol start="1" style="list-style-type: decimal;"> | <ol start="1" style="list-style-type: decimal;"> | ||
Revision as of 03:31, 8 December 2015
Home < Documentation < Nightly < Developers < Tutorials < BuildTestPackageDistributeExtensions
|
For the latest Slicer documentation, visit the read-the-docs. |
To learn what is an extension, see here
Conventions
- Terminal command - Block like the one below indicates that the command should be executed in a terminal.
- On Windows, Git Bash is expected (not the Windows command line). Need help ?
$ echo "This is a command"
Step-by-step: How to create, publish and distribute an extension ?
(Optionally) Present your extension(s) on the slicer developers list to check if other developer are working on a similar project, to seek for advice or to reach out for potential collaborator.
Build Slicer application in
ReleaseUse the Wizard to create an extension bundling one Command line module:
$ cd Slicer-SuperBuild/Slicer-build

$ bin/slicerExtensionWizard --create Slicer-MyExtension --addModule cli:MyCLI ~
- By specifying
~as destination, the extension will be created into your home directory. - Read our FAQ to learn about extension naming convention.
To learn more about:
- By specifying
Save the source code of your extension by publishing it on Github
$ bin/slicerExtensionWizard --publish ~/Slicer-MyExtension/
Implement your extension.
Hack, hack, hack :). Make sure to commit often using meaningful commit message.Create an account on the extension server and obtain an API Key. You will then use your midas login and api key to substitute
<YOUR-MIDAS-LOGIN>and<YOUR-MIDAS-APIKEY>in the examples.If not already done, go to NA-MIC community and click on
Join communityIf not already done, send an email on the slicer developers list asking to be granted write permission on the experimental folder.
To: slicer-devel@bwh.harvard.edu
Subject: Extension NAME-OF-YOUR-EXTENSION - Asking permission to write to the Experimental folder
Hi,

This extension will allow to [...]

Could you grant user YourUserName write access to the Experimental folder ?
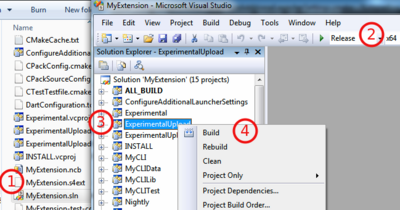
Assuming the source code of your extension is located in folder
MyExtension, you could upload your extension doing:- To avoid typing the API email and key, you can set the environment variables
MIDAS_PACKAGE_EMAILandMIDAS_PACKAGE_API_KEY. More details here
- To avoid typing the API email and key, you can set the environment variables
Check submission results on the dashboard: http://slicer.cdash.org/index.php?project=Slicer4#Extensions-Experimental
- You should expect the test
MyCLITestto fail with error of the form:[nrrd] nrrdIoStateDataFileIterNext: couldn't open "~/MyExtension-build/MyCLI/Data/Baseline/CLIModuleTemplateTest.raw"
This is explained by the fact the*.nhdrfile available on midas and downloaded locally still referenceCLIModuleTemplateTest.raw
- You should expect the test
Check that the extension can be installed by starting the Slicer executable from
/path/to/Slicer-Superbuild/Slicer-buildand installing your extension as explained here.If you consider your extension is ready for distribution, contribute it to the ExtensionsIndex:
$ bin/slicerExtensionWizard --contribute ~/Slicer-MyExtension/

