Difference between revisions of "Documentation/Nightly/Modules/PETTumorSegmentationEffect"
| Line 25: | Line 25: | ||
<!-- ---------------------------- --> | <!-- ---------------------------- --> | ||
{{documentation/{{documentation/version}}/module-section|Module Description}} | {{documentation/{{documentation/version}}/module-section|Module Description}} | ||
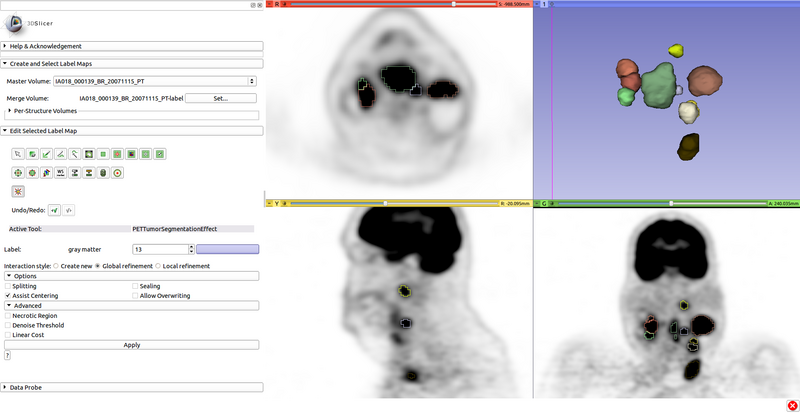
| − | Editor Effect for segmentation of tumors and hot lymph nodes in PET scans. | + | Editor Effect for segmentation of tumors and hot lymph nodes in PET scans. Click on a lesion (tumor or hot lymph node) in a PET scan to segment it with one click. For cases where the initial segmentation does not provide the desired result, the tool provides functionality to refine the segmentation with few clicks. Options may help deal with complicated cases such as segmenting individual lymph nodes in a lymph node chain. |
[[File:PETTumorSegmentation_Effect_with_models.png|800px|Screenshot]] | [[File:PETTumorSegmentation_Effect_with_models.png|800px|Screenshot]] | ||
<!-- ---------------------------- --> | <!-- ---------------------------- --> | ||
| − | + | {{documentation/{{documentation/version}}/module-section|Tutorial - Basic Tumor and Lymph Node Segmentation}} | |
| − | |||
| + | Step 1) Load PET scan. | ||
| + | Step 2) Go to the “Editor” module, select the volume loaded in Step 1 as the “Master Volume” in the “Create and Select Label Maps” drop-down menu. | ||
| + | Step 3) Press the “PETTumorSegmentation” button. | ||
| + | Step 4) Click on approximately the center of lesion (tumor or hot lymph node) to segment it. The algorithm automatically produces a segmentation, which can be inspected for quality and modified by the user if necessary (see tutorials further below). | ||
| + | Step 5) After segmentation of a lesion, change the label and segment the next lesion. | ||
<!-- ---------------------------- --> | <!-- ---------------------------- --> | ||
| − | {{documentation/{{documentation/version}}/module-section| | + | {{documentation/{{documentation/version}}/module-section|Tutorial - Segmentation Refinement}} |
| − | + | ||
| + | {{documentation/{{documentation/version}}/module-developerinfo}} | ||
| + | |||
| + | |||
| + | <!-- ---------------------------- --> | ||
| + | {{documentation/{{documentation/version}}/module-section|Tool Options}} | ||
| + | |||
| + | After changing segmentation options, click "Apply" to update the segmentation result. | ||
[[File:PETTumorSegmentationEffect_options.png|thumb|400px|PET Tumor Segmentation Editor Effect Options]] | [[File:PETTumorSegmentationEffect_options.png|thumb|400px|PET Tumor Segmentation Editor Effect Options]] | ||
| − | + | Options: | |
| + | * Splitting: Cut off adjacent objects to the target via watershed or local minimum. Useful for lymph node chains. | ||
| + | * Assist Centering: Move the center to the highest voxel within 7 physical units, without being on or next to other object labels. Improves consistency. | ||
| + | * Sealing: Close single-voxel gaps in the object or between the object and other objects, if above the threshold. Useful for lymph node chains. | ||
| + | * Allow Overwriting: Ignore other object labels. | ||
| + | |||
| + | Advanced Options: | ||
| + | * Necrotic Region: Prevents cutoff from low uptake. Use if placing a center inside a necrotic region. | ||
| + | * Denoise Threshold: Calculates threshold based on median-filtered image. Use only if scan is very noisy. | ||
| + | * Linear Cost: Cost function below threshold is linear rather than based on region. Use only if little/no transition region in uptake. | ||
<!-- ---------------------------- --> | <!-- ---------------------------- --> | ||
Revision as of 01:03, 8 January 2015
Home < Documentation < Nightly < Modules < PETTumorSegmentationEffect
|
For the latest Slicer documentation, visit the read-the-docs. |
Introduction and Acknowledgements
|
Acknowledgments:
This work is funded in part by Quantitative Imaging to Assess Response in Cancer Therapy Trials NIH grant U01-CA140206 and Quantitative Image Informatics for Cancer Research (QIICR) NIH grant U24 CA180918. License: Slicer License | |||||||
|
Module Description
Editor Effect for segmentation of tumors and hot lymph nodes in PET scans. Click on a lesion (tumor or hot lymph node) in a PET scan to segment it with one click. For cases where the initial segmentation does not provide the desired result, the tool provides functionality to refine the segmentation with few clicks. Options may help deal with complicated cases such as segmenting individual lymph nodes in a lymph node chain.
Tutorial - Basic Tumor and Lymph Node Segmentation
Step 1) Load PET scan.
Step 2) Go to the “Editor” module, select the volume loaded in Step 1 as the “Master Volume” in the “Create and Select Label Maps” drop-down menu.
Step 3) Press the “PETTumorSegmentation” button.
Step 4) Click on approximately the center of lesion (tumor or hot lymph node) to segment it. The algorithm automatically produces a segmentation, which can be inspected for quality and modified by the user if necessary (see tutorials further below).
Step 5) After segmentation of a lesion, change the label and segment the next lesion.
Tutorial - Segmentation Refinement
| Section under construction. |
Tool Options
After changing segmentation options, click "Apply" to update the segmentation result.
Options:
- Splitting: Cut off adjacent objects to the target via watershed or local minimum. Useful for lymph node chains.
- Assist Centering: Move the center to the highest voxel within 7 physical units, without being on or next to other object labels. Improves consistency.
- Sealing: Close single-voxel gaps in the object or between the object and other objects, if above the threshold. Useful for lymph node chains.
- Allow Overwriting: Ignore other object labels.
Advanced Options:
- Necrotic Region: Prevents cutoff from low uptake. Use if placing a center inside a necrotic region.
- Denoise Threshold: Calculates threshold based on median-filtered image. Use only if scan is very noisy.
- Linear Cost: Cost function below threshold is linear rather than based on region. Use only if little/no transition region in uptake.
References
- Markus L. van Tol (2014): A Graph-Based Method for Segmentation of Tumors and Lymph Nodes in Volumetric PET Images, The University of Iowa, 2014
Information for Developers
| Section under construction. |


