Difference between revisions of "Documentation/4.0/SlicerApplication/LoadingData"
| Line 18: | Line 18: | ||
The '''Add data''' dialog allows you to load virtually any type of data that Slicer can handle. It should be used as the default way of loading data, with the exception of DICOM which has its own interface. Data is added to the existing scene. | The '''Add data''' dialog allows you to load virtually any type of data that Slicer can handle. It should be used as the default way of loading data, with the exception of DICOM which has its own interface. Data is added to the existing scene. | ||
<gallery widths="250px" perrow="4"> | <gallery widths="250px" perrow="4"> | ||
| − | image:SlicerApplication-AddData-Empty.png| | + | image:SlicerApplication-AddData-Empty.png|This is how the dialog looks like. |
image:SlicerApplication-FileAddData.png|File/Add Data | image:SlicerApplication-FileAddData.png|File/Add Data | ||
image:SlicerApplication-AddData-SlicerWelcome.png|From the [[Documentation/{{documentation/version}}/Modules/SlicerWelcome|Welcome]] module | image:SlicerApplication-AddData-SlicerWelcome.png|From the [[Documentation/{{documentation/version}}/Modules/SlicerWelcome|Welcome]] module | ||
Revision as of 17:57, 20 February 2012
Home < Documentation < 4.0 < SlicerApplication < LoadingData
Contents
Introduction
Slicer can load a large variety of data in multiple ways. For Dicom data, please refer to the DICOM module documentation. For almost everything else (including scenes), you can use the Add Data dialog. For a listing of supported data formats see here. Please note that some of the formats listed are only partially supported.
For some of the more complicated formats (DWI in particular) it is recommended to first convert the DICOM data into the nrrd format using the DICOM to nrrd converter and then to load the nrrd file into Slicer. Many vendors are using non standard way to describe their DWI data in the DICOM headers. The DICOM to nrrd documentation contains a listing of specific formats that have been debugged and tested.
Add Sample Data
This module downloads a number of sample data sets from the internet. These data sets can be used for testing of slicer capabilities. Please refer to the Sample Data module documentation.
Add DICOM Data
Beginning with Slicer 4.0, Slicer holds DICOM data in a local data base. DICOM data can be imported from disk or retrieved from a PACS system (after proper setup). Please refer to the DICOM module documentation.
Add Data
The Add data dialog allows you to load virtually any type of data that Slicer can handle. It should be used as the default way of loading data, with the exception of DICOM which has its own interface. Data is added to the existing scene.

This is how the dialog looks like.
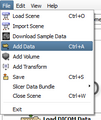
File/Add Data

From the Welcome module
Using the application-wide shortcut CTRL-A


"Add Data" Functionality
- The Choose Directory to Add button adds all files inside the selected directory to the file list.
- The Choose Files(s) to Add button adds all selected files to the file list.
- The Show Options checkbox shows/hides the option column to control loading properties.
- The Reset button clears the entire list of files to load.
- The Ok button loads all datasets in the list, and
- The Cancel button aborts the entire load.
Choose File Dialog
|
After clicking on the “Choose Files to Add” button, a new file dialog opens.
It is possible to select multiple files using CTRL-click and multiple contiguous files with SHIFT-click. |
|

Modify files before loading
|
|
|
You can review the selected files, and ensure they will be correctly loaded.
It is used to select the reader to load a file. Some file extensions (e.g. |
|
|
Some types (e.g. Volumes or Scalar Overlay) can take extra parameters before loading
|
|


Add Volume Data
|
This dialog is deprecated. The Add Volume dialog allows you to load volume files into the existing scene. |
|

There are 2 Ways to Open the Add Volume Dialog
|
|
|
|


Options
|
At the bottom of the dialog, a list of components offer options and controls on how to load the selected volume(s)
|
|

Favorites
|
When searching for files, in order to quickly find your data, it is possible to use favorites, symbolic links saved and restored for each session. |
|
|
To create a symbolic link, you drag&drop a directory from the right panel to the left panel. It will be remembered next time you start slicer. |
|

