Difference between revisions of "Documentation/Nightly/Extensions/ArduinoController"
(Created page with "<noinclude>{{documentation/versioncheck}}</noinclude> <!-- ---------------------------- --> {{documentation/{{documentation/version}}/module-header}} <!-- --------------------...") Tag: 2017 source edit |
Tag: 2017 source edit |
||
| (24 intermediate revisions by the same user not shown) | |||
| Line 1: | Line 1: | ||
| − | <noinclude>{{documentation/versioncheck}}</noinclude> | + | <noinclude>{{documentation/versioncheck}} |
| + | </noinclude> | ||
<!-- ---------------------------- --> | <!-- ---------------------------- --> | ||
{{documentation/{{documentation/version}}/module-header}} | {{documentation/{{documentation/version}}/module-header}} | ||
| Line 14: | Line 15: | ||
Contributor3: Andras Lasso - PerkLab, Queen's<br> | Contributor3: Andras Lasso - PerkLab, Queen's<br> | ||
Contributor4: Maria Francesca Spadea, Magna Graecia University of Catanzaro - Italy<br> | Contributor4: Maria Francesca Spadea, Magna Graecia University of Catanzaro - Italy<br> | ||
| − | Contact: Paolo Zaffino, | + | Contact: Paolo Zaffino, p.zaffino@unicz.it<br> |
{{documentation/{{documentation/version}}/module-introduction-row}} | {{documentation/{{documentation/version}}/module-introduction-row}} | ||
| − | |||
| − | |||
| − | |||
| − | |||
| − | |||
{{documentation/{{documentation/version}}/module-introduction-end}} | {{documentation/{{documentation/version}}/module-introduction-end}} | ||
| Line 27: | Line 23: | ||
{{documentation/{{documentation/version}}/module-section|Module Description}} | {{documentation/{{documentation/version}}/module-section|Module Description}} | ||
| + | 1. Arduino Connect: this module allows to connect Slicer and Arduino board. This will be use to build other modules and applications. The integration of the data coming from the board strongly relies on vtkMRMLScriptedModuleNode in order to notify to the entire system the arrival of a new data. | ||
| + | |||
| + | 2. Arduino Motion Sensor: Module for 3D Slicer that allows to control the Slice View through gestures using an inexpensive motion sensor compatible with Arduino. (Module Icon made by Freepik from www.flaticon.com) | ||
| + | |||
| + | |||
| + | Full documentation and examples available at: | ||
| + | https://pzaffino.github.io/SlicerArduinoController/index | ||
| + | |||
| + | |||
| + | If you use this extension please cite the following article: | ||
| + | |||
| + | Zaffino P, Merola A, Leuzzi D, Sabatino V, Cosentino C, Spadea MF. | ||
| + | SlicerArduino: A Bridge between Medical Imaging Platform and Microcontroller. | ||
| + | Bioengineering. 2020 Sep;7(3):109. | ||
| + | |||
| + | Journal link: https://www.mdpi.com/2306-5354/7/3/109 | ||
<!-- ---------------------------- --> | <!-- ---------------------------- --> | ||
{{documentation/{{documentation/version}}/module-section|Use Cases}} | {{documentation/{{documentation/version}}/module-section|Use Cases}} | ||
| + | |||
| + | ===Arduino Connect=== | ||
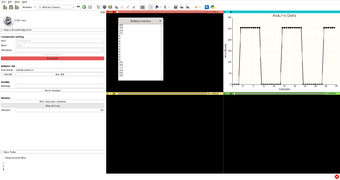
| + | Users wants to connect, receive and transmit data from/to Arduino. Connection parameters can be set according to user environment. | ||
| + | |||
| + | A sender and a monitor/plotter of data coming from the board are also available without the need of writing code. | ||
| + | |||
{| | {| | ||
| − | |[[Image: | + | |[[Image:ArduinoController_screenshot.png|thumb|340px|Arduino Connect module]] |
| − | |||
| − | |||
|} | |} | ||
| − | < | + | ===Arduino Motion Sensor=== |
| − | {{documentation/{{documentation/version}}/module-section|Tutorials}} | + | Users want to control the Slice View module by using gestures detected via dedicated Arduino sensor. |
| + | |||
| + | <br />{{documentation/{{documentation/version}}/module-section|Tutorials}} | ||
| + | |||
| + | ===Arduino Connect=== | ||
| + | 1. Connect Arduino to the system (user has to take care of Arduino code side). | ||
| + | 2. Click "Detect device(s)" button | ||
| + | 3. Set port and other connection parameters according to PC environment | ||
| + | 4. Click "Connect" button | ||
| + | 5. Send receive data (via GUI and/or Python code) | ||
| + | |||
| + | ===Arduino Motion Sensor=== | ||
| + | 1. Connect PAJ7620 to “Arduino”. To do this simply connect: | ||
| + | |||
| + | Vin to 3.3 V; | ||
| + | |||
| + | Gnd to Gnd; | ||
| + | |||
| + | SCL to SCL; | ||
| + | |||
| + | SDA to SDA. | ||
| + | 2. Connect “Arduino” to the USB port of pc and and run “paj7620_9gestures” code on “arduino IDE”. | ||
| + | |||
| + | The code can be found here: “https://github.com/Seeed-Studio/Gesture_PAJ7620”. | ||
| + | |||
| + | 3. Connect “Arduino” to “3D Slicer” using “Slicer Arduino Controller” extension. | ||
| + | |||
| + | 4. “ArduinoMotionSensor” extension in “3D Slicer”, choose the desidered offset variation and press “Start Motion” button. | ||
| + | |||
| + | 5. Use the gestures for controlling view settings by exploiting the following options: | ||
| + | |||
| + | “Left” = Select Previous View | ||
| + | |||
| + | “Right” = Select Next View | ||
| + | |||
| + | “Up” = Increase Offset | ||
| + | |||
| + | “Down” = Decrease Offset | ||
| + | |||
| + | “Forward” = Enable Full Screen | ||
| + | |||
| + | “Backward” = Disable Full Screen | ||
| + | |||
| + | ===Arduino Pedalboard=== | ||
| + | |||
| + | Module for 3D Slicer that allows to control the Slice View through a pedealboard connected via Arduino. | ||
| + | |||
| + | |||
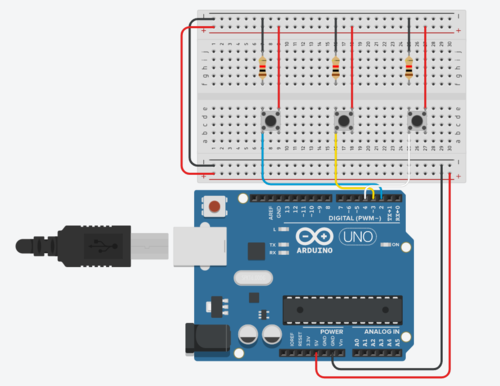
| + | 1. Connect buttons to Arduino as described in the figure below: | ||
| + | |||
| + | [[File:ArduinoPedalBoarad_schematic.png|500px]] | ||
| + | |||
| + | 2. Load in Arduino board the code hosted into the folder "ArduinoCode/ArduinoPedalboard". | ||
| + | |||
| + | 3. Connect “Arduino” to “3D Slicer” using “Slicer Arduino Controller” extension. | ||
| + | |||
| + | 4. On “ArduinoPedalBoard” extension in “3D Slicer”, choose the desidered tasks and offset variation and press “Start” button. | ||
| + | |||
| + | 5. Use the pedalboard for controlling view settings. | ||
| − | |||
{{documentation/{{documentation/version}}/module-section|Panels and their use}} | {{documentation/{{documentation/version}}/module-section|Panels and their use}} | ||
| + | |||
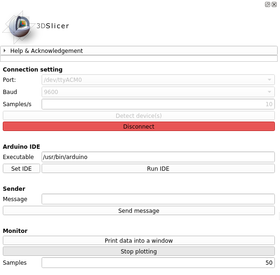
| + | Simple panel to connect Arduino and to interact with it. | ||
{| | {| | ||
| | | | ||
| − | |[[Image: | + | |[[Image:ArduinoController_UI_screenshot.png|thumb|280px|Arduino Connection Module UI]] |
|} | |} | ||
| Line 53: | Line 128: | ||
<!-- ---------------------------- --> | <!-- ---------------------------- --> | ||
{{documentation/{{documentation/version}}/module-section|References}} | {{documentation/{{documentation/version}}/module-section|References}} | ||
| − | |||
| − | |||
| + | Zaffino P, Merola A, Leuzzi D, Sabatino V, Cosentino C, Spadea MF. | ||
| − | <!-- ---------------------------- --> | + | SlicerArduino: A Bridge between Medical Imaging Platform and Microcontroller. |
| − | {{documentation/{{documentation/version}}/module-section|Information for Developers}} | + | |
| + | Bioengineering. 2020 Sep;7(3):109. | ||
| + | <!-- ---------------------------- -->{{documentation/{{documentation/version}}/module-section|Information for Developers}} | ||
{{documentation/{{documentation/version}}/module-developerinfo}} | {{documentation/{{documentation/version}}/module-developerinfo}} | ||
| + | Full documentation and examples available at: | ||
| + | https://pzaffino.github.io/SlicerArduinoController/index | ||
| + | |||
| + | Source code: | ||
| + | https://github.com/pzaffino/SlicerArduinoController | ||
| + | |||
<!-- ---------------------------- --> | <!-- ---------------------------- --> | ||
Latest revision as of 14:56, 11 April 2022
Home < Documentation < Nightly < Extensions < ArduinoController
|
For the latest Slicer documentation, visit the read-the-docs. |
Introduction and Acknowledgements
|
Extension: ArduinoController |
Module Description
1. Arduino Connect: this module allows to connect Slicer and Arduino board. This will be use to build other modules and applications. The integration of the data coming from the board strongly relies on vtkMRMLScriptedModuleNode in order to notify to the entire system the arrival of a new data.
2. Arduino Motion Sensor: Module for 3D Slicer that allows to control the Slice View through gestures using an inexpensive motion sensor compatible with Arduino. (Module Icon made by Freepik from www.flaticon.com)
Full documentation and examples available at:
https://pzaffino.github.io/SlicerArduinoController/index
If you use this extension please cite the following article:
Zaffino P, Merola A, Leuzzi D, Sabatino V, Cosentino C, Spadea MF. SlicerArduino: A Bridge between Medical Imaging Platform and Microcontroller. Bioengineering. 2020 Sep;7(3):109.
Journal link: https://www.mdpi.com/2306-5354/7/3/109
Use Cases
Arduino Connect
Users wants to connect, receive and transmit data from/to Arduino. Connection parameters can be set according to user environment.
A sender and a monitor/plotter of data coming from the board are also available without the need of writing code.
Arduino Motion Sensor
Users want to control the Slice View module by using gestures detected via dedicated Arduino sensor.
= Tutorials =
Arduino Connect
1. Connect Arduino to the system (user has to take care of Arduino code side).
2. Click "Detect device(s)" button
3. Set port and other connection parameters according to PC environment
4. Click "Connect" button
5. Send receive data (via GUI and/or Python code)
Arduino Motion Sensor
1. Connect PAJ7620 to “Arduino”. To do this simply connect:
  Vin to 3.3 V;

  Gnd to Gnd;

  SCL to SCL;

  SDA to SDA.
2. Connect “Arduino” to the USB port of pc and and run “paj7620_9gestures” code on “arduino IDE”.
The code can be found here: “https://github.com/Seeed-Studio/Gesture_PAJ7620”.
3. Connect “Arduino” to “3D Slicer” using “Slicer Arduino Controller” extension.
4. “ArduinoMotionSensor” extension in “3D Slicer”, choose the desidered offset variation and press “Start Motion” button.
5. Use the gestures for controlling view settings by exploiting the following options:
“Left” = Select Previous View
“Right” = Select Next View
“Up” = Increase Offset
“Down” = Decrease Offset
“Forward” = Enable Full Screen
“Backward” = Disable Full Screen
Arduino Pedalboard
Module for 3D Slicer that allows to control the Slice View through a pedealboard connected via Arduino.
1. Connect buttons to Arduino as described in the figure below:
2. Load in Arduino board the code hosted into the folder "ArduinoCode/ArduinoPedalboard".
3. Connect “Arduino” to “3D Slicer” using “Slicer Arduino Controller” extension.
4. On “ArduinoPedalBoard” extension in “3D Slicer”, choose the desidered tasks and offset variation and press “Start” button.
5. Use the pedalboard for controlling view settings.
Panels and their use
Simple panel to connect Arduino and to interact with it.
Similar Modules
References
Zaffino P, Merola A, Leuzzi D, Sabatino V, Cosentino C, Spadea MF.
SlicerArduino: A Bridge between Medical Imaging Platform and Microcontroller.
Bioengineering. 2020 Sep;7(3):109.
Information for Developers
| Section under construction. |
Full documentation and examples available at:
https://pzaffino.github.io/SlicerArduinoController/index
Source code: https://github.com/pzaffino/SlicerArduinoController


