Difference between revisions of "Documentation/Nightly/Modules/Editor/WatershedFromMarkers"
From Slicer Wiki
m |
|||
| (9 intermediate revisions by one other user not shown) | |||
| Line 19: | Line 19: | ||
{{documentation/{{documentation/version}}/module-introduction-start|{{documentation/modulename}}}} | {{documentation/{{documentation/version}}/module-introduction-start|{{documentation/modulename}}}} | ||
{{documentation/{{documentation/version}}/module-introduction-row}} | {{documentation/{{documentation/version}}/module-introduction-row}} | ||
| − | : '''Author(s)/Contributor(s):''' Bradley Lowekamp (MSC/NLM), Steve | + | : '''Author(s)/Contributor(s):''' Bradley Lowekamp (MSC/NLM), Steve Pieper(Isomics Inc.)<br> |
: '''Acknowledgements:''' This work is supported by NLM, and the Slicer Community. <br> | : '''Acknowledgements:''' This work is supported by NLM, and the Slicer Community. <br> | ||
: '''Contact:''' Bradley Lowekamp, <email>blowekamp@mail.nih.gov</email> <br> | : '''Contact:''' Bradley Lowekamp, <email>blowekamp@mail.nih.gov</email> <br> | ||
| Line 31: | Line 31: | ||
<!-- ---------------------------- --> | <!-- ---------------------------- --> | ||
{{documentation/{{documentation/version}}/module-section|Module Description}} | {{documentation/{{documentation/version}}/module-section|Module Description}} | ||
| − | + | Watershed from Markers is an edge based editing tool that detects edges and fills in a specific area based on the given outlines created in the label map. It is an effective way to segment features with robust outlines more efficiently. | |
| − | Watershed from Markers is an edge based editing tool that detects edges and fills in a specific area based on the given outlines created in the label map. | ||
<!-- ---------------------------- --> | <!-- ---------------------------- --> | ||
{{documentation/{{documentation/version}}/module-section|Use Cases}} | {{documentation/{{documentation/version}}/module-section|Use Cases}} | ||
| − | |||
| − | |||
| − | |||
| − | |||
{| | {| | ||
| − | |[[Image: | + | |[[Image:step1_grayscale.png|thumb|Step 1: Tumor Gray Scale]] |
| − | |[[Image: | + | |[[Image:step2_originallabel.png|thumb|Step 2: Original Label Map]] |
| − | |[[Image: | + | |[[Image:step3_watershed.png|thumb|Step 3: Label Map after Watershed]] |
| − | |[[Image: | + | |[[Image:step4_changelabelmap.png|thumb|Step 4: Label Map after Change Label effect]] |
| − | |[[Image: | + | |[[Image:step5_leakedpixels.png|thumb|Step 5: Leaked Pixels]] |
| − | |[[Image: | + | |[[Image:step6_finallabel.png|thumb|Step 6: Final Label Map]] |
|} | |} | ||
# Use MRBrain Tumor Time Point 1 from Slicer's [[Documentation/{{documentation/version}}/Modules/SampleData|Sample Data]]. Scroll through the data and find a feature of interest, for example the tumor. | # Use MRBrain Tumor Time Point 1 from Slicer's [[Documentation/{{documentation/version}}/Modules/SampleData|Sample Data]]. Scroll through the data and find a feature of interest, for example the tumor. | ||
| Line 53: | Line 48: | ||
# Using the [[Documentation/{{documentation/version}}/Modules/Editor#Change Label|Change Label]] effect, change the background color to black. | # Using the [[Documentation/{{documentation/version}}/Modules/Editor#Change Label|Change Label]] effect, change the background color to black. | ||
# Once the background label has been changed, look through each slice for leaked pixels. | # Once the background label has been changed, look through each slice for leaked pixels. | ||
| − | # To fix leaked pixels, use the [[Documentation/{{documentation/version}}/Modules/Editor#Paint|Paint]] tool to erase extra pixels from the label map. After looking through each slice for leaked pixels, the label map should accurately represent your tumor. | + | # To fix leaked pixels, use the [[Documentation/{{documentation/version}}/Modules/Editor#Paint|Paint]] tool to erase extra pixels from the label map. Another way to edit your label map is to apply the [[Documentation/{{documentation/version}}/Modules/Editor#Undo/Redo|Undo/Redo]] tools. Using the undo, the watershed can be undone and the original label map can be edited. The redo tool can reapply an updated version of the Watershed from Markers effect. After looking through each slice for leaked pixels, the label map should accurately represent your tumor. |
<!-- ---------------------------- --> | <!-- ---------------------------- --> | ||
Latest revision as of 15:01, 27 March 2017
Home < Documentation < Nightly < Modules < Editor < WatershedFromMarkers
|
For the latest Slicer documentation, visit the read-the-docs. |
WARNING: This module is Work in Progress, which means:
|
Introduction and Acknowledgements
| |||||
|
Module Description
Watershed from Markers is an edge based editing tool that detects edges and fills in a specific area based on the given outlines created in the label map. It is an effective way to segment features with robust outlines more efficiently.
Use Cases
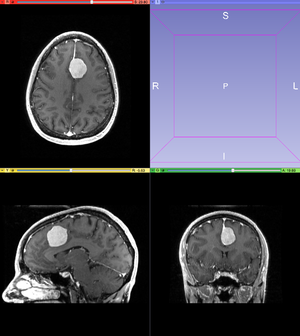
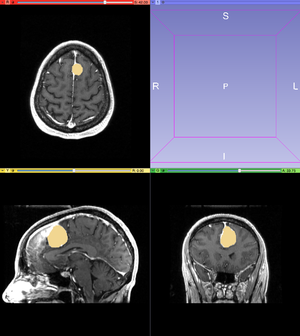
- Use MRBrain Tumor Time Point 1 from Slicer's Sample Data. Scroll through the data and find a feature of interest, for example the tumor.
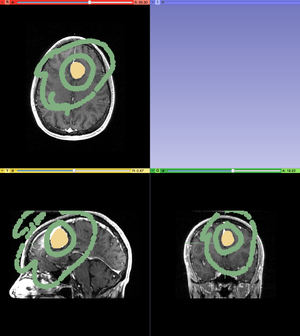
- With the Paint tool, create an original label map as the input for the Watershed from Markers tool. Using one color, paint the tumor precisely. Watershed from Markers is an edge based algorithm and labeling pixels outside of the tumor outline will result in an inaccurate label map. In another color, outline the tumor and fill in part of the background. This can be done for one slide or multiple slides in which the tumor is visible. Labeling more slides will result in a more accurate watershed.
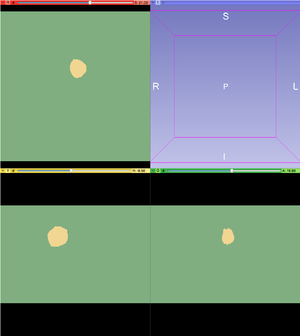
- After the Watershed from Markers is applied, the tumor will be represented by one color and the background will be represented by another color.
- Using the Change Label effect, change the background color to black.
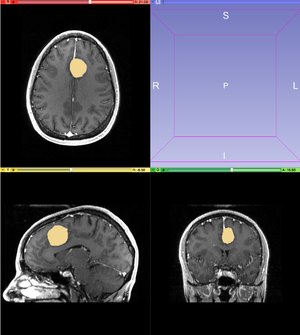
- Once the background label has been changed, look through each slice for leaked pixels.
- To fix leaked pixels, use the Paint tool to erase extra pixels from the label map. Another way to edit your label map is to apply the Undo/Redo tools. Using the undo, the watershed can be undone and the original label map can be edited. The redo tool can reapply an updated version of the Watershed from Markers effect. After looking through each slice for leaked pixels, the label map should accurately represent your tumor.
Tutorials
N/A
References
N/A
Information for Developers
| Section under construction. |


