Difference between revisions of "Documentation/4.2/Extensions/XNATSlicer"
(Prepend documentation/versioncheck template. See http://na-mic.org/Mantis/view.php?id=2887) |
|||
| (41 intermediate revisions by one other user not shown) | |||
| Line 1: | Line 1: | ||
| + | <noinclude>{{documentation/versioncheck}}</noinclude> | ||
<!-- ---------------------------- --> | <!-- ---------------------------- --> | ||
{{documentation/{{documentation/version}}/module-header}} | {{documentation/{{documentation/version}}/module-header}} | ||
| Line 7: | Line 8: | ||
{{documentation/{{documentation/version}}/module-introduction-start|{{documentation/modulename}}}} | {{documentation/{{documentation/version}}/module-introduction-start|{{documentation/modulename}}}} | ||
{{documentation/{{documentation/version}}/module-introduction-row}} | {{documentation/{{documentation/version}}/module-introduction-row}} | ||
| − | [[File:XNATSlicer- | + | [[File:XNATSlicer-Med.png]]<br> |
| − | |||
Extension: [[Documentation/{{documentation/version}}/Extensions/XNATSlicer|XNATSlicer]]<br> | Extension: [[Documentation/{{documentation/version}}/Extensions/XNATSlicer|XNATSlicer]]<br> | ||
Acknowledgments: TBD<br> | Acknowledgments: TBD<br> | ||
| Line 17: | Line 17: | ||
{{documentation/{{documentation/version}}/module-introduction-logo-gallery | {{documentation/{{documentation/version}}/module-introduction-logo-gallery | ||
|{{collaborator|logo|namic}}|{{collaborator|longname|namic}} | |{{collaborator|logo|namic}}|{{collaborator|longname|namic}} | ||
| − | |||
|File:NRGLogo.png|The Neuroinformatics Research Group - WUSTL | |File:NRGLogo.png|The Neuroinformatics Research Group - WUSTL | ||
}} | }} | ||
| Line 25: | Line 24: | ||
<!-- ---------------------------- --> | <!-- ---------------------------- --> | ||
{{documentation/{{documentation/version}}/module-section|Module Description}} | {{documentation/{{documentation/version}}/module-section|Module Description}} | ||
| − | Secure | + | Secure GUI-based IO with any XNAT server. Powered by PyXNAT. Win64 for now.<br> |
| + | |||
| + | |||
| + | Features:<br> | ||
| + | *;Download and view | ||
| + | **Scans (individual or batch) | ||
| + | **Bundled Slicer scenes (*.mrb) | ||
| + | **Any Slicer-readable file | ||
| + | |||
| + | *;Upload | ||
| + | **Bundled Slicer scenes (*.mrb) | ||
| − | ; | + | *;Other |
| − | * | + | **Project and folder creation |
| − | * | + | **File deletion |
| − | * | ||
| − | + | <!-- ---------------------------- --> | |
| − | + | {{documentation/{{documentation/version}}/module-section|Install Instructions}} | |
| − | + | ||
| − | + | <br><br><b>The only step needed is to make sure you have Read+Write permissions for your Slicer install directory. (If you already do, you can proceed to the [[#First Login|First Login]] section.)</b><br><br><br> | |
| − | + | ||
| + | <gallery widths=230px heights=230px perrow=4> | ||
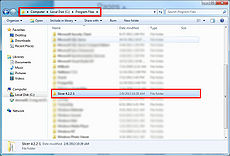
| + | File:XNATSlicer-Perms1.jpg|1. Navigate to the directory where Slicer is installed (or the master-build directory if you are using the compiled version) | ||
| + | File:XNATSlicer-Perms2.jpg|2. Right click on the Slicer install folder and go to "Properties." | ||
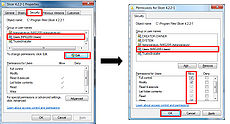
| + | File:XNATSlicer-Perms3-4.jpg|3. Go to the "Security" Tab. Click on "Users" (or the equivalent group) under the "Groups or user names:" category. Then click the "edit button". A "Permissions" window will pop up. In the "Permissions" window, select "Users" again and make sure "Allow" is checked for all options. Hit "OK." | ||
| + | File:XNATSlicer-Perms5.jpg|4. You should now see that Users have Read+Write access for the Slicer install folder. | ||
| + | </gallery> | ||
| + | You're all set. Just load up the XNATSlicer module and click the "Login" button, and the module will install the additional libraries for you. If you need a walkthrough, look [[#First Login|below]].<br> | ||
| + | <!-- ---------------------------- --> | ||
| + | {{documentation/{{documentation/version}}/module-section|First Login}} | ||
| + | {| | ||
| + | |} | ||
| + | <gallery widths=230px heights=230px perrow=4> | ||
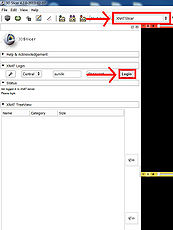
| + | File:XNATSlicer-LibInstall1.jpg|1. During your first login, the XNATSlicer module will install it's external libraries for you. Just click the "Login" button. | ||
| + | File:XNATSlicer-LibInstall2.jpg|2. You'll be notified that the module will install external libraries. Hit "OK." | ||
| + | File:XNATSlicer-LibInstall3.jpg|3. You'll be warned that you need full [[#Install Instructions|Read+Write]] access to your Slicer install directory. Assuming you followed the [[#Install Instructions|instructions above]], hit "OK." | ||
| + | File:XNATSlicer-LibInstall4.jpg|4. A popup will appear telling you what libraries are being installed. | ||
| + | File:XNATSlicer-LibInstall5.jpg|5. You'll be asked to restart Slicer. Afterwards, just log in to your XNAT host of choice and you're all set. See the [[#Panels and their use|"Panels and their use"]] section. | ||
| + | </gallery> | ||
| Line 43: | Line 69: | ||
{{documentation/{{documentation/version}}/module-section|Use Cases}} | {{documentation/{{documentation/version}}/module-section|Use Cases}} | ||
{| | {| | ||
| − | |||
|} | |} | ||
| Line 53: | Line 78: | ||
{| | {| | ||
| − | + | |[[Image:XNATSlicer-Panel.png|thumb|340px|XNATSlicer]] | |
| + | | | ||
| + | * Secure login | ||
| + | * Status updater | ||
| + | * Project and file browser | ||
| + | ** Traverse via tree | ||
| + | ** Download/view | ||
| + | ** Upload | ||
| + | ** Create projects and folders | ||
| + | ** Delete folders and files | ||
|} | |} | ||
Latest revision as of 07:46, 14 June 2013
Home < Documentation < 4.2 < Extensions < XNATSlicer
|
For the latest Slicer documentation, visit the read-the-docs. |
Introduction and Acknowledgements
|
| |||||
|
Module Description
Secure GUI-based IO with any XNAT server. Powered by PyXNAT. Win64 for now.
Features:
- Download and view
- Scans (individual or batch)
- Bundled Slicer scenes (*.mrb)
- Any Slicer-readable file
- Upload
- Bundled Slicer scenes (*.mrb)
- Other
- Project and folder creation
- File deletion
Install Instructions
The only step needed is to make sure you have Read+Write permissions for your Slicer install directory. (If you already do, you can proceed to the First Login section.)
You're all set. Just load up the XNATSlicer module and click the "Login" button, and the module will install the additional libraries for you. If you need a walkthrough, look below.
First Login
3. You'll be warned that you need full Read+Write access to your Slicer install directory. Assuming you followed the instructions above, hit "OK."
5. You'll be asked to restart Slicer. Afterwards, just log in to your XNAT host of choice and you're all set. See the "Panels and their use" section.
Use Cases
Tutorials
Panels and their use
|
Similar Modules
References
Information for Developers
| Section under construction. |


