Difference between revisions of "Documentation/4.0/Modules/CropVolume"
(Prepend documentation/versioncheck template. See http://na-mic.org/Mantis/view.php?id=2887) |
|||
| (11 intermediate revisions by 3 users not shown) | |||
| Line 1: | Line 1: | ||
| + | <noinclude>{{documentation/versioncheck}}</noinclude> | ||
<!-- ---------------------------- --> | <!-- ---------------------------- --> | ||
{{documentation/{{documentation/version}}/module-header}} | {{documentation/{{documentation/version}}/module-header}} | ||
| Line 7: | Line 8: | ||
{{documentation/{{documentation/version}}/module-introduction-start|{{documentation/modulename}}}} | {{documentation/{{documentation/version}}/module-introduction-start|{{documentation/modulename}}}} | ||
{{documentation/{{documentation/version}}/module-introduction-row}} | {{documentation/{{documentation/version}}/module-introduction-row}} | ||
| − | This work is part of the National Alliance for Medical Image Computing (NA-MIC), funded by the National Institutes of Health through the NIH Roadmap for Medical Research, Grant U54 EB005149. Information on NA-MIC can be obtained from the [http://www.na-mic.org/ NA-MIC website].<br> | + | This work is part of the National Alliance for Medical Image Computing (NA-MIC), funded by the National Institutes of Health through the NIH Roadmap for Medical Research, Grant U54 EB005149. Information on NA-MIC can be obtained from the [http://www.na-mic.org/ NA-MIC website]. The development of this module was supported in part by NIH CA111288 and CA151261.<br> |
| − | Author: Andrey Fedorov, SPL | + | Author: Andrey Fedorov, Ron Kikinis, SPL<br> |
| − | |||
| − | |||
Contact: Andrey Fedorov, <email>fedorov@bwh.harvard.edu</email><br> | Contact: Andrey Fedorov, <email>fedorov@bwh.harvard.edu</email><br> | ||
{{documentation/{{documentation/version}}/module-introduction-row}} | {{documentation/{{documentation/version}}/module-introduction-row}} | ||
{{documentation/{{documentation/version}}/module-introduction-logo-gallery | {{documentation/{{documentation/version}}/module-introduction-logo-gallery | ||
| − | | | + | |{{collaborator|logo|namic}}|NA-MIC |
| + | |{{collaborator|logo|ncigt}}|NCIGT | ||
| + | |{{collaborator|logo|spl}}|SPL | ||
}} | }} | ||
{{documentation/{{documentation/version}}/module-introduction-end}} | {{documentation/{{documentation/version}}/module-introduction-end}} | ||
| Line 20: | Line 21: | ||
<!-- ---------------------------- --> | <!-- ---------------------------- --> | ||
{{documentation/{{documentation/version}}/module-section|Module Description}} | {{documentation/{{documentation/version}}/module-section|Module Description}} | ||
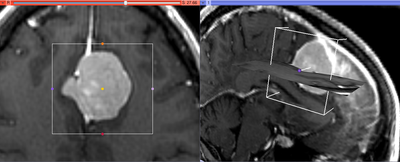
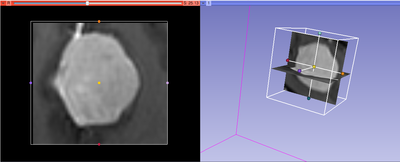
| − | + | This module allows to extract rectangular subvolume from a scalar image, with the subvolume defined by Slicer ROI widget. | |
| − | + | You can use this module to crop a DTI or DWI volume. | |
| − | |||
| − | |||
| − | |||
| − | |||
| − | |||
| − | |||
| − | |||
| − | |||
| − | |||
| − | |||
| − | |||
| − | |||
| + | The cropping functionality of this module is enabled by [[Documentation/4.0/Modules/ResampleScalarVectorDWIVolume | Resample Scalar/Vector/DWI Volume]] module, which is called internally. | ||
<!-- ---------------------------- --> | <!-- ---------------------------- --> | ||
{{documentation/{{documentation/version}}/module-section|Use Cases}} | {{documentation/{{documentation/version}}/module-section|Use Cases}} | ||
| + | |||
| + | {| | ||
| + | | | ||
Most frequently used for these scenarios: | Most frequently used for these scenarios: | ||
| − | * | + | * You are trying to segment an object that occupies small portion of the image. Cropping the ROI with that object can simplify your segmentation task and reduce both the memory requirements and processing time. |
| − | + | * You are trying to register two objects that occupy smaller portions of the image. In this scenario, cropping will allow you to focus the processing at the region of interest, and simplify registration initialization. | |
| + | |||
| + | | | ||
| + | {| | ||
| + | |[[Image:Slicer4_ExtractSubvolumeROI_before.jpg|thumb|400px|Input image and ROI]] | ||
| + | |- | ||
| + | |[[Image:Slicer4_ExtractSubvolumeROI_after.jpg|thumb|400px|Cropped subvolume]] | ||
| + | |} | ||
| + | |||
| + | |} | ||
| + | |||
<!-- ---------------------------- --> | <!-- ---------------------------- --> | ||
{{documentation/{{documentation/version}}/module-section|Tutorials}} | {{documentation/{{documentation/version}}/module-section|Tutorials}} | ||
| − | + | Not available at this time, but see the list of Slicer 3.6 tutorials that use CropVolume here: [[Modules:CropVolume-Documentation-3.6]]. | |
<!-- ---------------------------- --> | <!-- ---------------------------- --> | ||
{{documentation/{{documentation/version}}/module-section|Panels and their use}} | {{documentation/{{documentation/version}}/module-section|Panels and their use}} | ||
| − | + | {| | |
| + | | | ||
| + | |||
| + | * '''Input/initialization parameters panel:''' | ||
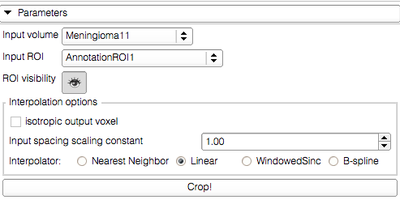
| + | ** '''Input volume''' defines the input image from which you need to crop a subvolume. Output volume will be created automatically. | ||
| + | ** '''ROI''' is a Region of Interest (see [[Modules:ROIModule-Documentation-3.6|the ROI module documentation]]), which can be defined outside CropVolume, or by creating new MRMLROINode from the selector menu. The ROI can be adjusted using the widget handles in 3D view panel and/or in the 2D slice view panels. | ||
| + | ** '''ROI visibility''' allows to turn the visibility of the 3D widget on or off in the 3D view panel. | ||
| + | ** '''Interpolation options''' | ||
| + | *** '''Isotropic output voxel''' if this checkbox is selected, the output image will have isotropic spacing, with the voxel size of the output image in each dimension equal to the ''smallest'' voxel dimension of the input image multiplied by the scaling constant. | ||
| + | *** '''Input spacing scaling constant''' is the coefficient used to determine the spacing of the output volume. The output spacing is defined by multiplying the input spacing in each dimension by the user-specified coefficient. For example, if the input spacing is 1x1x1.4, and the scaling coefficient is 0.5, the output volume will have spacing 0.5x0.5x0.7, effectively doubling the resolution of the output image. | ||
| + | *** '''Interpolator''' allows to select between Nearest Neighbor, Linear, Windowed Sinc or B-spline interpolators (see [[Documentation/4.0/Modules/ResampleScalarVectorDWIVolume | Resample Scalar/Vector/DWI Volume]] for details). For subvolumes being extracted from a label volume, you should use Nearest Neighbor interpolator. Otherwise B-spline is the preferred choice. Linear interpolator requires less computation, which may be important for very large ROIs. | ||
| + | ** '''Crop!''' button initiates the subvolume extraction based on the inputs and parameters. | ||
| − | |||
| | | | ||
| − | + | ||
| − | + | {| | |
| − | + | |[[Image:Slicer4_ExtractSubvolumeROI_controls.jpg|thumb|400px|CropVolume control panel]] | |
| − | + | ||
| − | + | |} | |
| − | + | ||
| − | |||
| − | |||
| − | |||
| − | |||
| − | | | ||
| − | [[Image: | ||
| − | |||
| − | | | ||
| − | |||
| − | |||
| − | |||
| − | |||
| − | |||
| − | |||
| − | |||
| − | |||
| − | |||
| − | |||
| − | |||
| − | |||
|} | |} | ||
| + | |||
| + | '''Cropping of oblique sub-volumes''' can be done by placing either or both of input volume and ROI under transform(s). These transforms will be taken into account while preparing the output. | ||
<!-- ---------------------------- --> | <!-- ---------------------------- --> | ||
{{documentation/{{documentation/version}}/module-section|Similar Modules}} | {{documentation/{{documentation/version}}/module-section|Similar Modules}} | ||
| − | * | + | * [[Documentation/4.0/Modules/ResampleScalarVectorDWIVolume | Resample Scalar/Vector/DWI Volume]] |
<!-- ---------------------------- --> | <!-- ---------------------------- --> | ||
{{documentation/{{documentation/version}}/module-section|References}} | {{documentation/{{documentation/version}}/module-section|References}} | ||
| − | + | N/A | |
| − | |||
<!-- ---------------------------- --> | <!-- ---------------------------- --> | ||
{{documentation/{{documentation/version}}/module-section|Information for Developers}} | {{documentation/{{documentation/version}}/module-section|Information for Developers}} | ||
| − | {{documentation/{{documentation/version}}/module-developerinfo | + | {{documentation/{{documentation/version}}/module-developerinfo}} |
| − | |||
| − | |||
| − | |||
| − | |||
| − | |||
| − | |||
| − | |||
| − | |||
| − | |||
| − | |||
| − | |||
| − | |||
| − | |||
| − | |||
| − | |||
| − | |||
| − | |||
| − | |||
| − | |||
| − | |||
| − | |||
<!-- ---------------------------- --> | <!-- ---------------------------- --> | ||
| − | {{documentation/{{documentation/version}}/module-footer | + | {{documentation/{{documentation/version}}/module-footer}} |
<!-- ---------------------------- --> | <!-- ---------------------------- --> | ||
Latest revision as of 07:36, 14 June 2013
Home < Documentation < 4.0 < Modules < CropVolume
|
For the latest Slicer documentation, visit the read-the-docs. |
Introduction and Acknowledgements
|
This work is part of the National Alliance for Medical Image Computing (NA-MIC), funded by the National Institutes of Health through the NIH Roadmap for Medical Research, Grant U54 EB005149. Information on NA-MIC can be obtained from the NA-MIC website. The development of this module was supported in part by NIH CA111288 and CA151261. | |||||||
|
Module Description
This module allows to extract rectangular subvolume from a scalar image, with the subvolume defined by Slicer ROI widget.
You can use this module to crop a DTI or DWI volume.
The cropping functionality of this module is enabled by Resample Scalar/Vector/DWI Volume module, which is called internally.
Use Cases
|
Most frequently used for these scenarios:
|
|
Tutorials
Not available at this time, but see the list of Slicer 3.6 tutorials that use CropVolume here: Modules:CropVolume-Documentation-3.6.
Panels and their use
|
|
Cropping of oblique sub-volumes can be done by placing either or both of input volume and ROI under transform(s). These transforms will be taken into account while preparing the output.
Similar Modules
References
N/A
Information for Developers
| Section under construction. |


