Difference between revisions of "Modules:VolumeRendering-Documentation-3.6"
| (73 intermediate revisions by 6 users not shown) | |||
| Line 16: | Line 16: | ||
===Module Type & Category=== | ===Module Type & Category=== | ||
| − | Type: Interactive | + | Type: Interactive |
| − | Category: Base | + | Category: Base |
===Authors, Collaborators & Contact=== | ===Authors, Collaborators & Contact=== | ||
| − | * | + | * Yanling Liu, SAIC-Frederick/NCI-Frederick, Alex Yarmarkovich, Isomics, SPL |
| − | * | + | *Origianl work: Andreas Freudling, Student Intern at SPL (freudling@bwh.harvard.edu), Steve Pieper, Isomics |
| − | * | + | * Contact: Yanling Liu, liuy5@mail.nih.gov, Alex Yarmarkovich, alexy@bwh.harvard.edu |
| − | * | + | * Some of the transfer functions were contributed by Kitware, Inc. (VolView) |
===Module Description=== | ===Module Description=== | ||
| − | + | Provides interactive visualization of 3D image data. To learn about volume rendering start with [http://en.wikipedia.org/wiki/Volume_rendering Wikipedia]. | |
== Usage == | == Usage == | ||
===Use Cases, Examples=== | ===Use Cases, Examples=== | ||
| + | * '''Distance Color Blending in NCI GPU Ray Casting''' | ||
| + | Distance Color Blending will make voxels with longer distance to eye/camera more darker than voxels with shorter distance. The effect helps to reveal depth information in volume. | ||
| − | + | A "Dist. Color Blending" slider bar is available in NCI GPU Ray Casting parameter panel to adjust the effect. Higher value indicates stronger darkening effect. Setting the value to be 0 will turn off the effect. | |
| − | + | Below are two images of the same volume with identical transfer functions. The first one is rendered with the feature off and the second one is rendered with the feature on. On the second image, darker voxels indicate these voxels are more far away from eye/camera. | |
| − | |||
| − | + | {| | |
| + | |[[Image:DistColorBlendingOff.png|thumb|320px|Distance Color Blending Off]] | ||
| + | |[[Image:DistColorBlendingOn.png|thumb|320px|Distance Color Blending On]] | ||
| + | |} | ||
| + | |||
| + | The effect is available on Composite With Shading, Composite With Pseudo Shading, and Gradient Magnitude Opacity Modulation techniques. | ||
| + | |||
| + | * '''Pausing VolumeRendering module in scene loading''' | ||
| + | The VolumeRendering module can be paused in scene loading by un-checking the "Monitor Scene Loading Event" check button. Re-checking the check button will flush the paused pipeline and initialize the module using the loaded scene. | ||
| + | |||
| + | * '''Multi-Volume GPU Ray Casting''' | ||
| + | VolumeRendering module has the capability to blend two (bg and fg) volumes in one rendering pipeline. User may select different rendering technique for bg or fg volumes. Different blending options are also available. | ||
| + | |||
| + | Currently under development. Available rendering techniques: Composite (bg) + Composite (fg) + OR blending, Composite (bg) + Composite (fg) + AND blending, Composite (bg) + MIP (fg), MIP (bg) + MIP (fg), GMOM (bg) + GMOM (fg). | ||
| − | + | '''Important:''' when using Multi-Volume GPU Ray Casting, both bg and fg volume need to have '''same data type'''. Please use Cast Image filter to cast image with smaller data type to larger data type. For example, if bg volume is short and fg volume is float, use Cast Image filter to cast bg volume to be float. Using bg and fg volumes with different data type may cause Slicer to crash. | |
| − | + | {| | |
| + | |[[Image:PET-CT.png|thumb|320px|PET-CT Visualization. Gray scale colors are from PET volume. Non-Gray scale colors are from CT volume. GMOM rendering technique used for both bg and fg.]] | ||
| + | |[[Image:PET-CT.gif|thumb|320px|PET-CT Visualization. Gray scale colors are from PET volume. Non-Gray scale colors are from CT volume. GMOM rendering technique used for both bg and fg.]] | ||
| + | |} | ||
| − | + | {| | |
| + | |[[Image:multi-vol-bg-composite.png|thumb|320px|Bg volume only (Composite)]] | ||
| + | |[[Image:multi-vol-bg-composite-fg-mip-alpha_blending.png|thumb|320px|Bg and Fg volume]] | ||
| + | |[[Image:multi-vol-fg-mip.png|thumb|320px|Fg volume only (MIP)]] | ||
| + | |} | ||
| + | |||
| + | * '''Dual 3D View mode''' | ||
| + | **The NCI GPU Ray casting does support the Dual 3D View mode. | ||
| + | **The VTK GPU Ray Casting doesn't support the Dual 3D View mode. | ||
| + | |||
| + | {| | ||
| + | |[[Image:GPUraycastDual3Dview.png|thumb|320px|Gradient Magnitude Opacity Modulation in Dual 3D View mode (Single Volume GPU Ray Casting)]] | ||
| + | |} | ||
| − | + | * '''Volume-Following Mode''' | |
| + | In Volume-Following mode, color and opacity transfer functions in the VolumeRendering module will follow window/level and threshold settings in the Volumes module for a uniform appearance on both slice view and 3D volume rendering view. To use, check VolumeRendering module -> Rendering panel -> Volume Property tab -> Follow Volumes Module check button. | ||
| − | + | In Volume-Following mode, window/level plus lookup table in Volumes module will be used to set colors in volume rendering. Threshold in Volumes module will be used to set opacity in volume rendering. Color and opacity transfer function editor also are disabled in Volume-Following mode because we are following volumes module now. | |
| − | |||
| − | + | {| | |
| + | |[[Image:Volumes_following.png|thumb|320px|Volume Rendering in Volume-Following Mode]] | ||
| + | |} | ||
| − | + | ===Tutorials=== | |
| + | ===Quick Tour of Features and Use=== | ||
| + | |||
{| | {| | ||
| | | | ||
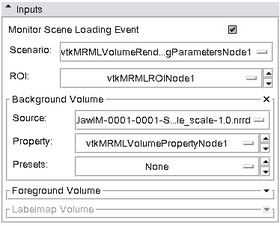
| − | * '''Input panel:''' | + | * '''Input panel:''' |
| − | ** ''' | + | ** '''Monitor scene loading event''' If unchecked the Volume rendering module will not monitor scene loading event. If a scene contains volume rendering node and a very large dataset, loading this scene on machine without volume rendering capabilities, can cause errors (a crash or a frozen machine -- if the machine runs out of memory). |
| − | ** ''' | + | ** '''Scenario''' A volume rendering scenario is defined by input set of bg, fg and label map volumes. |
| − | * ''' | + | ** '''ROI''' The single ROI node for the current scenario. The ROI can be defined using volume rendering and then used to crop a volume in the crop volume module. May be changed to one ROI per input(bg/fg/labelmap) instead of per scenario. |
| − | ** ''' | + | ** '''Background Volume''' This specifies the default volume for volume rendering. Volume input, volume property, and presets for background. |
| − | ** ''' | + | *** Source: Background volume source. |
| − | * ''' | + | *** Property: Volume Rendering Property Node: Volume rendering properties, such as color and opacity transfer functions are saved in the Volume Rendering Property Node. |
| − | ** ''' | + | *** Presets: Predefined transfer functions for convenience. Some are provided by Jim Miller, and the majority of them are transferred from VolView (Thank you very much). Please see [[Modules:VolumeRendering-Documentation-3.6-TransferFunctions|'''here''']] for a listing. |
| − | ** ''' | + | ** '''Foreground Volume''' This is used only in experimental NCI GPU Ray Casting (which is one of the Rendering Methods in the Rendering Techniques Tab). Otherwise this volume is ignored. Volume input. volume property, and presets for foreground. Works only with the experimental NCI GPU Raycasting Multi-volume (experimental) |
| − | * ''' | + | ** '''Label Map''' This volume is experimental and disabled for now. Volume input, volume property, and presets for label map.<br><br> |
| − | |[[Image: | + | |[[Image:3.6VolrendInputs.png|thumb|280px|User Interface]] |
| + | |- | ||
| + | | | ||
| + | '''Rendering panel:''' This panel is Dynamically generated panel when valid input is selected. | ||
| + | * '''Techniques TAB ''' Under the techniques tab, there are currently five rendering methods available. Each of these are described below. | ||
| + | ** Intro: | ||
| + | ***VTK CPU raycasting can do both volume rendering and z-buffer compositing. The same is true for the VTK GRPU ray casting and the VTK OpenGL 3D Texture mapping methods, the latter sometimes produces a "rougher" looking image. The NCI GPU raycaster offers good quality and speed, but does not allow for z-buffer compositing. That means that the volume rendering cannot be combined with a triangulated surface model or a cross section in the 3D view. | ||
| + | *** In general you want dedicated GPUs with dedicated GPU memory, if using GPU accelerated methods. Computers that are labeled "gaming computers" will usually have the right type of hardware. Depending on the size of data that is rendered, you will need more GPU memory. If your data set is too large for your memory, performance will drop considerably. It might take some time before the rendering is shown. | ||
| + | ** Rendering Method | ||
| + | *** '''VTK CPU Ray Casting:''' Uses the CPU for volume rendering, is parallelized and can take advantage of multi-core capabilities. Uses level-of-detail approach where low resolution is rendered while moving, and high resolution is rendered once motion ceases. Allows zbuffer compositing with texture map cross sections and non-transparent triangulated surface model. | ||
| + | **** Method Configuration Panel: | ||
| + | ***** Maximum Intensity Projection: turn on/off MIP rendering in VTK CPU Ray Casting. | ||
| + | *** '''VTK GPU Ray Casting:''' Uses GPU accelerated ray caster. Allows z-buffer compositing with non-transparent polygon models only. This is currently working on Linux and Win32, but not on Mac due to a bug in the OpenGL drivers. | ||
| + | **** Method Configuration Panel: | ||
| + | ***** Technique: Two techniques available: Composite and MIP. | ||
| + | *** '''VTK OpenGL 3D Texture Mapping:''' Uses texture mapping approach to volume rendering compared to the two render methods above, it has slightly lower performance and slightly coarser appearance. | ||
| + | *** '''NCI GPU Ray Casting:''' This is a GLSL-based ray caster with several experimental mapping techniques. No z-buffer compositing with polygon models. Good performance and quality. No hardware restrictions on this method. | ||
| + | **** Method Configuration Panel: | ||
| + | ***** Rendering Technique: | ||
| + | ****** Composite With Shading: regular ray casting volume rendering with shading | ||
| + | ****** Composite Psuedo Shading: slightly faster than regular composite | ||
| + | ****** Maximum Intensity Projection: | ||
| + | ****** Minimum Intensity Projection: | ||
| + | ****** Gradient Magnitude Opacity Modulation: Enhances boundary in volume by multiplying gradient magnitude with voxel opacity | ||
| + | ****** Illustrative Context Preserving Exploration: Automatic "open up" boundaries that are closer to viewer. Two parameters ICPE scale and ICPE smoothness controls "open up" depth and width. | ||
| + | ***** Dist. Color Blending: Enhancing depth info in volume rendering by darkening voxels based on their distance to user/camera. Voxels more far away will be darken more. | ||
| + | ***** ICPE Scale: parameter for Illustrative Context Preserving Exploration | ||
| + | ***** ICPE Smoothness: parameter for Illustrative Context Preserving Exploration | ||
| + | ***** Vol. Depth Peeling: Starting volume rendering once voxel with high intensity than the threshold value has been hit by viewing ray. Helps to reveal close objects with similar intensity. | ||
| + | *** '''NCI GPU Ray Casting (Multi-Volume):''' ''Note: this is a newly added mode that should be considered experimental.'' This allows two volumes to be volume rendered and performs an alpha blend between the two volumes. This method requires enough graphics memory to hold all data, or a crash or frozen machine may occur. ''If you use this method, and select a foreground volume, you need to set the "Fg|Bg Ratio" slider in "NCI GPU Ray Casting (Multi-Volume)" section to see the rendering of the foreground volume. By default, the foreground volume is completely transparent.'' Both bg and fg volumes need to have '''same data type'''. See above Use Case and Example section for details. | ||
| + | **** Method Configuration Panel: | ||
| + | ***** Technique (Bg): rendering techniques for bg volume. | ||
| + | ***** Technique (Fg): rendering techniques for fg volume. | ||
| + | ***** Fusion: bg/fg blending method | ||
| + | ***** Bg|Fg Ratio: blending weights for bg and fg volumes in. | ||
| + | ** GPU Memory Size: A user must hand-select the amount of graphics memory in your machine. The setting will be remembered for your next session. Find this information in video card driver control panel on your computer. | ||
| + | ** Quality Control: Defines mapper rendering behavior | ||
| + | *** Adaptive: Effect on all mappers. When user using mouse button to do interactions, all mappers automatically switch to the frame rate setting in '''Interactive Speed'''. After user release mouse button to finish interaction, all mappers switch back to highest quality rendering. | ||
| + | *** Maximum: Force highest quality rendering on all mappers except VTK OpenGL Texture Mapping | ||
| + | *** Fixed Framerate: Force mapper to user fixed frame rate setting in '''Interactive Speed'''. Effect on NCI mappers only. | ||
| + | *** Interactive Speed: defines the frame rate to be used during user interaction, for example, rotate the volume using mouse left button. | ||
| + | |[[Image:3.6VolrendRenderingTechniques.png|thumb|280px|User Interface]] | ||
| + | |- | ||
| + | | | ||
| + | '''Volume Property Tab''' | ||
| + | * Follow Volumes Module Option: When this is checked, you can use the window level and threshold settings and the Color LUT settings in the volumes module display section to manipulate a ramp-shaped transfer function. | ||
| + | * Use Thresholding Option: Basically this is a block filter with adjustable upper and lower thresholds in the transfer function. The opacity slider may be used to adjust the opacity of the pass band. Effects of this option can be seen below in the Scalar Opacity Mapping Transfer Function Editor. | ||
| + | *Volume Appearance Settings | ||
| + | **Interpolation: Linear or nearest neighbor. Usually, linear will produce more pleasing results. | ||
| + | **Material: A pop-up allows to determine the reflection properties for the rendered structures ("shiny" to "dull") | ||
| + | **Scalar Opacity Mapping: select a control point (click to create a new one) and change its signal intensity value and opacity. 0 means transparent and 1 means opaque. | ||
| + | **Scalar Opacity Mapping: select a control point (click to create a new one) and change its color. Both Hue/Saturation and value can be selected | ||
| + | |[[Image:3.6VolrendRenderingVolumeProperty.png|thumb|280px|User Interface]] | ||
| + | |- | ||
| + | | | ||
| + | '''ROI Tab''' | ||
| + | *The ROI's are compatible with the crop volume module. | ||
| + | *Interactive cropping of the volume visualization. You can use either the sliders or click on the colorized spheres in the 3D view. | ||
| + | *ROI box can be made visible or invisible | ||
| + | *check box allows to apply to the visualization or not. | ||
| + | *"Fit ROI to Volume" button is helpful when ROI default range is smaller than volume. | ||
| + | |[[Image:3.6VolrendRenderingROI.png|thumb|280px|User Interface]] | ||
| + | |- | ||
| + | | | ||
| + | '''Misc Tab''' | ||
| + | *Turn volume rendering visibility on or off | ||
| + | *Turn models on or off | ||
| + | *May need to be moved to main toolbar. | ||
| + | |[[Image:3.6VolrendRenderingMisc.png|thumb|280px|User Interface]] | ||
|} | |} | ||
| Line 72: | Line 173: | ||
===Notes from the Developer(s)=== | ===Notes from the Developer(s)=== | ||
| − | |||
| − | |||
===Dependencies=== | ===Dependencies=== | ||
| − | + | None. | |
===Tests=== | ===Tests=== | ||
| − | On the [http://www.cdash.org/CDash/index.php?project=Slicer3 Dashboard], these tests verify that the module is working on various platforms | + | On the [http://www.cdash.org/CDash/index.php?project=Slicer3 Dashboard], these tests verify that the module is working on various platforms |
| − | |||
| − | |||
| − | |||
===Known bugs=== | ===Known bugs=== | ||
Links to known bugs in the Slicer3 bug tracker | Links to known bugs in the Slicer3 bug tracker | ||
| − | |||
| − | |||
| − | |||
===Usability issues=== | ===Usability issues=== | ||
| Line 98: | Line 191: | ||
===Source code & documentation=== | ===Source code & documentation=== | ||
| − | |||
| − | |||
Source code: | Source code: | ||
| − | + | http://viewvc.slicer.org/viewcvs.cgi/branches/Slicer-3-6/Modules/VolumeRendering/?rev=13274 | |
| − | |||
Doxygen documentation: | Doxygen documentation: | ||
| − | + | http://www.na-mic.org/Slicer/Documentation/Slicer3-doc/html/classes.html | |
== More Information == | == More Information == | ||
===Acknowledgment=== | ===Acknowledgment=== | ||
| − | + | This work is supported by NA-MIC, NAC, BIRN, NCIGT, and the Slicer Community. See http://www.slicer.org for details. The VolumeRendering module is implemented by Yanling Liu, NCI-Frederick/SAIC-Frederick, Andreas Freudling, Student Intern at SPL, BWH (Ron Kikinis) and Alex Yarmarkovich, Isomics Inc. (Steve Pieper). Some of the transfer functions were contributed by Kitware, Inc. (VolView)". | |
===References=== | ===References=== | ||
| − | |||
Latest revision as of 15:28, 26 July 2010
Home < Modules:VolumeRendering-Documentation-3.6Return to Slicer 3.6 Documentation
Module Name
Volume Rendering
General Information
Module Type & Category
Type: Interactive
Category: Base
Authors, Collaborators & Contact
- Yanling Liu, SAIC-Frederick/NCI-Frederick, Alex Yarmarkovich, Isomics, SPL
- Origianl work: Andreas Freudling, Student Intern at SPL (freudling@bwh.harvard.edu), Steve Pieper, Isomics
- Contact: Yanling Liu, liuy5@mail.nih.gov, Alex Yarmarkovich, alexy@bwh.harvard.edu
- Some of the transfer functions were contributed by Kitware, Inc. (VolView)
Module Description
Provides interactive visualization of 3D image data. To learn about volume rendering start with Wikipedia.
Usage
Use Cases, Examples
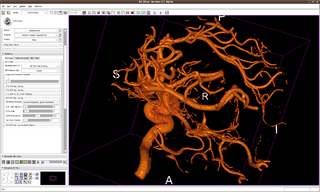
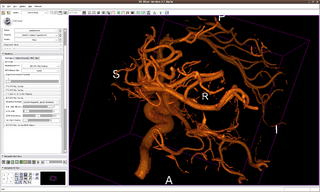
- Distance Color Blending in NCI GPU Ray Casting
Distance Color Blending will make voxels with longer distance to eye/camera more darker than voxels with shorter distance. The effect helps to reveal depth information in volume.
A "Dist. Color Blending" slider bar is available in NCI GPU Ray Casting parameter panel to adjust the effect. Higher value indicates stronger darkening effect. Setting the value to be 0 will turn off the effect.
Below are two images of the same volume with identical transfer functions. The first one is rendered with the feature off and the second one is rendered with the feature on. On the second image, darker voxels indicate these voxels are more far away from eye/camera.
The effect is available on Composite With Shading, Composite With Pseudo Shading, and Gradient Magnitude Opacity Modulation techniques.
- Pausing VolumeRendering module in scene loading
The VolumeRendering module can be paused in scene loading by un-checking the "Monitor Scene Loading Event" check button. Re-checking the check button will flush the paused pipeline and initialize the module using the loaded scene.
- Multi-Volume GPU Ray Casting
VolumeRendering module has the capability to blend two (bg and fg) volumes in one rendering pipeline. User may select different rendering technique for bg or fg volumes. Different blending options are also available.
Currently under development. Available rendering techniques: Composite (bg) + Composite (fg) + OR blending, Composite (bg) + Composite (fg) + AND blending, Composite (bg) + MIP (fg), MIP (bg) + MIP (fg), GMOM (bg) + GMOM (fg).
Important: when using Multi-Volume GPU Ray Casting, both bg and fg volume need to have same data type. Please use Cast Image filter to cast image with smaller data type to larger data type. For example, if bg volume is short and fg volume is float, use Cast Image filter to cast bg volume to be float. Using bg and fg volumes with different data type may cause Slicer to crash.
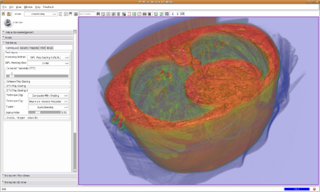
- Dual 3D View mode
- The NCI GPU Ray casting does support the Dual 3D View mode.
- The VTK GPU Ray Casting doesn't support the Dual 3D View mode.
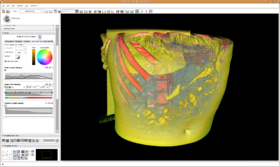
- Volume-Following Mode
In Volume-Following mode, color and opacity transfer functions in the VolumeRendering module will follow window/level and threshold settings in the Volumes module for a uniform appearance on both slice view and 3D volume rendering view. To use, check VolumeRendering module -> Rendering panel -> Volume Property tab -> Follow Volumes Module check button.
In Volume-Following mode, window/level plus lookup table in Volumes module will be used to set colors in volume rendering. Threshold in Volumes module will be used to set opacity in volume rendering. Color and opacity transfer function editor also are disabled in Volume-Following mode because we are following volumes module now.
Tutorials
Quick Tour of Features and Use
|
|
|
Rendering panel: This panel is Dynamically generated panel when valid input is selected.
|
|
|
Volume Property Tab
|
|
|
ROI Tab
|
|
|
Misc Tab
|
Development
Notes from the Developer(s)
Dependencies
None.
Tests
On the Dashboard, these tests verify that the module is working on various platforms
Known bugs
Links to known bugs in the Slicer3 bug tracker
Usability issues
Follow this link to the Slicer3 bug tracker. Please select the usability issue category when browsing or contributing.
Source code & documentation
Source code: http://viewvc.slicer.org/viewcvs.cgi/branches/Slicer-3-6/Modules/VolumeRendering/?rev=13274
Doxygen documentation: http://www.na-mic.org/Slicer/Documentation/Slicer3-doc/html/classes.html
More Information
Acknowledgment
This work is supported by NA-MIC, NAC, BIRN, NCIGT, and the Slicer Community. See http://www.slicer.org for details. The VolumeRendering module is implemented by Yanling Liu, NCI-Frederick/SAIC-Frederick, Andreas Freudling, Student Intern at SPL, BWH (Ron Kikinis) and Alex Yarmarkovich, Isomics Inc. (Steve Pieper). Some of the transfer functions were contributed by Kitware, Inc. (VolView)".

