Difference between revisions of "Documentation/Nightly/Extensions/ModelClip"

From Slicer Wiki
Jump to: navigation, search
(Created page with '<noinclude>{{documentation/versioncheck}}</noinclude> <!-- ---------------------------- --> {{documentation/{{documentation/version}}/module-header}} <!-- -----------------------…')
 
m (Text replacement - "\[http:\/\/www\.slicer\.org\/slicerWiki\/index\.php\/([^ ]+) ([^]]+)]" to "$2")
 
(39 intermediate revisions by one other user not shown)
Line 6: Line 6:
 
<!-- ---------------------------- -->
 
<!-- ---------------------------- -->
 
{{documentation/{{documentation/version}}/module-section|Introduction and Acknowledgements}}
 
{{documentation/{{documentation/version}}/module-section|Introduction and Acknowledgements}}
Authors: Guillaume Pernelle, Xiaojun Chen, Yi Gao, Jan Egger<br>
+
{{documentation/{{documentation/version}}/module-introduction-start|{{documentation/modulename}}}}
Contributors: iGyne Team<br>
+
{{documentation/{{documentation/version}}/module-introduction-row}}
Contact: Guillaume Pernelle, <email>gpernelle@gmail.com</email><br>
+
Authors: Jun Lin and Xiaojun Chen(Shanghai Jiao Tong University)<br>
Website: https://github.com/gpernelle/iGynePy<br>
+
Contact: Xiaojun Chen, <email>xiaojunchen@163.com</email><br>
 +
Website: https://github.com/Ting-Jia/ModelClip<br>
 
License: [http://www.slicer.org/pages/LicenseText Slicer license]<br>
 
License: [http://www.slicer.org/pages/LicenseText Slicer license]<br>
Related Master's Thesis: [http://www.ncigt.org/publications/item/view/2316 Labeled Needle Rendering Solution for Image Guided Brachytherapy]
 
  
<!-- ---------------------------- -->
+
<gallery>
{{documentation/{{documentation/version}}/extension-section|Extension Description}}
+
Image:SJTU_Logo.png|Shanghai Jiao Tong University(SJTU)
iGyne is an open source software for MR-Guided Interstitial Gynecologic Brachytherapy. It enables on-time processing of the intra-operative MRI data via a DICOM connection to the scanner followed by a multi-stage registration of CAD models of the template and the obturator to the patient images. This allows the virtual placement of interstitial needles during the intervention, as well as needle detection and needle labeling.  
+
File:Logo-splnew.jpg|Surgical Planning Lab(SPL)
 +
</gallery>
  
iGyne is currently articulated in seven steps:
+
This project is partially supported by Natural Science Foundation of China (Grant No.51005156 and 81171429).
1) procedure selection
+
{{documentation/{{documentation/version}}/module-introduction-end}}
2) applicator selection
 
3) data importation
 
4) initial applicator registration
 
5) refined applicator registration
 
6) needle position planning
 
7) needle detection


<!-- ---------------------------- -->
 
<!-- ---------------------------- -->
{{documentation/{{documentation/version}}/extension-section|Modules}}
+
{{documentation/{{documentation/version}}/extension-section|Extension Description}}
 +
ModelClip module allows you to set the osteotomy trajectory with multiple planes, and clip the model with just one click. It is designed for osteotomy simulation.
  
 
<!-- ---------------------------- -->
 
<!-- ---------------------------- -->
 
{{documentation/{{documentation/version}}/extension-section|Use Cases}}
 
{{documentation/{{documentation/version}}/extension-section|Use Cases}}
[http://slicer.kitware.com/midas3/folder/876 Phantom Study] and
+
{|
[https://github.com/xjchen/igyne/tree/master/Sample%20data Sample data]
+
|[[Image:ModelClipScreenShot.png|thumb|650px|The screenshot of the ModelClip module]]
 +
|}
  
<gallery widths="200px" perrow="4">
+
{|
Image:IGyne-beforeFirstRegsitration.png|Data loaded
+
|[[Image:ModelClipAnimatedGif.gif|The animated GIF of the ModelClip module]]
Image:IGyne-BeforeRefinedRegistration.png|After the initial registration
+
|}
Image:IGyne-applicatorSegmentation.png|Applicator Segmentation
 
Image:IGyne-registrationResult.png|Registration results
 
Image:IGyne-needlePlanning.png|Planning with virtual needles
 
Image:IGyne-needleSegmentation.png|Real needles segmentation
 
Image:IGyne-labelingResult.png|Labeling result on the planning sheet
 
  
</gallery>
+
{{documentation/{{documentation/version}}/module-section|Tutorials}}
 +
* Tutorial about [[File:ModelClip_Tutorial.ppt|ModelClip]].
  
 
<!-- ---------------------------- -->
 
<!-- ---------------------------- -->
Line 51: Line 44:
 
<!-- ---------------------------- -->
 
<!-- ---------------------------- -->
 
{{documentation/{{documentation/version}}/extension-section|References}}
 
{{documentation/{{documentation/version}}/extension-section|References}}
* http://www.na-mic.org/Wiki/index.php/2012_Summer_Project_Week:iGyne
 
* Xiaojun Chen, Jan Egger, Akila Viswanathan, Neha Agrawal, William Wells, Ron Kikinis, Clare Tempany, Ferenc Jolesz and Tina Kapur.  "Image Processing for MR-guided Gynecologic Interstitial Brachytherapy in AMIGO", The 9th Interventional MRI Symposium. September 22-23, 2012.
 
* Gao, Farhat, Pernelle et al. "Needle Labeling for Interstitial Gynecological Brachytherapy". Fifth National Image Guided Therapy Workshop, Sept 21, 2012
 
* Pernelle, Egger, Vale, Chen, Irlinger, Lueth, Wells, Kikinis, Viswanathan and Kapur. Robust Applicator Registration for Interstitial Gynecologic Brachytherapy. ABS 2013 Annual Meeting
 
* Pernelle. "Needle labeling for Image-Guided Brachytherapy", Masters thesis (in preparation). Technical University Munich and Ecole Centrale Marseille, Dec 14, 2012


<!-- ---------------------------- -->
 
<!-- ---------------------------- -->
 
{{documentation/{{documentation/version}}/extension-section|Information for Developers}}
 
{{documentation/{{documentation/version}}/extension-section|Information for Developers}}
iGyne is currently articulated in seven steps:
 
1) procedure selection
 
2) applicator selection
 
3) data importation
 
4) initial applicator registration
 
5) refined applicator registration
 
6) needle position planning
 
7) needle detection
 
It offers also a way to go directly from 1) to 7), skipping the registration/planning steps
 
 
- iGyneSelectProcedureStep.py (1) and iGyneSelectApplicatorStep.py (2) let you choose to use or not an applicator, and to select the most convenient one. There are different configurations for the fiducial markers:
 
* 4 landmarks, ordered from the top left corner and counting counter-clockwise (new cases)
 
* 3 landmarks, positioned at the corners of the template, ordered as above
 
* 3 landmarks, starting from the one in the middle of the template and counting counter-clockwise
 
This step offers an automatic registration option if the CLI module Hough Transformed has been previously enabled
 
 
- iGyneLoadModelStep.py (3) let you load the data while the scene is loaded depending on the made in step 2.
 
 
- iGyneFirstRegistrationStep.py (4) is the initial registration step. Depending on the choice you made on the previous step, you can click on the bright markers in the image or let the automatic registration find them for you (requires the CLI module called Hough Transform).
 
 
- iGyneSecondRegistrationStep.py (5) is the refined applicator registration step. It offers fully automated computation to complete manual parameterization if needed. Thus, several segmentation methods are available to segment the obturator, and the registration parameters can be tweaked. By default, the most efficient parameters are chosen and all steps of the refined registration are computed successively. Evaluation functions have also been integrated to allow developers to measure time and accuracy of the chosen methods and parameters. Beside the control interface, 2D views display cross sections of the applicator in axial, sagital and coronal planes giving the user a visual characterization of the registration state.
 
 
- iGyneNeedlePlanningStep.py (6) let you insert "virtual needles" and visualize their trajectory in the 2D/3D viewer. You can tweak the color and the length of the needles.
 
 
- iGyneNeedleSegmentationStep.py (7) is the "keystone" of iGyne. Start by clicking on "Start Giving Needle Tips" and at each click in the 2D axial viewer, a needle will be segmented. You can display, delete the needles individually or all together. You can also differentiate the different insertion steps and separate each group of needles. A table shows some parameters of the caculated needles. If a registration has been done previously, it will assign to each needle the most probable label. It is also possible to tweak the needle segmentation parameters.


<!-- ---------------------------- -->
 
<!-- ---------------------------- -->
 
{{documentation/{{documentation/version}}/extension-footer}}
 
{{documentation/{{documentation/version}}/extension-footer}}
 
<!-- ---------------------------- -->
 
<!-- ---------------------------- -->

Latest revision as of 02:26, 27 November 2019

Home < Documentation < Nightly < Extensions < ModelClip


For the latest Slicer documentation, visit the read-the-docs.


Introduction and Acknowledgements

Authors: Jun Lin and Xiaojun Chen(Shanghai Jiao Tong University)
Contact: Xiaojun Chen, <email>xiaojunchen@163.com</email>
Website: https://github.com/Ting-Jia/ModelClip
License: Slicer license

This project is partially supported by Natural Science Foundation of China (Grant No.51005156 and 81171429).

Extension Description

ModelClip module allows you to set the osteotomy trajectory with multiple planes, and clip the model with just one click. It is designed for osteotomy simulation.

Use Cases
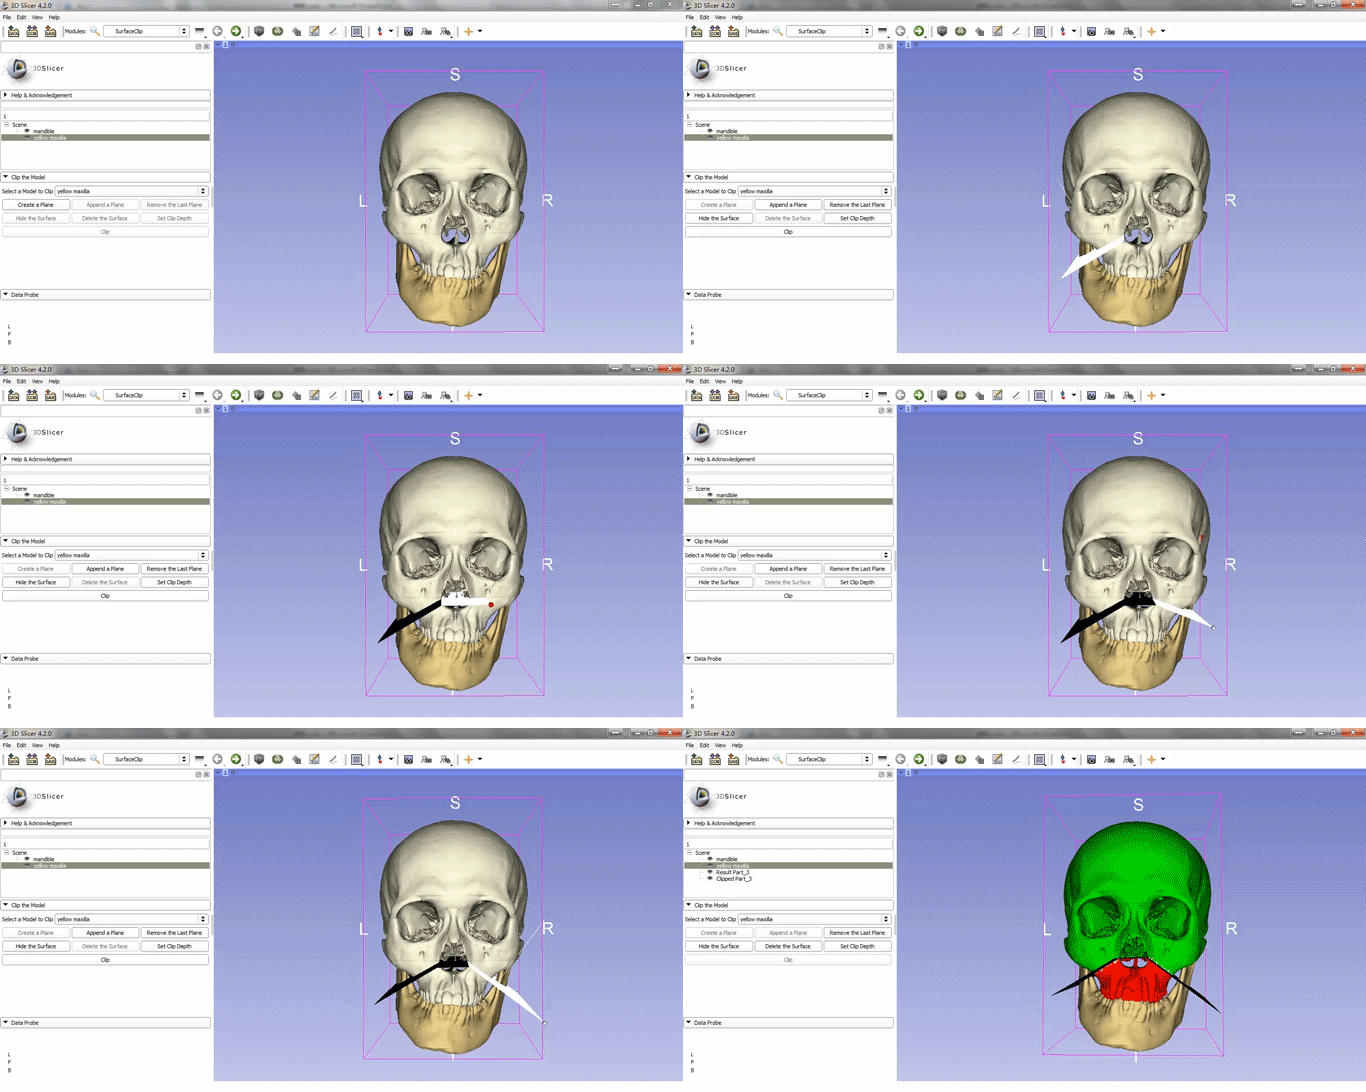
The screenshot of the ModelClip module
The animated GIF of the ModelClip module

Tutorials

Similar Extensions

N/A

References

Information for Developers