Difference between revisions of "Slicer3:Module:LabelBinaryImages-Documentation"
| Line 32: | Line 32: | ||
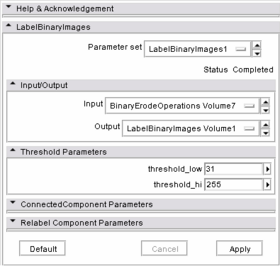
|[[Image:LabelGUI.png|thumb|280px|The GUI panel for LabelBinaryImages Module]] | |[[Image:LabelGUI.png|thumb|280px|The GUI panel for LabelBinaryImages Module]] | ||
|} | |} | ||
| + | |||
| + | ==DEVELOPMENT== | ||
| + | |||
| + | ===Dependencies=== | ||
| + | |||
| + | In this module, there are 3 ITK classes which are used. | ||
| + | |||
| + | One of them is for binary thresholding which is called itkBinaryThresholdImageFilter[http://www.itk.org/Doxygen/html/classitk_1_1BinaryThresholdImageFilter.html]. It takes two user inputs which are LowerThreshold and UpperThreshold values. The output is a binary images with 0 outside and 255 inside. | ||
| + | |||
| + | The other class which is for labeling the objects in a binary image is itkConnectedComponentImageFilter class [http://www.itk.org/Doxygen/html/classitk_1_1ConnectedComponentImageFilter.html].Each distinct object is assigned a unique label. The filter experiments with some improvements to the existing implementation, and is based on run length encoding along raster lines. The final object labels start with 1 and are consecutive. Objects that are reached earlier by a raster order scan have a lower label. This is different to the behaviour of the original connected component image filter which did not produce consecutive labels or impose any particular ordering. | ||
Revision as of 15:33, 28 August 2008
Home < Slicer3:Module:LabelBinaryImages-DocumentationBinary Thresholding and Labeling
GENERAL INFORMATION
Module Type&Category
The type of this module is CLI and is under the category Segmentation in Slicer 3. The name of this module is LabelBinaryImages in Slicer 3.
Authors, Collaborators&Contact
- Author: Bike Kilic, MSc student in Northeastern University
- Contact: kilicbike@gmail.com
Module Description
The purpose of this module is defining different labels in an image after morphological operations. This module performs thresholding in the first step and then implements labeling by using the information of connectedness in given input.
The input of this module is the last eroded image. And after this process, the labeled binary image is taken to dilation process. After LabelBinaryImages module, the output shows us different labeled areas. For instance, in this project, the input is eroded spheres and then after this module the output is an image with three different labeled areas:background as 0, one of the spheres as 1 and the other one as 2. The sphere with bigger area is labeled as 1.
The results can be seen in the section called Screen shots in this page.
USAGE
Quick Tour of Features and Use
DEVELOPMENT
Dependencies
In this module, there are 3 ITK classes which are used.
One of them is for binary thresholding which is called itkBinaryThresholdImageFilter[1]. It takes two user inputs which are LowerThreshold and UpperThreshold values. The output is a binary images with 0 outside and 255 inside.
The other class which is for labeling the objects in a binary image is itkConnectedComponentImageFilter class [2].Each distinct object is assigned a unique label. The filter experiments with some improvements to the existing implementation, and is based on run length encoding along raster lines. The final object labels start with 1 and are consecutive. Objects that are reached earlier by a raster order scan have a lower label. This is different to the behaviour of the original connected component image filter which did not produce consecutive labels or impose any particular ordering.
