Difference between revisions of "Documentation/Nightly/Modules/DatabaseInteractor"
| (26 intermediate revisions by the same user not shown) | |||
| Line 9: | Line 9: | ||
{{documentation/{{documentation/version}}/module-introduction-row}} | {{documentation/{{documentation/version}}/module-introduction-row}} | ||
Extension: '''Database Interactor'''<br> | Extension: '''Database Interactor'''<br> | ||
| − | Acknowledgments: This work was supported by the National Institues of Dental and Craniofacial Research and Biomedical Imaging and Bioengineering of the National Institutes of Health.<br> | + | Acknowledgments: This work was supported by the National Institues of Dental and Craniofacial Research and Biomedical Imaging and Bioengineering R01DE024450 of the National Institutes of Health.<br> |
| − | Author: Clément Mirabel | + | Author: Clément Mirabel (University of Michigan)<br> |
| − | Contributor1: Juan Carlos Prieto | + | Contributor1: Juan Carlos Prieto (UNC)<br> |
Contributor2: Lucia Cevidanes (University of Michigan)<br> | Contributor2: Lucia Cevidanes (University of Michigan)<br> | ||
Contact: Clément Mirabel, <email>clement.mirabel@gmail.com</email><br> | Contact: Clément Mirabel, <email>clement.mirabel@gmail.com</email><br> | ||
| Line 22: | Line 22: | ||
</gallery> | </gallery> | ||
{{documentation/{{documentation/version}}/module-introduction-end}} | {{documentation/{{documentation/version}}/module-introduction-end}} | ||
| + | __TOC__ | ||
<!-- ---------------------------- --> | <!-- ---------------------------- --> | ||
{{documentation/{{documentation/version}}/module-section|Module Description}} | {{documentation/{{documentation/version}}/module-section|Module Description}} | ||
{{documentation/{{documentation/version}}/module-description}} | {{documentation/{{documentation/version}}/module-description}} | ||
| − | This extension contains multiple panels that allow the user to manage data from a | + | This extension contains multiple panels that allow the user to manage data from a CouchDB database stored on a server. It has been developed to work with this [https://ec2-52-42-49-63.us-west-2.compute.amazonaws.com:8180/DCBIA-OrthoLab/public/ website], so the user will need to have an account on this website. |
| + | The data currently stored on this website is for a pilot study which needs to federate biological, morphological and clinical data. At the end of the development of the website, this should be available for other projects. For more information about the website status, contact <email>juanprietob@gmail.com</email>.<br> | ||
| + | The data displayed in this extension dynamically reacts with user local folders and online database. The user should login with the same credentials than on the server entered as input.<br><br> | ||
| + | |||
| + | If you want to try the website for your project, you can create an account [https://ec2-52-42-49-63.us-west-2.compute.amazonaws.com:8180/DCBIA-OrthoLab/public/#/login here] and contact <email>juanprietob@gmail.com</email> for privileges. | ||
<!-- ---------------------------- --> | <!-- ---------------------------- --> | ||
| Line 38: | Line 43: | ||
<!-- ---------------------------- --> | <!-- ---------------------------- --> | ||
{{documentation/{{documentation/version}}/module-section|Tutorials}} | {{documentation/{{documentation/version}}/module-section|Tutorials}} | ||
| + | == Interact with the database == | ||
===Login to the database=== | ===Login to the database=== | ||
{| | {| | ||
|[[Image:LoginPanelDatabaseInteractor.png|500px]] | |[[Image:LoginPanelDatabaseInteractor.png|500px]] | ||
|This tab allows the user to connect to a web database using the credentials registered in this database. The user can only access the web system if he has the correct permissions. <br> | |This tab allows the user to connect to a web database using the credentials registered in this database. The user can only access the web system if he has the correct permissions. <br> | ||
| + | For the pilot study, the server address is https://ec2-52-42-49-63.us-west-2.compute.amazonaws.com:8180 | ||
|} | |} | ||
===Download data using a patient Id=== | ===Download data using a patient Id=== | ||
{| | {| | ||
| − | |[[ | + | |[[File:DownloadPanelOnlyId.png|500px|frameless]] |
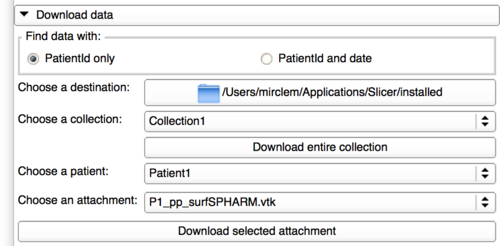
|After connecting to the database, the user will have access to the file stored in the database and has 2 options: | |After connecting to the database, the user will have access to the file stored in the database and has 2 options: | ||
* Downloading an entire collection. This button will download the selected collection using the following architecture. | * Downloading an entire collection. This button will download the selected collection using the following architecture. | ||
| Line 72: | Line 79: | ||
===Download data using date and patient Id=== | ===Download data using date and patient Id=== | ||
| + | To switch to this functionality, it only needs to tick the option "PatientId and date" in the download panel.<br> | ||
{| | {| | ||
|[[Image:DownloadPanelDateAndIdWrongDate.png|500px]] | |[[Image:DownloadPanelDateAndIdWrongDate.png|500px]] | ||
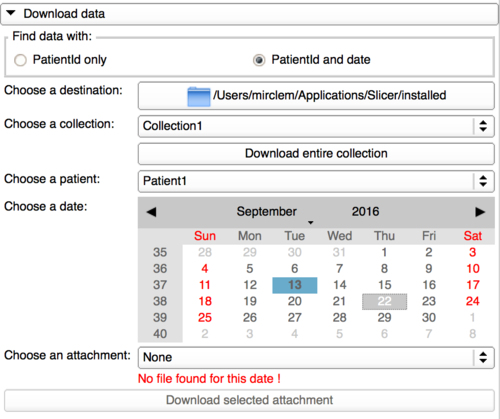
| − | |This panel is a bit different than the previous one as it allows the user to use a calendar to find a file date corresponding to the patient Id selected. The dates | + | |This panel is a bit different than the previous one as it allows the user to use a calendar to find a file date corresponding to the patient Id selected. The user first needs to select a collection, then a patient Id in this collection and the attachment dates corresponding to this patient Id will be displayed in <span style="background:#6BABC8">blue</span> and '''bold''' in the calendar.<br> |
| + | It is still possible to download the entire collection in this panel. | ||
| + | |} | ||
| + | {| | ||
| + | |[[Image:DownloadPanelDateAndIdGoodDate.png|500px]] | ||
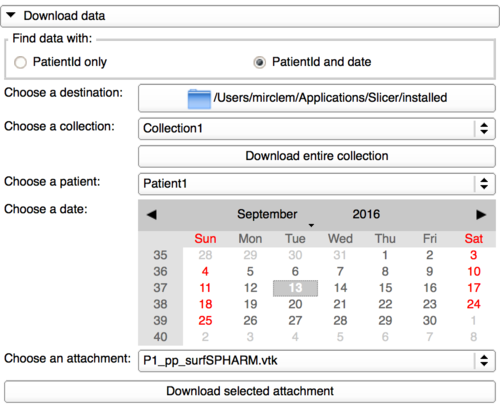
| + | |When a date containing one or multiple attachments is selected, the user can now select in a list an attachment to be downloaded. By clicking on the button "Download selected attachment", the user will download this attachment from the database and store it in the destination specified. | ||
|} | |} | ||
===Upload panel=== | ===Upload panel=== | ||
| + | {| | ||
| + | |[[Image:UploadPanelWithCollection.png|500px]] | ||
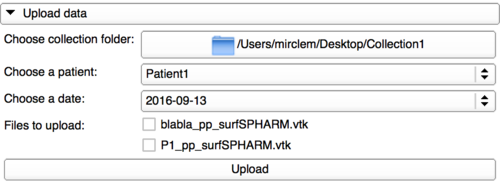
| + | | In this panel, the user can now upload local data to the web-based system. To do that, it needs first to select the '''collection''' directory. That will automatically fill the lists bellow with the content in the collection folder using the same architecture than here. <br> | ||
| + | The user will have the possibility to tick one or multiple attachments to be uploaded. '''Be careful''', switching to another date or patient Id won't keep in memory the attachments you have ticked. <br> | ||
| + | Then, by clicking on the '''''Upload''''' button, the user can upload to the database the attachments ticked. | ||
| + | |} | ||
| − | === | + | ===Create patient Id in a collection=== |
| − | + | This functionality and the next one are part of the management panel. This panel should be restricted to "admin" users as defined in the database. To show this panel, the "admin" user just needs to click on the collapsible button. | |
| − | + | {| | |
| − | + | |[[Image:AddPatientId.png|500px]] | |
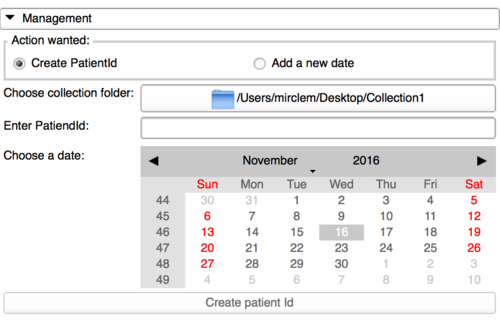
| − | + | |This panel has been implemented to facilitate the work for the collection owner. This module is based on a specific architecture as shown upper and needs some temporary files to perfectly parse the collection folder. That means adding a patient Id to a collection is not just creating a folder with a name and a folder with a date in it. <br> | |
| − | + | So, all the clean process is done by this panel, in which the user should select the collection folder, then type a patient Id and click on a date to be a default folder. This will generate the files needed for a later use of the upload panel. | |
| − | + | |} | |
| + | |||
| + | ===Add a date to a patient Id in a collection=== | ||
| + | {| | ||
| + | |[[Image:AddDateToPatientId.png|500px]] | ||
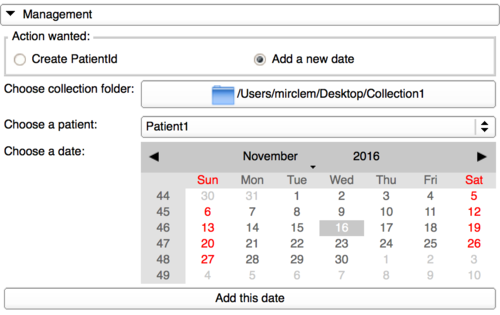
| + | |In the case the "admin" user gets more data for a patient with a different date than the ones already created, this panel gives the possibility to add a new one. First, it needs to select the collection, then a patient Id and finally the date wanted. The last step is to click on the button and check in the collection folder that everything has been correctly done. | ||
| + | |} | ||
| + | |||
| + | == Run tasks remotely == | ||
| + | ===Create a job=== | ||
| + | {| | ||
| + | |[[Image:CreateJob.png|500px]] | ||
| + | |In this panel, there is a drop-down menu which allows the user to select any CLI module loaded into Slicer. When a CLI is selected, it will display its user interface with the same attributes than the regular module. The user can set inputs, outputs parameters and use the button "Apply" to create a new job. The job is submitted to the server you previously connected. Inputs and parameter files are uploaded to the server, so the process can take some time if the files are large. | ||
| + | Then, it is possible to check the status of a job using the [https://ec2-52-42-49-63.us-west-2.compute.amazonaws.com:8180/DCBIA-OrthoLab/public/#/tasks dedicated page] on the website. The computation will be explained in the next part. Based on the settings and the number of machines used for the computation, a job can be done in few minutes or few hours. | ||
| + | <br /><br /> | ||
| + | It is not recommended to use such a feature with just one fast program because of the delayed computation. But, it is convenient to submit a computationally intensive task or fast programs for a full dataset. | ||
| + | |} | ||
| + | ===Use Slicer as a job computer=== | ||
| + | {| | ||
| + | |- | ||
| + | | [[Image:RunJobs.png|500px]] || With this panel, any Slicer can be used as a computation instance. After connecting to the server, the user can select a period for Slicer to check if there is a job waiting. If a job is pending and the Slicer version matches with the job executable, the CLI will be computed and the outputs uploaded to the server. | ||
| + | Be careful, it is possible to submit jobs for a full dataset and then connect Slicer to run those jobs during nights. But, some user could have sent a job that can take three weeks to run and so Slicer will run this one instead of the one just sent. | ||
| + | |- | ||
| + | | [[Image:DisconnectJobListener.png|500px]] || At any time, the Slicer instance can be disconnected from the server and a new period can be set. | ||
| + | |} | ||
<!-- ---------------------------- --> | <!-- ---------------------------- --> | ||
{{documentation/{{documentation/version}}/module-section|Similar Modules}} | {{documentation/{{documentation/version}}/module-section|Similar Modules}} | ||
| Line 97: | Line 140: | ||
<!-- ---------------------------- --> | <!-- ---------------------------- --> | ||
{{documentation/{{documentation/version}}/module-section|Information for Developers}} | {{documentation/{{documentation/version}}/module-section|Information for Developers}} | ||
| + | This extension has been designed to work with this [https://ec2-52-42-49-63.us-west-2.compute.amazonaws.com:8180/DCBIA-OrthoLab/public/ website] and should not work with other architectures. | ||
| + | If you want to use this plugin on another server, you need to make sure your documents are stored by CouchDB and your documents contain a field "type" set to "morphologicalData". | ||
| + | Your user would need to connect using [https://jwt.io/ JWT] and have a "scope" field.<br> | ||
| + | For more information, you can take a look at the website source code [https://github.com/DCBIA-OrthoLab/shiny-tooth here].<br> | ||
The source code is available on [https://github.com/DCBIA-OrthoLab/DatabaseInteractorExtension/tree/release github] | The source code is available on [https://github.com/DCBIA-OrthoLab/DatabaseInteractorExtension/tree/release github] | ||
Latest revision as of 18:51, 25 May 2017
Home < Documentation < Nightly < Modules < DatabaseInteractor
|
For the latest Slicer documentation, visit the read-the-docs. |
Introduction and Acknowledgements
|
Extension: Database Interactor |
|
|
Module Description
This extension contains multiple panels that allow the user to manage data from a CouchDB database stored on a server. It has been developed to work with this website, so the user will need to have an account on this website.
The data currently stored on this website is for a pilot study which needs to federate biological, morphological and clinical data. At the end of the development of the website, this should be available for other projects. For more information about the website status, contact <email>juanprietob@gmail.com</email>.
The data displayed in this extension dynamically reacts with user local folders and online database. The user should login with the same credentials than on the server entered as input.
If you want to try the website for your project, you can create an account here and contact <email>juanprietob@gmail.com</email> for privileges.
Use Cases
Tutorials
Interact with the database
Login to the database
|
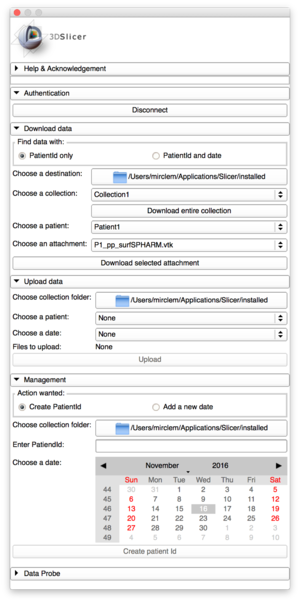
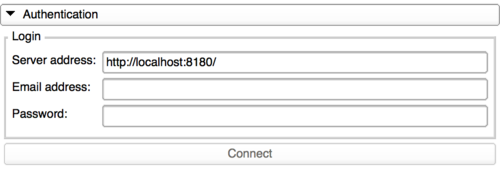
This tab allows the user to connect to a web database using the credentials registered in this database. The user can only access the web system if he has the correct permissions. For the pilot study, the server address is https://ec2-52-42-49-63.us-west-2.compute.amazonaws.com:8180 |
Download data using a patient Id
Download data using date and patient Id
To switch to this functionality, it only needs to tick the option "PatientId and date" in the download panel.
Upload panel
Create patient Id in a collection
This functionality and the next one are part of the management panel. This panel should be restricted to "admin" users as defined in the database. To show this panel, the "admin" user just needs to click on the collapsible button.
Add a date to a patient Id in a collection
Run tasks remotely
Create a job
|
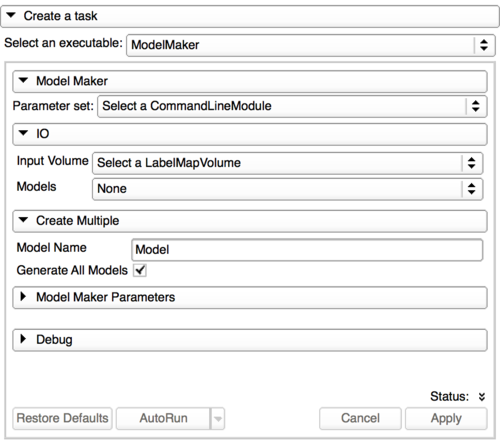
In this panel, there is a drop-down menu which allows the user to select any CLI module loaded into Slicer. When a CLI is selected, it will display its user interface with the same attributes than the regular module. The user can set inputs, outputs parameters and use the button "Apply" to create a new job. The job is submitted to the server you previously connected. Inputs and parameter files are uploaded to the server, so the process can take some time if the files are large.
Then, it is possible to check the status of a job using the dedicated page on the website. The computation will be explained in the next part. Based on the settings and the number of machines used for the computation, a job can be done in few minutes or few hours.
|
Use Slicer as a job computer
Similar Modules
N/A
References
N/A
Information for Developers
This extension has been designed to work with this website and should not work with other architectures.
If you want to use this plugin on another server, you need to make sure your documents are stored by CouchDB and your documents contain a field "type" set to "morphologicalData".
Your user would need to connect using JWT and have a "scope" field.
For more information, you can take a look at the website source code here.
The source code is available on github


