Difference between revisions of "New users"
| Line 15: | Line 15: | ||
===Hardware Requirements=== | ===Hardware Requirements=== | ||
| − | 3D Slicer is an open-source package that can be used on Mac, Linux and Windows. In order to run 3D Slicer your computer must have the graphics capabilities and memory to hold the original image data and process results. A 64-bit system is required. | + | 3D Slicer is an open-source package that can be used on Mac, Linux and Windows. In order to run 3D Slicer your computer must have the graphics capabilities and memory to hold the original image data and process results. A 64-bit system is required. Click [[Documentation/{{documentation/currentversion}}/SlicerApplication/HardwareConfiguration|here]] more information. |
[[File:Screen_Shot_2016-06-01_at_1.21.15_PM.png|thumb|600px]] | [[File:Screen_Shot_2016-06-01_at_1.21.15_PM.png|thumb|600px]] | ||
| Line 26: | Line 26: | ||
===Further Documentation=== | ===Further Documentation=== | ||
| − | If you're interested in extending your knowledge, access the [ | + | If you're interested in extending your knowledge, access the [[Documentation/{{documentation/currentversion}}|User Manual]]. See also the [http://slicer-users.65878.n3.nabble.com archives of the users mailing list] . The archive is searchable so most answers to questions can be found there. |
| − | If you're a developer looking for more information, access the [ | + | If you're a developer looking for more information, access the [[Documentation/Nightly/Developers|Developer Manual]]. See also [http://slicer-devel.65872.n3.nabble.com archives of the developer's mailing list] . Similar to the Users Mailing List archive, it is searchable. |
==Main Application GUI== | ==Main Application GUI== | ||
| − | 3D Slicer is built on a modular architecture. The Main Application GUI is divided into six components: the Application Menu Bar, the Application Toolbar, the Module GUI Panel, the Data Probe Panel, the 2D Slice Viewers, and the 3D Viewer. This section will introduce you to the basic functions on the main application's GUI. If you require detailed information, visit this [ | + | 3D Slicer is built on a modular architecture. The Main Application GUI is divided into six components: the Application Menu Bar, the Application Toolbar, the Module GUI Panel, the Data Probe Panel, the 2D Slice Viewers, and the 3D Viewer. This section will introduce you to the basic functions on the main application's GUI. If you require detailed information, visit this [[Documentation/{{documentation/currentversion}}/SlicerApplication/MainApplicationGUI|page]]. |
| Line 61: | Line 61: | ||
modules. | modules. | ||
| − | Try the [ | + | Try the [[Documentation/{{documentation/currentversion}}/Training#Slicer_Welcome_Tutorial|Welcome Tutorial]] and the [[Documentation/{{documentation/currentversion}}/Training#Slicer4_Data_Loading_and_3D_Visualization|Data Loading and 3D Visualization Tutorial]] to learn the basics of using 3D Slicer. |
| − | *To learn about using Slicer for 3D Printing, visit [ | + | *To learn about using Slicer for 3D Printing, visit [[Documentation/{{documentation/currentversion}}/Training#Slicer4_3D_Printing|this tutorial]]. |
| − | *To learn about Neurosurgical Planning with Slicer, visit [ | + | *To learn about Neurosurgical Planning with Slicer, visit [[Documentation/{{documentation/currentversion}}/Training#Slicer4_Neurosurgical_Planning_Tutorial|this tutorial]]. |
| − | *To learn about DTI, visit [ | + | *To learn about DTI, visit [[Documentation/{{documentation/currentversion}}/Training#Slicer4_Diffusion_Tensor_Imaging_Tutorial|this tutorial]]. |
| − | For more tutorials, visit the [ | + | For more tutorials, visit the [[Documentation/{{documentation/currentversion}}/Training|Tutorial page]] to see a comprehensive list. Additionally, visit our [https://www.youtube.com/channel/UC11x1iQ7ydSIFYw4L6wveXg?view_as=public YouTube page] for video tutorials. |
| − | If you would like to see a list of example cases with data sets and steps to achieve the same result, visit the [ | + | If you would like to see a list of example cases with data sets and steps to achieve the same result, visit the [[Documentation/{{documentation/currentversion}}/Registration/RegistrationLibrary|Registration Library]] |
==Modules== | ==Modules== | ||
| − | 3D Slicer has an abundance of modules to allow it's variety of functionalities. Refer to the [ | + | 3D Slicer has an abundance of modules to allow it's variety of functionalities. Refer to the [[Documentation/{{documentation/currentversion}}#Modules_by_category|documentation page]] for a comprehensive list of modules. Each module has it's own documentation page that has information about the module and may include a tutorial. 3D Slicer has more than 10 core modules that are displayed in the top section of the Modules drop down menu. |
===Core Modules=== | ===Core Modules=== | ||
'''Welcome''': The default module when 3D Slicer is started. The panel features options for loading data and customizing 3D Slicer. Below those options are drop-down boxes that contain essential information for using 3D Slicer. | '''Welcome''': The default module when 3D Slicer is started. The panel features options for loading data and customizing 3D Slicer. Below those options are drop-down boxes that contain essential information for using 3D Slicer. | ||
| − | '''[ | + | '''[[Documentation/{{documentation/currentversion}}/Modules/Annotations|Annotations]]: '''Allows the creation and editing of annotations or supplementary information. Currently, rulers and regions of interest (ROIs) are supported. See the [[Documentation/{{documentation/currentversion}}/Modules/Markups|Markups Module]] for fiducials. |
| − | [ | + | [[Documentation/{{documentation/currentversion}}/Modules/Markups|'''Markups''']]: Allows the creation and editing of markups associated with a scene. Currently, lists of fiducially are supported as markups. |
| − | [ | + | [[Documentation/{{documentation/currentversion}}/Modules/Data|'''Data''']]: Lists the objects currently in the scene and allows basic operations such as search, rename, delete and move. |
'''DataStore''': Allows users to download and upload data sets. | '''DataStore''': Allows users to download and upload data sets. | ||
| − | [ | + | [[Documentation/{{documentation/currentversion}}/Modules/DICOM|'''DICOM''']]: Integrates [http://dicom.nema.org DICOM] support from [http://commontk.org CTK] and [http://dicom.offis.de DCMTK]. |
| − | [ | + | [[Documentation/{{documentation/currentversion}}/Modules/Editor|'''Editor''']]: Allows manual segmentation of volumes. |
| − | [ | + | [[Documentation/{{documentation/currentversion}}/Modules/Models|'''Models''']]''':''' Loads and adjusts display parameters of models. Allows the user to change the appearance of and organize 3D surface models. |
| − | [ | + | [[Documentation/{{documentation/currentversion}}/Modules/SceneViews|'''Scene Views''']]: Tool for organizing multiple 'live views' of the data in the scene. The user can create any number of views and control parameters |
| − | [ | + | [[Documentation/{{documentation/currentversion}}/Modules/SubjectHierarchy|'''Subject Hierarchy''']]''':''' The SubjectHierarchy module acts as a central data-organizing point in Slicer. Subject hierarchy nodes provide features for the underlying data nodes, including cloning, bulk transforming, bulk show/hide, type-specific features, and basic node operations such as delete or rename. |
| − | [ | + | [[Documentation/{{documentation/currentversion}}/Modules/Transforms|'''Transforms''']]''': '''This module is used for creating and editing transformation matrices. You can establish these relations by moving nodes from the Transformable list to the Transformed list or by dragging the nodes under the Transformation nodes in the Data module. |
| − | [ | + | [[Documentation/{{documentation/currentversion}}/Modules/VolumeRendering|'''Volume Rendering''']]''':''' Provides interactive visualization of 3D image data. |
| − | '''[ | + | '''[[Documentation/{{documentation/currentversion}}/Modules/Volumes|Volumes]]: '''Used for changing the appearance of various volume types. |
[[File:Extension Manager.png|thumb|350x350px]] | [[File:Extension Manager.png|thumb|350x350px]] | ||
==Extensions== | ==Extensions== | ||
| − | 3D Slicer supports plug-ins that are called extensions. | + | 3D Slicer supports plug-ins that are called extensions. An extension could be seen as a delivery package bundling together one or more Slicer modules. After installing an extension, the associated modules will be presented to the user as built-in ones. Extensions can be downloaded from the extension manager to selectively install features that are useful for the end-user. |
| − | * For details about downloading extensions, see the [ | + | * For details about downloading extensions, see the [[[Documentation/{{documentation/currentversion}}/SlicerApplication/ExtensionsManager|Extension Manager page]]. |
| − | * Click [ | + | * Click [[Documentation/{{documentation/currentversion}}/ModuleExtensionListing/Extensions_by_category|here]] for a full list of extensions. The links on the page will provide documentation for each extension. |
| − | * See the [ | + | * See the [[Documentation/{{documentation/currentversion}}/Announcements#Slicer_Extensions Announcements|page]] for descriptions of the latest 3D Slicer extensions. |
| − | * Slicer is extensible. If you are a programmer who wants to add functionality to Slicer, click [ | + | * Slicer is extensible. If you are a programmer who wants to add functionality to Slicer, click [[Documentation/{{documentation/currentversion}}/Developers/Tutorials/BuildTestPackageDistributeExtensions|here]]. |
==Use Cases== | ==Use Cases== | ||
| Line 118: | Line 118: | ||
|[[File:NeurosurgicalPlanningTutorial.png|thumb|360px|centre]] | |[[File:NeurosurgicalPlanningTutorial.png|thumb|360px|centre]] | ||
|- | |- | ||
| − | |style="text-align:center;" | | + | |style="text-align:center;" |The [[Documentation/{{documentation/currentversion}}/Training#Slicer4_Diffusion_Tensor_Imaging_Tutorial|Diffusion Tensor Imaging Tutorial]] course guides through the basics of loading Diffusion Weighted images in Slicer, estimating tensors and generating fiber tracts. |
| − | |style="text-align:center;" |The [ | + | |style="text-align:center;" |The [[Documentation/{{documentation/currentversion}}/Training#Slicer4_Neurosurgical_Planning_Tutorial|Neurosurgical Planning Tutorial]] course guides through the generation of fiber tracts in the vicinity of a tumor. |
|- | |- | ||
| Line 128: | Line 128: | ||
|[[File:QuantitaiveImaging_tutorial.png|thumb|350px|centre]] | |[[File:QuantitaiveImaging_tutorial.png|thumb|350px|centre]] | ||
|- | |- | ||
| − | |style="text-align:center;" |The [ | + | |style="text-align:center;" |The [[Documentation/{{documentation/currentversion}}/Training#Slicer4_3D_Visualization_of_DICOM_images_for_Radiology_Applications|3D Visualization of DICOM Images for Radiology Applications Tutorial]] guides through 3D data loading and visualization of DICOM images for radiology applications. |
| − | | style="text-align:center;" |The [ | + | | style="text-align:center;" |The [[Documentation/{{documentation/currentversion}}/Training#Slicer4_Quantitative_Imaging_tutorial|Quantitative Imaging Tutorial]] guides through the use of 3D Slicer for quanitifying small volumetric changes in slow-growing tumors and for calculating Standardized Uptake Value (SUV) from PET/CT data. |
|- | |- | ||
! Surgical Navigation | ! Surgical Navigation | ||
| Line 137: | Line 137: | ||
|[[File:SlicerRTUseCaseImage.png|thumb|354px|centre]] | |[[File:SlicerRTUseCaseImage.png|thumb|354px|centre]] | ||
|- | |- | ||
| − | | style="text-align:center;"|The [ | + | | style="text-align:center;"|The [[Documentation/{{documentation/currentversion}}/Training#Slicer4_IGT|Slicer IGT tutorials]] are designed for end-users interested in using Slicer for real-time navigated procedures. |
| − | | style="text-align:center;" | | + | | style="text-align:center;" |The [[Documentation/{{documentation/currentversion}}/Training#SlicerRT|SlicerRT tutorial]] demonstrates how to perform a radiation therapy research workflow using the SlicerRT extension. |
|- | |- | ||
| Line 147: | Line 147: | ||
|[[File:3DPrinting_tutorial.png|thumb|390px|centre]] | |[[File:3DPrinting_tutorial.png|thumb|390px|centre]] | ||
|- | |- | ||
| − | | style="text-align:center;" |The [ | + | | style="text-align:center;" |The [[Documentation/{{documentation/currentversion}}/Training#Slicer4_Image_Registration|Image Registration Tutorial]] show how to perform intra- and inter-subject registration within 3D Slicer. |
| style="text-align:center;" | | | style="text-align:center;" | | ||
| − | + | The [[Documentation/{{documentation/currentversion}}/Training#Slicer4_3D_Printing|3D Printing tutorial]] shows how to prepare 3D Slicer Data for 3D printing. | |
|} | |} | ||
Revision as of 15:32, 21 July 2016
Home < New usersContents
Welcome to 3D Slicer
Welcome to the 3D Slicer community. Here you will learn the basics of using Slicer including installing 3D Slicer, the basics of the main application GUI, how to use Slicer and where to find tutorials and more information.
| The Users Mailing List
is a place for you to ask any questions regarding Slicer and its usage. |
|---|
What is Slicer ?
3D Slicer is:
- A software platform for the analysis (including registration and interactive segmentation) and visualization (including volume rendering) of medical images and for research in image guided therapy.
- A free, open source software available on multiple operating systems: Linux, MacOSX and Windows
- Extensible, with powerful plug-in capabilities for adding algorithms and applications.
Features include:
- Multi organ: from head to toe.
- Support for multi-modality imaging including, MRI, CT, US, nuclear medicine, and microscopy.
- Bidirectional interface for devices.
There is no restriction on use, but Slicer is not approved for clinical use and intended for research. Permissions and compliance with applicable rules are the responsibility of the user. For details on the license see here
Hardware Requirements
3D Slicer is an open-source package that can be used on Mac, Linux and Windows. In order to run 3D Slicer your computer must have the graphics capabilities and memory to hold the original image data and process results. A 64-bit system is required. Click here more information.
Installing 3D Slicer
To install Slicer, click here
The Nightly version of 3D Slicer is updated nightly as groups of developers make changes. The Stable version of 3D Slicer is not updated nightly and is more rigorously tested.
Once downloaded, follow the instructions to complete installation.
Further Documentation
If you're interested in extending your knowledge, access the User Manual. See also the archives of the users mailing list . The archive is searchable so most answers to questions can be found there.
If you're a developer looking for more information, access the Developer Manual. See also archives of the developer's mailing list . Similar to the Users Mailing List archive, it is searchable.
Main Application GUI
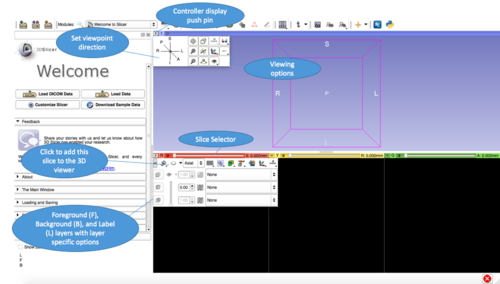
3D Slicer is built on a modular architecture. The Main Application GUI is divided into six components: the Application Menu Bar, the Application Toolbar, the Module GUI Panel, the Data Probe Panel, the 2D Slice Viewers, and the 3D Viewer. This section will introduce you to the basic functions on the main application's GUI. If you require detailed information, visit this page.
Open 3D Slicer and load your own data or download sample data to explore. Go ahead and click around the user interface.
From the Welcome panel, you can load your own data or download sample data. Sample data is often useful for exploring the features of 3D Slicer if you don't have data of your own.
Click on the push pin in the top left corner of each of the Slice Viewers or the 3D Viewer to see more options. In the Slice Viewers, the horizontal bar can be used to scroll through slices or select a slice. You can explore the various options using your loaded data or downloaded sample data.
Tutorials
The 3D Slicer documentation has an abundance of tutorials to help you familiarize yourself with the basics of 3D Slicer and with specific modules.
Try the Welcome Tutorial and the Data Loading and 3D Visualization Tutorial to learn the basics of using 3D Slicer.
- To learn about using Slicer for 3D Printing, visit this tutorial.
- To learn about Neurosurgical Planning with Slicer, visit this tutorial.
- To learn about DTI, visit this tutorial.
For more tutorials, visit the Tutorial page to see a comprehensive list. Additionally, visit our YouTube page for video tutorials.
If you would like to see a list of example cases with data sets and steps to achieve the same result, visit the Registration Library
Modules
3D Slicer has an abundance of modules to allow it's variety of functionalities. Refer to the documentation page for a comprehensive list of modules. Each module has it's own documentation page that has information about the module and may include a tutorial. 3D Slicer has more than 10 core modules that are displayed in the top section of the Modules drop down menu.
Core Modules
Welcome: The default module when 3D Slicer is started. The panel features options for loading data and customizing 3D Slicer. Below those options are drop-down boxes that contain essential information for using 3D Slicer.
Annotations: Allows the creation and editing of annotations or supplementary information. Currently, rulers and regions of interest (ROIs) are supported. See the Markups Module for fiducials.
Markups: Allows the creation and editing of markups associated with a scene. Currently, lists of fiducially are supported as markups.
Data: Lists the objects currently in the scene and allows basic operations such as search, rename, delete and move.
DataStore: Allows users to download and upload data sets.
DICOM: Integrates DICOM support from CTK and DCMTK.
Editor: Allows manual segmentation of volumes.
Models: Loads and adjusts display parameters of models. Allows the user to change the appearance of and organize 3D surface models.
Scene Views: Tool for organizing multiple 'live views' of the data in the scene. The user can create any number of views and control parameters
Subject Hierarchy: The SubjectHierarchy module acts as a central data-organizing point in Slicer. Subject hierarchy nodes provide features for the underlying data nodes, including cloning, bulk transforming, bulk show/hide, type-specific features, and basic node operations such as delete or rename.
Transforms: This module is used for creating and editing transformation matrices. You can establish these relations by moving nodes from the Transformable list to the Transformed list or by dragging the nodes under the Transformation nodes in the Data module.
Volume Rendering: Provides interactive visualization of 3D image data.
Volumes: Used for changing the appearance of various volume types.
Extensions
3D Slicer supports plug-ins that are called extensions. An extension could be seen as a delivery package bundling together one or more Slicer modules. After installing an extension, the associated modules will be presented to the user as built-in ones. Extensions can be downloaded from the extension manager to selectively install features that are useful for the end-user.
- For details about downloading extensions, see the [[[Documentation/4.10/SlicerApplication/ExtensionsManager|Extension Manager page]].
- Click here for a full list of extensions. The links on the page will provide documentation for each extension.
- See the page for descriptions of the latest 3D Slicer extensions.
- Slicer is extensible. If you are a programmer who wants to add functionality to Slicer, click here.
Use Cases
| Diffusion Tensor Imaging | Neurosurgical Planning |
|---|---|
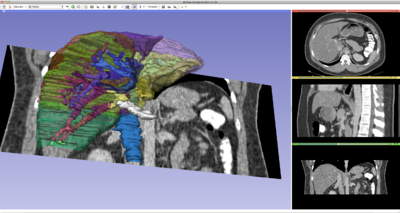
| The Diffusion Tensor Imaging Tutorial course guides through the basics of loading Diffusion Weighted images in Slicer, estimating tensors and generating fiber tracts. | The Neurosurgical Planning Tutorial course guides through the generation of fiber tracts in the vicinity of a tumor. |
| Visualization of DICOM Images for Radiology Applications | Quantitative Imaging |
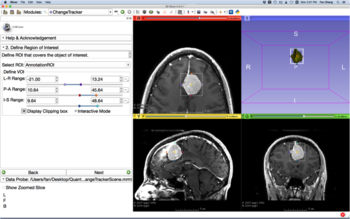
| The 3D Visualization of DICOM Images for Radiology Applications Tutorial guides through 3D data loading and visualization of DICOM images for radiology applications. | The Quantitative Imaging Tutorial guides through the use of 3D Slicer for quanitifying small volumetric changes in slow-growing tumors and for calculating Standardized Uptake Value (SUV) from PET/CT data. |
| Surgical Navigation | Radiation Therapy |
| The Slicer IGT tutorials are designed for end-users interested in using Slicer for real-time navigated procedures. | The SlicerRT tutorial demonstrates how to perform a radiation therapy research workflow using the SlicerRT extension. |
| Image Registration | 3D Printing |
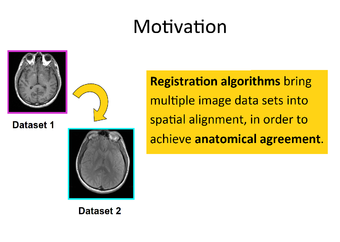
| The Image Registration Tutorial show how to perform intra- and inter-subject registration within 3D Slicer. |
The 3D Printing tutorial shows how to prepare 3D Slicer Data for 3D printing. |


