Difference between revisions of "Documentation/4.2/Extensions/PortPlacement"
(Porting the current out-dated "nightly" port placement documentation to 4.2 where it belongs) |
|||
| Line 21: | Line 21: | ||
<!-- ---------------------------- --> | <!-- ---------------------------- --> | ||
{{documentation/{{documentation/version}}/module-section|Module Description}} | {{documentation/{{documentation/version}}/module-section|Module Description}} | ||
| − | |||
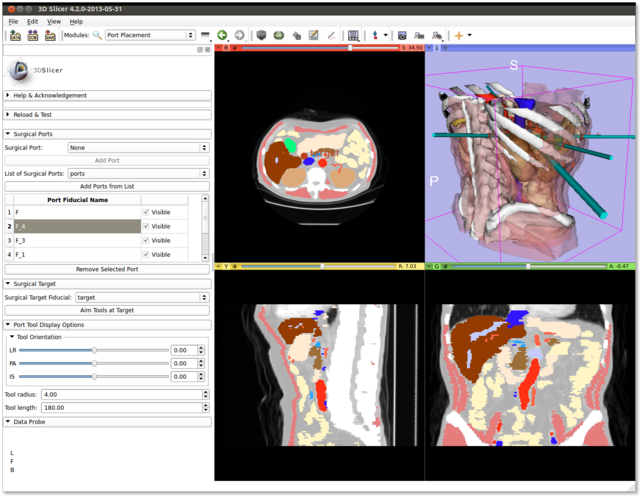
The PortPlacement module assists in the planning of surgical port placement in a laparoscopic procedure. Users can specify ports using fiducial markers and the module will automatically visualize simulated surgical tools at the port locations. Users can freely pivot the simulated surgical tools about the ports, as well as automatically orient all surgical tools toward a specified surgical target. Simulated tools are represented by cylinders whose lengths and radii can be varied from tool to tool. | The PortPlacement module assists in the planning of surgical port placement in a laparoscopic procedure. Users can specify ports using fiducial markers and the module will automatically visualize simulated surgical tools at the port locations. Users can freely pivot the simulated surgical tools about the ports, as well as automatically orient all surgical tools toward a specified surgical target. Simulated tools are represented by cylinders whose lengths and radii can be varied from tool to tool. | ||
Latest revision as of 14:36, 11 November 2013
Home < Documentation < 4.2 < Extensions < PortPlacement
|
For the latest Slicer documentation, visit the read-the-docs. |
Introduction and Acknowledgements
|
Extension: PortPlacement | |||||
|
Module Description
The PortPlacement module assists in the planning of surgical port placement in a laparoscopic procedure. Users can specify ports using fiducial markers and the module will automatically visualize simulated surgical tools at the port locations. Users can freely pivot the simulated surgical tools about the ports, as well as automatically orient all surgical tools toward a specified surgical target. Simulated tools are represented by cylinders whose lengths and radii can be varied from tool to tool.
Use Cases
Tutorials
Ports
There are two ways to add surgical ports to be visualized:
- Individually
- Place a fiducial marker at a desired surgical port location.
- Select that fiducial in the box labeled "Surgical Port".
- Click the "Add Port" button.
- From a List
- Select the Annotations module.
- Click the "Create a new hierarchy" button.
- (Optional) Rename the new hierarchy to something meaningful like "My Surgical Ports".
- Add fiducial markers to the scene where surgical ports are desired.
- Select the Port Placement module.
- Select your annotation hierarchy in the box labeled "List of Surgical Ports".
- Click the "Add Ports from List" button.
Once you've added your ports, the module will automatically visualize surgical tools at each port at some default (and likely useless) orientation.
You can remove a port by selecting the fiducial used to specify it in the ports table and then clicking the "Remove Port" button.
Tools
Once you've added some ports, you can re-orient the surgical tools in two ways:
- Target-oriented
- Place a fiducial marker in the scene that you want your surgical tools to point at. Think of this as your surgical target.
- Select that fiducial marker in the box labeled "Surgical Target Fiducial".
- Click the "Aim Tools at Target" button to automatically orient all surgical tools toward your selected target.
- Manual Orientation
- In order to manually orient an individual tool, look in the port table for the fiducial corresponding to that tool's port and select it by clicking on it.
- Use the Tool Orientation sliders to re-orient the tool about the port location.
You can also vary the length and radius of individual tools by selecting them in the table and adjusting the "Tool radius" and "Tool length" spinboxes.
Notes
Each port added to the scene is tied directly to the fiducial marker used to specify it; this means the user can move the fiducial marker around and the port/tool will follow automatically. This also means that if the user deletes a fiducial marker associated with the port, the port will also be removed from the scene.
References
- Andinet Enquobahrie, Vikas Shivaprabhu, Stephen Aylward, Julien Finet, Kevin Cleary, and Ron Alterovitz. Patient-specific port placement for laparoscopic surgery using atlas-based registration, SPIE, Mar. 2013.
- SPL Abdominal Atlas (used in examples)


