Difference between revisions of "Documentation/Nightly/Registration/RegistrationLibrary/RegLib C29"
From Slicer Wiki
(→Input) |
|||
| Line 117: | Line 117: | ||
=== Registration Results=== | === Registration Results=== | ||
| − | [[Image:RegLib_C29_registered.gif|500px|Registered DTI superimposed on SPGR and T2]] registered | + | [[Image:RegLib_C29_registered.gif|500px|Registered DTI superimposed on SPGR and T2]] original and registered pair of T1 and DTI (animated gif, may have to be opened to animate)<br> |
<br> | <br> | ||
Revision as of 19:52, 9 May 2013
Home < Documentation < Nightly < Registration < RegistrationLibrary < RegLib C29Contents
Slicer Registration Library Case #29: Intra-subject Brain DTI
Input
|
|

|

|
|
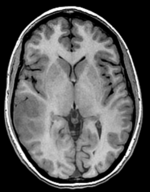
| moving image T1 SPGR |
fixed image 1 T2 |
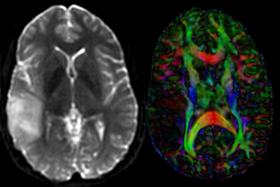
moving image DTI baseline+DTI tensor |
Slicer4 Modules used
Objective / Background
This is a classic case of a multi-sequence MRI exam we wish to spatially align to the anatomical reference scan (T1-SPGR). The scan of interest is the DTI image to be aligned for surgical planning/reference.
Download (from NAMIC MIDAS)
Keywords
MRI, brain, head, intra-subject, DTI, T1, T2, non-rigid, tumor, surgical planning
Registration Challenges
- The DWI sequence (EPI) contains strong distortions we seek to correct via non-rigid alignment
- The DWI sequence also contains strong intensity inhomogeneity (coil bias)
- the DTI baseline is similar in contrast to a T2, albeit at much lower resolution
- we have different amounts of voxel-anisotropy
Registration Approach
- a direct registration of the DTI_baseline to the T1 is not recommended, since the T2 is a better match in contrast to the DTI baseline. We therefore first align the DTI with the T2 and then also register the T1 to the T2.
- the DTI-T2 registration includes non-rigid deformation to correct for the strong distortions from the EPI acquisition. Because of the nonrigid component a mask of the brain parenchyma helps in obtaining a meaningful transform. Registration without a mask is possible but not as good as with a mask.
- The DTI estimation provides an automated mask for the DTI_baseline scan, but we have no mask for the T2. We obtain a T2 mask through separate segmentation.
- thus the full pipeline is this:
- build a mask for the T2.
- Affine+BSpline align of DTI_baseline to T2r (unmasked)
- Resample DTI_mask with above BSpline -> mask for the T2r
- repeat Affine+BSpline align of DTI_base to T2r, WITH masks
- resample DTI with result Affine+BSpline transform
- Affine align T2-T1, incl. resampled T2 volume = T2r
Procedures
- Phase II: Preprocessing: Build DWI mask + baseline
- open the Modules:Diffusion:DiffusionWeightedImages:DiffusionWeightedVolumeMasking module
- Input DWI Volume: "DWI"
- Output Baseline Volume: Create & Rename New Volume, rename to "DWI_baseline"
- Output Threshold Mask: Create & Rename New Volume, rename to "DWI_mask"
- Leave other settings at default; click Apply
- You should obtain a baseline scalar image and a mask label map.
- Phase III: Preprocessing: Convert DWI -> DTI
- open Documentation/Nightly/Modules/DiffusionTensorEstimation "Diffusion Tensor Estimation" module (menu: Diffusion:DiffusionWeightedImages: DiffusionTensorEstimation)
- Input DWI Volume: DWI
- Output DTI Volume: create & rename new, rename to "DTI"
- Output Baseline Volume: create & rename new, rename to "DTI_baseline"
- Click: Apply
- Phase I: build a T2 mask
See here for a selection of videos showing 6 different methods to build a mask. Below is one of those, using the "GrowCut" tool in the Editor
- see here for a video (4 min) of the steps below:
- Open the editor tool, select the T2 as master volume and create a new label map.
- select the brush tool, set the label to 2 and the brush size to 80 mm or larger (filling almost entire FOV)
- on 4 or 5 slices select the entire head and a good portion of the background
- switch to the Level Tracing effect/tool. Switch the label to 1.
- On the same slices as before, place the cursor near the brain surface until the yellow outline shows a good enclosure of the brain at that slice. Click the left mouse to fill.
- you should now have a handful of slices, even distributed, where label 1 describes the brain parenchyma and label 2 everything else.
- switch to the GrowCutEffect and click Apply.
- Apply some Dilation+Erosion filtering to cleanup the result.
- Phase III: register T2 to T1
- open the Documentation/Nightly/Modules/BRAINSFit General Registration (BRAINS) module
- Fixed Image Volume: T1
- Moving Image Volume: T2
- Output Settings:
- Slicer BSpline Transform": none
- Slicer Linear Transform: create new transform, rename to "Xf1_T2-T1"
- Output Image Volume: create new volume, rename to "T2_Xf1"
- Registration Phases: check boxes for Rigid and Affine
- Main Parameters:
- Number Of Samples: 200,000
- Leave all other settings at default
- click: Apply; runtime < 10 sec (MacPro QuadCore 2.4GHz)
- Phase IV: Register DTI (masked)
- open the General Registration (BRAINS) module
- Fixed Image Volume: FLAIR_Xf1
- Moving Image Volume: DWI_iso_baseline
- Output Settings:
- Slicer BSpline Transform": create new transform, rename to "Xf2_DTI-T1"
- Slicer Linear Transform: none
- Output Image Volume: create new volume, rename to DWI_baseline_Xf2
- Regstration Phases: check boxes for Rigid, Affine and BSpline
- Main Parameters:
- Number Of Samples: 300,000
- B-Spline Grid Size: 7,7,5
- Mask Option: select ROIAUTO button
- (ROIAUTO) Output fixed mask: create new volume
- (ROIAUTO) Output moving mask: create new volume
- Leave all other settings at default
- click: Apply; runtime 1-2 min (MacPro QuadCore 2.4GHz)
- Phase V: Resample DTI
- Open the Resample DTI Volume module (under All Modules menu; note this is distinct from the ResampleScalarVectorDWIVolume used above)
- Input Volume: DTI
- Output Volume: create new DTI Volume, rename to DTI_Xf2
- Reference Volume: T2_Xf1
- Transform Node: select "Xf2_DTI-T1 created above
- check box: displacement
- leave all other settings at defaults
- Click Apply; runtime ~ 3 min.
- set T1 or FLAIR as background and the new DTI_Xf2 volume as foreground
- Move fade slider to see DTI overlay onto the structural image
Registration Results
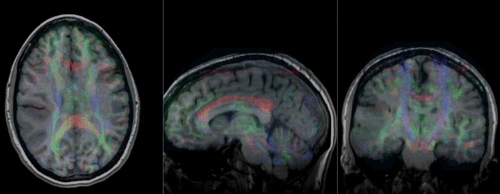 original and registered pair of T1 and DTI (animated gif, may have to be opened to animate)
