Difference between revisions of "Modules:ProstateNav-Documentation-3.6"
| (32 intermediate revisions by 2 users not shown) | |||
| Line 7: | Line 7: | ||
{| | {| | ||
| − | |[[Image:ProstateModule-3. | + | |[[Image:ProstateModule-3.6.jpg|thumb|360px|ProstateNav in clinical MRI-guided prostate biopsy.]] |
| + | |[[Image:ProstateNav-3.6_Transrectal.png|thumb|360px|ProstateNav for MRI-guided transrectal biospy]] | ||
|} | |} | ||
| Line 30: | Line 31: | ||
===Module Description=== | ===Module Description=== | ||
| − | The ProstateNav module is designed to add an integrated user interface (UI) for MRI-guided prostate intervention (e.g. needle biopsy and brachytherapy) to 3D Slicer. In version 3.6, the module provides user interfaces for the following devices: | + | The ProstateNav module is designed to add an integrated user interface (UI) for MRI-guided prostate intervention (e.g. needle biopsy and brachytherapy) to 3D Slicer. Like all of Slicer it is not FDA approved and only intended for research. In version 3.6, the module provides user interfaces for the following devices: |
*MRI-compatible pneumatic needle placement robot for transperineal prostate biopsy and brachytherapy (Johns Hopkins University + Brigham and Women's Hospital + Queen's Univeristy) | *MRI-compatible pneumatic needle placement robot for transperineal prostate biopsy and brachytherapy (Johns Hopkins University + Brigham and Women's Hospital + Queen's Univeristy) | ||
*MRI-compatible transrectal needle biopsy device (Queen's University + Johns Hopkins University) | *MRI-compatible transrectal needle biopsy device (Queen's University + Johns Hopkins University) | ||
*Template-based needle guiding system for MRI-guided prostate biopsy and brachy therapy (Queen's University + Brigham and Women's Hospital) | *Template-based needle guiding system for MRI-guided prostate biopsy and brachy therapy (Queen's University + Brigham and Women's Hospital) | ||
| + | The module has wizard-style interface, which helps an operator follow the clinical procedure step by step. It supports target planning and management, patient-device registration, and verification. The module can also communicate with some of the devices listed above using [http://www.na-mic.org/Wiki/index.php/OpenIGTLink OpenIGTLink protocol]. | ||
| − | The | + | == Usage == |
| + | ===Tutorials=== | ||
| + | The ProstateNav switches its user interface based on the device type selected by the user. This section describes step-by-step instruction. | ||
| + | |||
| + | ===Template-based needle guiding system for MRI-guided prostate biopsy and brachy therapy=== | ||
| + | ====Step 1: Create a manager node and select a device type==== | ||
| + | First, create a manager node by choosing '''Create New ProstateNavManager''' from a node selector menu in '''Active configuration'''. | ||
| + | Then click '''Create New TransperinealProstateTemplate''' from '''Robot''' node selector. | ||
| + | |||
| + | <center> | ||
| + | {| | ||
| + | |[[Image:Slicer3_ProstateNav_SelectManager.png|thumb|center|240px|]] | ||
| + | |[[Image:Slicer3_ProstateNav_SelectDevice.png|thumb|center|240px|]] | ||
| + | |} | ||
| + | </center> | ||
| + | |||
| + | |||
| + | ====Step 2: Calibration==== | ||
| + | Press '''Cliabration''' button in the workphase tab to open '''2/4 Calibration''' page. | ||
| + | [[Image:Slicer3_ProstateNav_OpenCalibration.png|thumb|center|240px|]] | ||
| + | |||
| + | First, we load a multi-slice Z-frame image to register the device coordinate system to the image coordinate system. Choose "File->Add Volume..." menu to open the file selection dialog box. | ||
| + | |||
| + | [[Image:Slicer3_ProstateNav_LoadZFrameImage.png|thumb|center|400px|]] | ||
| + | |||
| + | To display a model of Z-frame fiducial frame in the 3D viewer, click '''Show Z-frame''' check box. | ||
| + | |||
| + | [[Image:Slicer3_ProstateNav_ShowZFrameModel.png|thumb|center|400px|]] | ||
| − | + | Before run automatic Z-frame registration, scroll the all slices in the multi-slice Z-frame image to identify the range of slices that show clear Z-frame images. If you want to adjust the slice range, input the start and end slice index in the text box. | |
| − | |||
| − | + | [[Image:Slicer3_ProstateNav_CheckZFrameSliceRange.png|thumb|center|400px|]] | |
| − | |||
| − | |||
| − | |||
| − | |||
| − | |||
| − | + | To start automatic Z-frame registration, press '''Perform Calibration''' button. It takes a few seconds or more depending on the environment and number of slices. Once the Z-frame is registered to the image coordinate system, the z-frame model is overlaid to the Z-frame image in the 3D view. | |
| − | ==== | + | [[Image:Slicer3_ProstateNav_ZFrameRegistration.png|thumb|center|400px|]] |
| − | To | + | |
| + | |||
| + | ====Step 3: Targeting==== | ||
| + | |||
| + | To start targeting, open '''Targeting''' button in '''Workphase''' panel or '''Next''' button in the '''Calibration''' Page. | ||
| + | |||
| + | [[Image:Slicer3_ProstateNav_Targeting.png|thumb|center|400px|]] | ||
| + | |||
| + | By clicking '''Needle''' and '''Template''' check buttons, models of the needle and the template can be displayed in 3D viewer. | ||
| + | |||
| + | [[Image:Slicer3_ProstateNav_ShowNeedleAndTemplate.png|thumb|center|400px|]] | ||
| + | |||
| + | |||
| + | For the needle placement planning, load a target volume from '''File->Add Volume...''' menu. | ||
| + | |||
| + | <center> | ||
| + | {| | ||
| + | |[[Image:Slicer3_ProstateNav_LoadTargetVolumeMenu.png|thumb|center|200px|]] | ||
| + | |[[Image:Slicer3_ProstateNav_LoadTargetVolumeDialog.png|thumb|center|400px|]] | ||
| + | |} | ||
| + | </center> | ||
| + | |||
| + | To place a target point, simply click at the point on the axial image. Make sure '''Add Target by Image Click''' check box before you click the image. | ||
| + | |||
| + | [[Image:Slicer3_ProstateNav_Planning.png|thumb|center|400px|]] | ||
| − | |||
| − | + | To choose a template hole for needle insertion, choose a target point from the list and press '''Move''' button at the bottom of the module's user interface. The index of the hole shows up on the panel. | |
| − | |||
| − | |||
| − | |||
| − | + | [[Image:Slicer3_ProstateNav_TargetSelection.png|thumb|center|400px|]] | |
| − | |||
| − | |||
| − | |||
== Development == | == Development == | ||
===Dependencies=== | ===Dependencies=== | ||
| − | [[Modules:OpenIGTLinkIF-Documentation-3. | + | [[Modules:OpenIGTLinkIF-Documentation-3.6| OpenIGTLinkIF Module]] |
===Known bugs=== | ===Known bugs=== | ||
Latest revision as of 14:59, 10 February 2011
Home < Modules:ProstateNav-Documentation-3.6Return to Slicer 3.6 Documentation
Module Name
ProstateNav
General Information
Module Type & Category
Type: Interactive
Category: IGT
Authors, Collaborators & Contact
- Junichi Tokuda, BWH
- Andras Lasso, Queen's University (New GUI interface)
- Simon DiMaio, Intuitive Surgical Inc. (System design, Z-frame registration)
- Gregory Fischer, WPI (System design, Robot Software)
- David Gobbi (Wizard Interface)
- Csaba Csoma, JHU (System design, Robot Software)
- Haiying Liu, BWH (Software packaging)
- Philip Mewes (Initial version)
- Gabor Fitchinger, Queen's University
- Nobuhiko Hata, BWH
- Clare Tempany, BWH
Module Description
The ProstateNav module is designed to add an integrated user interface (UI) for MRI-guided prostate intervention (e.g. needle biopsy and brachytherapy) to 3D Slicer. Like all of Slicer it is not FDA approved and only intended for research. In version 3.6, the module provides user interfaces for the following devices:
- MRI-compatible pneumatic needle placement robot for transperineal prostate biopsy and brachytherapy (Johns Hopkins University + Brigham and Women's Hospital + Queen's Univeristy)
- MRI-compatible transrectal needle biopsy device (Queen's University + Johns Hopkins University)
- Template-based needle guiding system for MRI-guided prostate biopsy and brachy therapy (Queen's University + Brigham and Women's Hospital)
The module has wizard-style interface, which helps an operator follow the clinical procedure step by step. It supports target planning and management, patient-device registration, and verification. The module can also communicate with some of the devices listed above using OpenIGTLink protocol.
Usage
Tutorials
The ProstateNav switches its user interface based on the device type selected by the user. This section describes step-by-step instruction.
Template-based needle guiding system for MRI-guided prostate biopsy and brachy therapy
Step 1: Create a manager node and select a device type
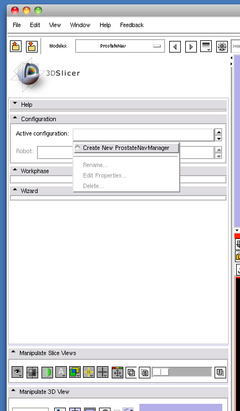
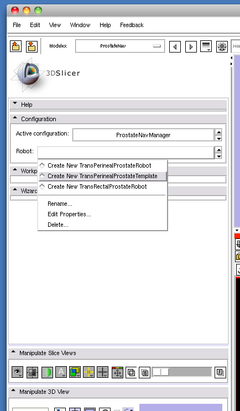
First, create a manager node by choosing Create New ProstateNavManager from a node selector menu in Active configuration. Then click Create New TransperinealProstateTemplate from Robot node selector.
Step 2: Calibration
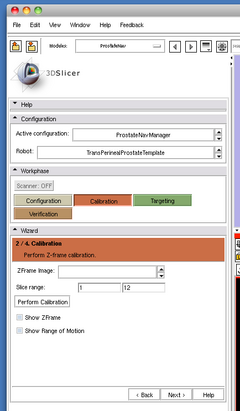
Press Cliabration button in the workphase tab to open 2/4 Calibration page.
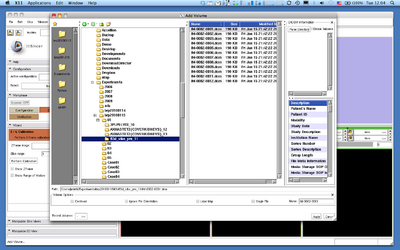
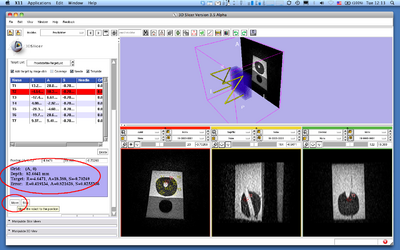
First, we load a multi-slice Z-frame image to register the device coordinate system to the image coordinate system. Choose "File->Add Volume..." menu to open the file selection dialog box.
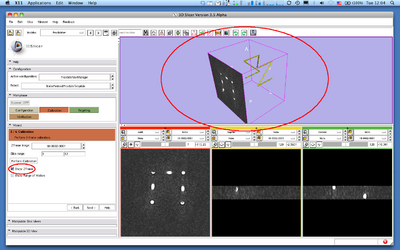
To display a model of Z-frame fiducial frame in the 3D viewer, click Show Z-frame check box.
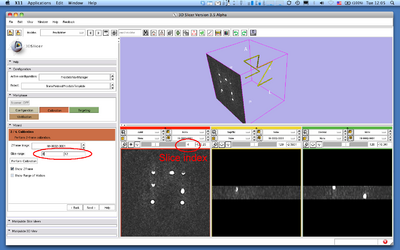
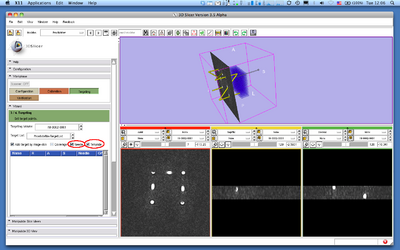
Before run automatic Z-frame registration, scroll the all slices in the multi-slice Z-frame image to identify the range of slices that show clear Z-frame images. If you want to adjust the slice range, input the start and end slice index in the text box.
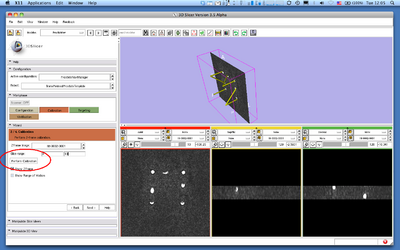
To start automatic Z-frame registration, press Perform Calibration button. It takes a few seconds or more depending on the environment and number of slices. Once the Z-frame is registered to the image coordinate system, the z-frame model is overlaid to the Z-frame image in the 3D view.
Step 3: Targeting
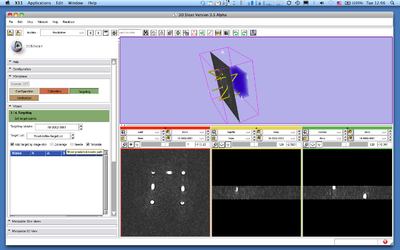
To start targeting, open Targeting button in Workphase panel or Next button in the Calibration Page.
By clicking Needle and Template check buttons, models of the needle and the template can be displayed in 3D viewer.
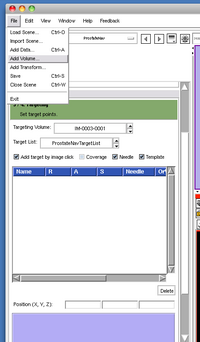
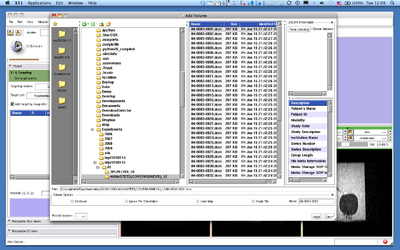
For the needle placement planning, load a target volume from File->Add Volume... menu.
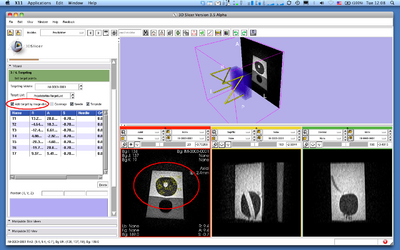
To place a target point, simply click at the point on the axial image. Make sure Add Target by Image Click check box before you click the image.
To choose a template hole for needle insertion, choose a target point from the list and press Move button at the bottom of the module's user interface. The index of the hole shows up on the panel.
Development
Dependencies
Known bugs
Follow this link to the Slicer3 bug tracker.
Usability issues
Follow this link to the Slicer3 bug tracker. Please select the usability issue category when browsing or contributing.
Source code & documentation
See ViweCV page for the source code.
Links to documentation generated by doxygen.
More Information
Acknowledgment
This work is supported by 1R01CA111288, 5U41RR019703, 5P01CA067165, 1R01CA124377, 5P41RR013218, 5U54EB005149, 5R01CA109246 from NIH. This study was also in part supported by NSF 9731748, CIMIT, Intelligent Surgical Instruments Project of METI (Japan).
References
- Fischer GS, Iordachita I, Csoma C, Tokuda J, DiMaio SP, Tempany CM, Hata N and Fichtinger G. MRI-Compatible Pneumatic Robot for Transperineal Prostate Needle Placement. IEEE/ASME Trans Mechatronics 2008; 13(3):295-305 [1]
- Tokuda J, Fischer GS, Csoma C, DiMaio SP, Gobbi DG, Fichtinger G, Tempany CM, Hata N. Software Strategy for Robotic Transperineal Prostate Therapy in Closed-Bore MRI. In: Proc. 11th International Conference on Medical Image Computing and Computer-Assisted Intervention - MICCAI 2008; 9/6/2008-9/10/2008; New York, NY ;2008. p. 701-709. [2]
- DiMaio S, Samset E, Fischer G, Iordachita I, Fichtinger G, Jolesz F, Tempany C. Dynamic MRI Scan Plane Control for Passive Tracking of Instruments and Devices. Int Conf Med Image Comput Comput Assist Interv. 2007;10(Pt 2):50-58. [3]


