Difference between revisions of "Modules:SpineSegmentation-Documentation-3.6"
Sylvainjaume (talk | contribs) |
Sylvainjaume (talk | contribs) (add link to HBM 2010 poster) |
||
| (22 intermediate revisions by the same user not shown) | |||
| Line 5: | Line 5: | ||
__NOTOC__ | __NOTOC__ | ||
===Module Name=== | ===Module Name=== | ||
| − | SpineSegmentation module for Slicer 3.6 | + | SpineSegmentation module for Slicer 3.6 (available through Slicer extension manager) |
{| | {| | ||
| − | |[[Image:SpineSegmentation_Slicer3. | + | |[[Image:SpineSegmentation_Slicer3.6_documentation00.png|thumb|300px|A sample data set is available on http://nitrc.org. Download both .mhd and .zraw files.]] |
| − | |[[Image:SpineSegmentation_Slicer3. | + | |[[Image:SpineSegmentation_Slicer3.6_documentation02.png|thumb|300px|The SpineSegmentation module is available through the Slicer extension module manager.]] |
| − | |[[Image:SpineSegmentation_Slicer3. | + | |[[Image:SpineSegmentation_Slicer3.6_documentation09.png|thumb|300px|After 3 minutes, the segmentation results appear: a label map (blue) and a 3D model (3D view).]] |
|} | |} | ||
| Line 21: | Line 21: | ||
===Authors, Collaborators & Contact=== | ===Authors, Collaborators & Contact=== | ||
| − | * Sylvain Jaume: MIT | + | * Sylvain Jaume: MIT CSAIL |
| − | * Contact: | + | * Contact: sylvain at csail.mit.edu |
| + | {| | ||
| + | |[[Image:MIT_NAMIC_Logo.png|thumb|200px|MIT & NA-MIC]] | ||
| + | |} | ||
===Module Description=== | ===Module Description=== | ||
| − | Image segmentation of the spinal cord and the cerebro-spinal fluid in T2-weighted MRI images. The SpineSegmentation module | + | Image segmentation of the spinal cord and the cerebro-spinal fluid in T2-weighted MRI images. The SpineSegmentation module builds on Pattern Recognition theory to provide for a fully automated segmentation. The module first defines a shape model of the spinal cord modeling both the inner volume and the outer volume. Then the segmentation algorithm uses this model to explored the image space and find the best match given the field on intensities in the image. The advantage of this method relies on its unsupervised property: no need for any parameter setting or any initialization. |
== Usage == | == Usage == | ||
| Line 40: | Line 43: | ||
===Tutorial=== | ===Tutorial=== | ||
| + | Below are the step-by-step instructions to load, process and save some sample data (see link above). | ||
| − | * Sample Data | + | * Step 0/9. Download Sample Data |
| + | {| | ||
| + | | | ||
| + | |[[Image:SpineSegmentation_Slicer3.6_documentation00.png|thumb|600px|0. download sample data]] | ||
| + | |} | ||
The sample data sets MRI_Spine.mhd and MRI_Spine.zraw are available at the link below. You will need to create a username on http://nitrc.org. Then log onto nitrc.org and click on the link below. Right-click on MRI_Spine.mhd and MRI_Spine.zraw to copy those files to your local directory. | The sample data sets MRI_Spine.mhd and MRI_Spine.zraw are available at the link below. You will need to create a username on http://nitrc.org. Then log onto nitrc.org and click on the link below. Right-click on MRI_Spine.mhd and MRI_Spine.zraw to copy those files to your local directory. | ||
http://www.nitrc.org/plugins/scmsvn/viewcvs.php/Slicer3/Modules/SpineSegmentation/TestingData/?root=sylvainproject | http://www.nitrc.org/plugins/scmsvn/viewcvs.php/Slicer3/Modules/SpineSegmentation/TestingData/?root=sylvainproject | ||
| − | + | * Step 1/9. Load the sample data | |
| − | |||
| − | |||
{| | {| | ||
| | | | ||
| − | + | |[[Image:SpineSegmentation_Slicer3.6_documentation01.png|thumb|600px|1. load sample data]] | |
| − | |[[Image:SpineSegmentation_Slicer3.6_documentation01.png|thumb| | ||
|} | |} | ||
| − | Step 2/9. | + | * Step 2/9. Select the SpineSegmentation module. |
{| | {| | ||
| | | | ||
| − | + | |[[Image:SpineSegmentation_Slicer3.6_documentation02.png|thumb|600px|2. select SpineSegmentation module]] | |
| − | |[[Image:SpineSegmentation_Slicer3.6_documentation02.png|thumb| | ||
|} | |} | ||
| − | Step 3/9. | + | * Step 3/9. Select the input image. |
{| | {| | ||
| | | | ||
| − | + | |[[Image:SpineSegmentation_Slicer3.6_documentation03.png|thumb|600px|3. select input image]] | |
| − | |[[Image:SpineSegmentation_Slicer3.6_documentation03.png|thumb| | ||
|} | |} | ||
| − | Step 4/9. | + | * Step 4/9. Create a Slicer node for the output image. |
{| | {| | ||
| | | | ||
| − | + | |[[Image:SpineSegmentation_Slicer3.6_documentation04.png|thumb|600px|4. create image node]] | |
| − | |[[Image:SpineSegmentation_Slicer3.6_documentation04.png|thumb| | ||
|} | |} | ||
| − | Step 5/9. | + | * Step 5/9. Create a Slicer node for the output model. |
{| | {| | ||
| | | | ||
| − | + | |[[Image:SpineSegmentation_Slicer3.6_documentation05.png|thumb|600px|5. create model node]] | |
| − | |[[Image:SpineSegmentation_Slicer3.6_documentation05.png|thumb| | ||
|} | |} | ||
| − | * Step 6/9. | + | * Step 6/9. Apply the segmentation algorithm. |
{| | {| | ||
| | | | ||
| − | + | |[[Image:SpineSegmentation_Slicer3.6_documentation06.png|thumb|600px|6. apply algorithm]] | |
| − | |[[Image:SpineSegmentation_Slicer3.6_documentation06.png|thumb| | ||
|} | |} | ||
| − | * Step 7/9. | + | * Step 7/9. Review segmentation result. |
{| | {| | ||
| | | | ||
| − | + | |[[Image:SpineSegmentation_Slicer3.6_documentation07.png|thumb|600px|7. review result]] | |
| + | |} | ||
The sliders on the top of each 2D view allows for reviewing the segmentation result overlaid on the input image. | The sliders on the top of each 2D view allows for reviewing the segmentation result overlaid on the input image. | ||
| − | |||
| − | |||
| − | * Step 8/9. | + | * Step 8/9. Save result image and model. |
{| | {| | ||
| | | | ||
| − | + | |[[Image:SpineSegmentation_Slicer3.6_documentation08.png|thumb|600px|8. save results]] | |
| + | |} | ||
The output image and the 3D model can be saved using the Slicer user interface. | The output image and the 3D model can be saved using the Slicer user interface. | ||
| − | |||
| − | |||
| − | * Step 9/9. | + | * Step 9/9. Find contact information for help and paper reference. |
{| | {| | ||
| | | | ||
| − | + | |[[Image:SpineSegmentation_Slicer3.6_documentation09.png|thumb|600px|9. help information]] | |
| − | |[[Image:SpineSegmentation_Slicer3.6_documentation09.png|thumb| | ||
|} | |} | ||
| − | |||
===Quick Tour of Features and Use=== | ===Quick Tour of Features and Use=== | ||
* '''Input panel:''' | * '''Input panel:''' | ||
| − | ** '''Image input''' select the input image | + | ** '''Image input:''' select the input image |
| − | ** '''Image output''' create Slicer node for output image | + | ** '''Image output:''' create Slicer node for output image |
| − | ** '''Model output''' create Slicer node for output model | + | ** '''Model output:''' create Slicer node for output model |
* '''Command panel:''' | * '''Command panel:''' | ||
| − | ** '''Default''' reset input and output nodes to blank values | + | ** '''Default:''' reset input and output nodes to blank values |
| − | ** '''Cancel''' cancel the execution of the algorithm | + | ** '''Cancel:''' cancel the execution of the algorithm |
| − | ** '''Apply''' apply the segmentation algorithm (takes approx. 3 min) | + | ** '''Apply:''' apply the segmentation algorithm (takes approx. 3 min) |
== Development == | == Development == | ||
| Line 127: | Line 123: | ||
===Notes from the Developer(s)=== | ===Notes from the Developer(s)=== | ||
| − | + | Reports of new use cases are welcome (email: sylvain at csail.mit.edu). If time permits, we will tune the algorithm for your data sets. | |
===Dependencies=== | ===Dependencies=== | ||
| − | + | Linking to Slicer 3.6 is sufficient. This module requires the typical packages bundled with Slicer. | |
===Tests=== | ===Tests=== | ||
| − | + | Tests are automatically generated using CTest to verify that the module is working on all platforms supported by Slicer. | |
| − | * | + | * SpineSegmentation's [http://www.nitrc.org/plugins/scmsvn/viewcvs.php/Slicer3/Modules/SpineSegmentation/CMakeLists.txt?annotate=151&root=sylvainproject CMakeLists.txt] |
| − | * | + | * Slicer's [http://www.cdash.org/CDash/index.php?project=Slicer3 Dashboard] |
===Known bugs=== | ===Known bugs=== | ||
| − | + | No bugs have been found yet. If you find a bug, please first email the Slicer mailing list to verify that this is a bug due to SpineSegmentation. Once you have received an answer, follow the link below to add a bug report: | |
| − | |||
| − | |||
| + | * [http://www.na-mic.org/Bug/view.php? Slicer bug tracker] | ||
===Usability issues=== | ===Usability issues=== | ||
| Line 153: | Line 148: | ||
===Source code & documentation=== | ===Source code & documentation=== | ||
| − | + | Module source code (revision 151): | |
| − | + | *[http://www.nitrc.org/plugins/scmsvn/viewcvs.php/Slicer3/Modules/SpineSegmentation/SpineSegmentation.cxx?annotate=151&root=sylvainproject SpineSegmentation.cxx] | |
| − | *[http:// | + | *[http://www.nitrc.org/plugins/scmsvn/viewcvs.php/Slicer3/Modules/SpineSegmentation/SpineSegmentation.xml?annotate=151&root=sylvainproject SpineSegmentation.xml] |
| − | *[http:// | ||
| − | Doxygen documentation: | + | Doxygen generated documentation: |
| − | *[http://www.na-mic.org/Slicer/Documentation/Slicer3-doc/html/classes.html | + | *[http://www.na-mic.org/Slicer/Documentation/Slicer3-doc/html/classes.html Slicer Doxygen] |
== More Information == | == More Information == | ||
===Acknowledgment=== | ===Acknowledgment=== | ||
| − | + | This work is part of the National Alliance for Medical Image Computing (NAMIC), funded by the National Institutes of Health through the NIH Roadmap for Medical Research, Grant U54 EB005149 (PI: Ron Kikinis). | |
===References=== | ===References=== | ||
| − | + | [http://people.csail.mit.edu/sylvain/Sylvain_Jaume_HBM_poster_2010.pdf Stochastic Neurography], S. Jaume, M. Loepprich, E.J. Schmidt, R. Kikinis, 16th Annual Meeting of the Organization for Human Brain Mapping (HBM 2010), Barcelona, Spain, June 6-10, 2010. | |
Latest revision as of 13:37, 16 June 2010
Home < Modules:SpineSegmentation-Documentation-3.6Return to Slicer 3.6 Documentation
Module Name
SpineSegmentation module for Slicer 3.6 (available through Slicer extension manager)
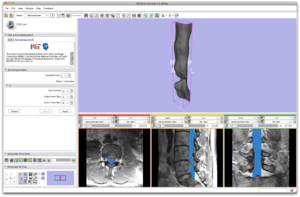
 A sample data set is available on http://nitrc.org. Download both .mhd and .zraw files. |
General Information
Module Type & Category
Type: Interactive or CLI
Category: Segmentation
Authors, Collaborators & Contact
- Sylvain Jaume: MIT CSAIL
- Contact: sylvain at csail.mit.edu
Module Description
Image segmentation of the spinal cord and the cerebro-spinal fluid in T2-weighted MRI images. The SpineSegmentation module builds on Pattern Recognition theory to provide for a fully automated segmentation. The module first defines a shape model of the spinal cord modeling both the inner volume and the outer volume. Then the segmentation algorithm uses this model to explored the image space and find the best match given the field on intensities in the image. The advantage of this method relies on its unsupervised property: no need for any parameter setting or any initialization.
Usage
Use Cases, Examples
This module is especially appropriate for this use case:
- Automated segmentation of MRI of the spine is critical during minimally invasive intervention when frequent acquisitions of intra-operative images prevents the manual segmentation of the image by an expert. The SpineSegmentation module provides a solution to reduce the burden on the radiologist.
Examples of the module in use:
- Image-guided surgery for the treatment of disk herniation
Tutorial
Below are the step-by-step instructions to load, process and save some sample data (see link above).
- Step 0/9. Download Sample Data
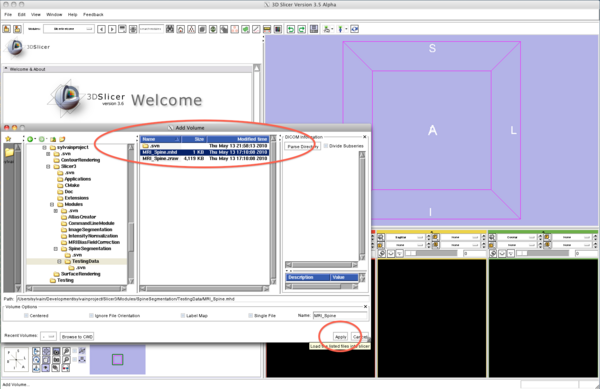
The sample data sets MRI_Spine.mhd and MRI_Spine.zraw are available at the link below. You will need to create a username on http://nitrc.org. Then log onto nitrc.org and click on the link below. Right-click on MRI_Spine.mhd and MRI_Spine.zraw to copy those files to your local directory.
http://www.nitrc.org/plugins/scmsvn/viewcvs.php/Slicer3/Modules/SpineSegmentation/TestingData/?root=sylvainproject
- Step 1/9. Load the sample data
- Step 2/9. Select the SpineSegmentation module.
- Step 3/9. Select the input image.
- Step 4/9. Create a Slicer node for the output image.
- Step 5/9. Create a Slicer node for the output model.
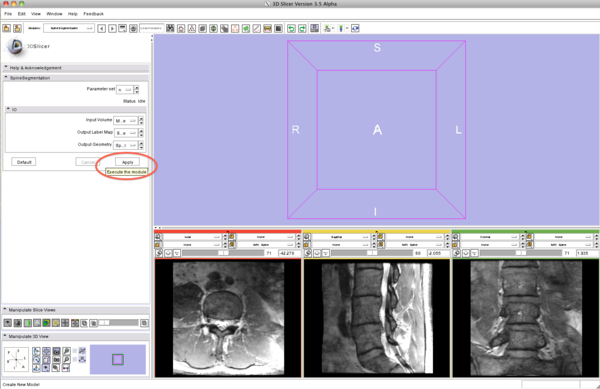
- Step 6/9. Apply the segmentation algorithm.
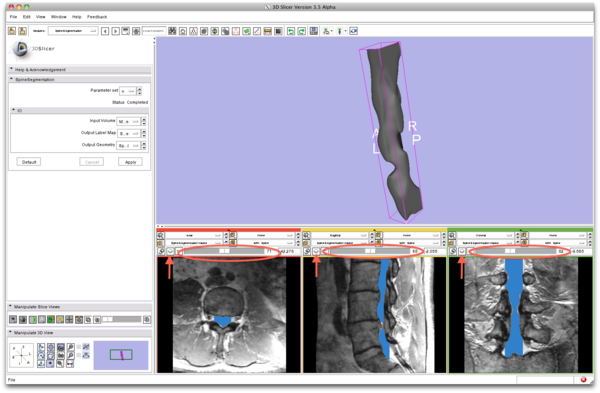
- Step 7/9. Review segmentation result.
The sliders on the top of each 2D view allows for reviewing the segmentation result overlaid on the input image.
- Step 8/9. Save result image and model.
The output image and the 3D model can be saved using the Slicer user interface.
- Step 9/9. Find contact information for help and paper reference.
Quick Tour of Features and Use
- Input panel:
- Image input: select the input image
- Image output: create Slicer node for output image
- Model output: create Slicer node for output model
- Command panel:
- Default: reset input and output nodes to blank values
- Cancel: cancel the execution of the algorithm
- Apply: apply the segmentation algorithm (takes approx. 3 min)
Development
Notes from the Developer(s)
Reports of new use cases are welcome (email: sylvain at csail.mit.edu). If time permits, we will tune the algorithm for your data sets.
Dependencies
Linking to Slicer 3.6 is sufficient. This module requires the typical packages bundled with Slicer.
Tests
Tests are automatically generated using CTest to verify that the module is working on all platforms supported by Slicer.
- SpineSegmentation's CMakeLists.txt
- Slicer's Dashboard
Known bugs
No bugs have been found yet. If you find a bug, please first email the Slicer mailing list to verify that this is a bug due to SpineSegmentation. Once you have received an answer, follow the link below to add a bug report:
Usability issues
Follow this link to the Slicer3 bug tracker. Please select the usability issue category when browsing or contributing.
Source code & documentation
Module source code (revision 151):
Doxygen generated documentation:
More Information
Acknowledgment
This work is part of the National Alliance for Medical Image Computing (NAMIC), funded by the National Institutes of Health through the NIH Roadmap for Medical Research, Grant U54 EB005149 (PI: Ron Kikinis).
References
Stochastic Neurography, S. Jaume, M. Loepprich, E.J. Schmidt, R. Kikinis, 16th Annual Meeting of the Organization for Human Brain Mapping (HBM 2010), Barcelona, Spain, June 6-10, 2010.


